Facebook Live Selling Operation Manual
Update Time: 24 Sep 2026 09:25
Working through it from the beginning is all it takes to complete your first live session.
1. Before You Begin
- A Facebook Page with 100+ followers
- An Ad account (only needed when you plan to run ads)
- A synced product Catalog (only needed when you want to display products during the live)
- A device for going live: a mobile phone, or a computer with streaming software installed
| Feature | Requirements | Requirements |
|---|---|---|
| Go live | No special requirements | Anyone with a public Page can go live. |
| Live shopping | A product catalog is required | Sync products via a commerce partner platform or Commerce Manager. |
| Live video ads | Ad account eligibility requirements apply | Meta determines eligibility based on the history and reputation of your Page and ad account. New Pages or new ad accounts may need to build a track record first. |
| Promote past live video | No special requirements | Available to all advertisers. |
If you are not yet eligible to run ads during live sessions
You can go live as usual first and promote the live replay after the session ends. This method is available to all advertisers and requires no additional eligibility.
As your Page operating history and ad spending history accumulate, eligibility for in-live advertising is usually granted automatically.
2. Create a Facebook Page
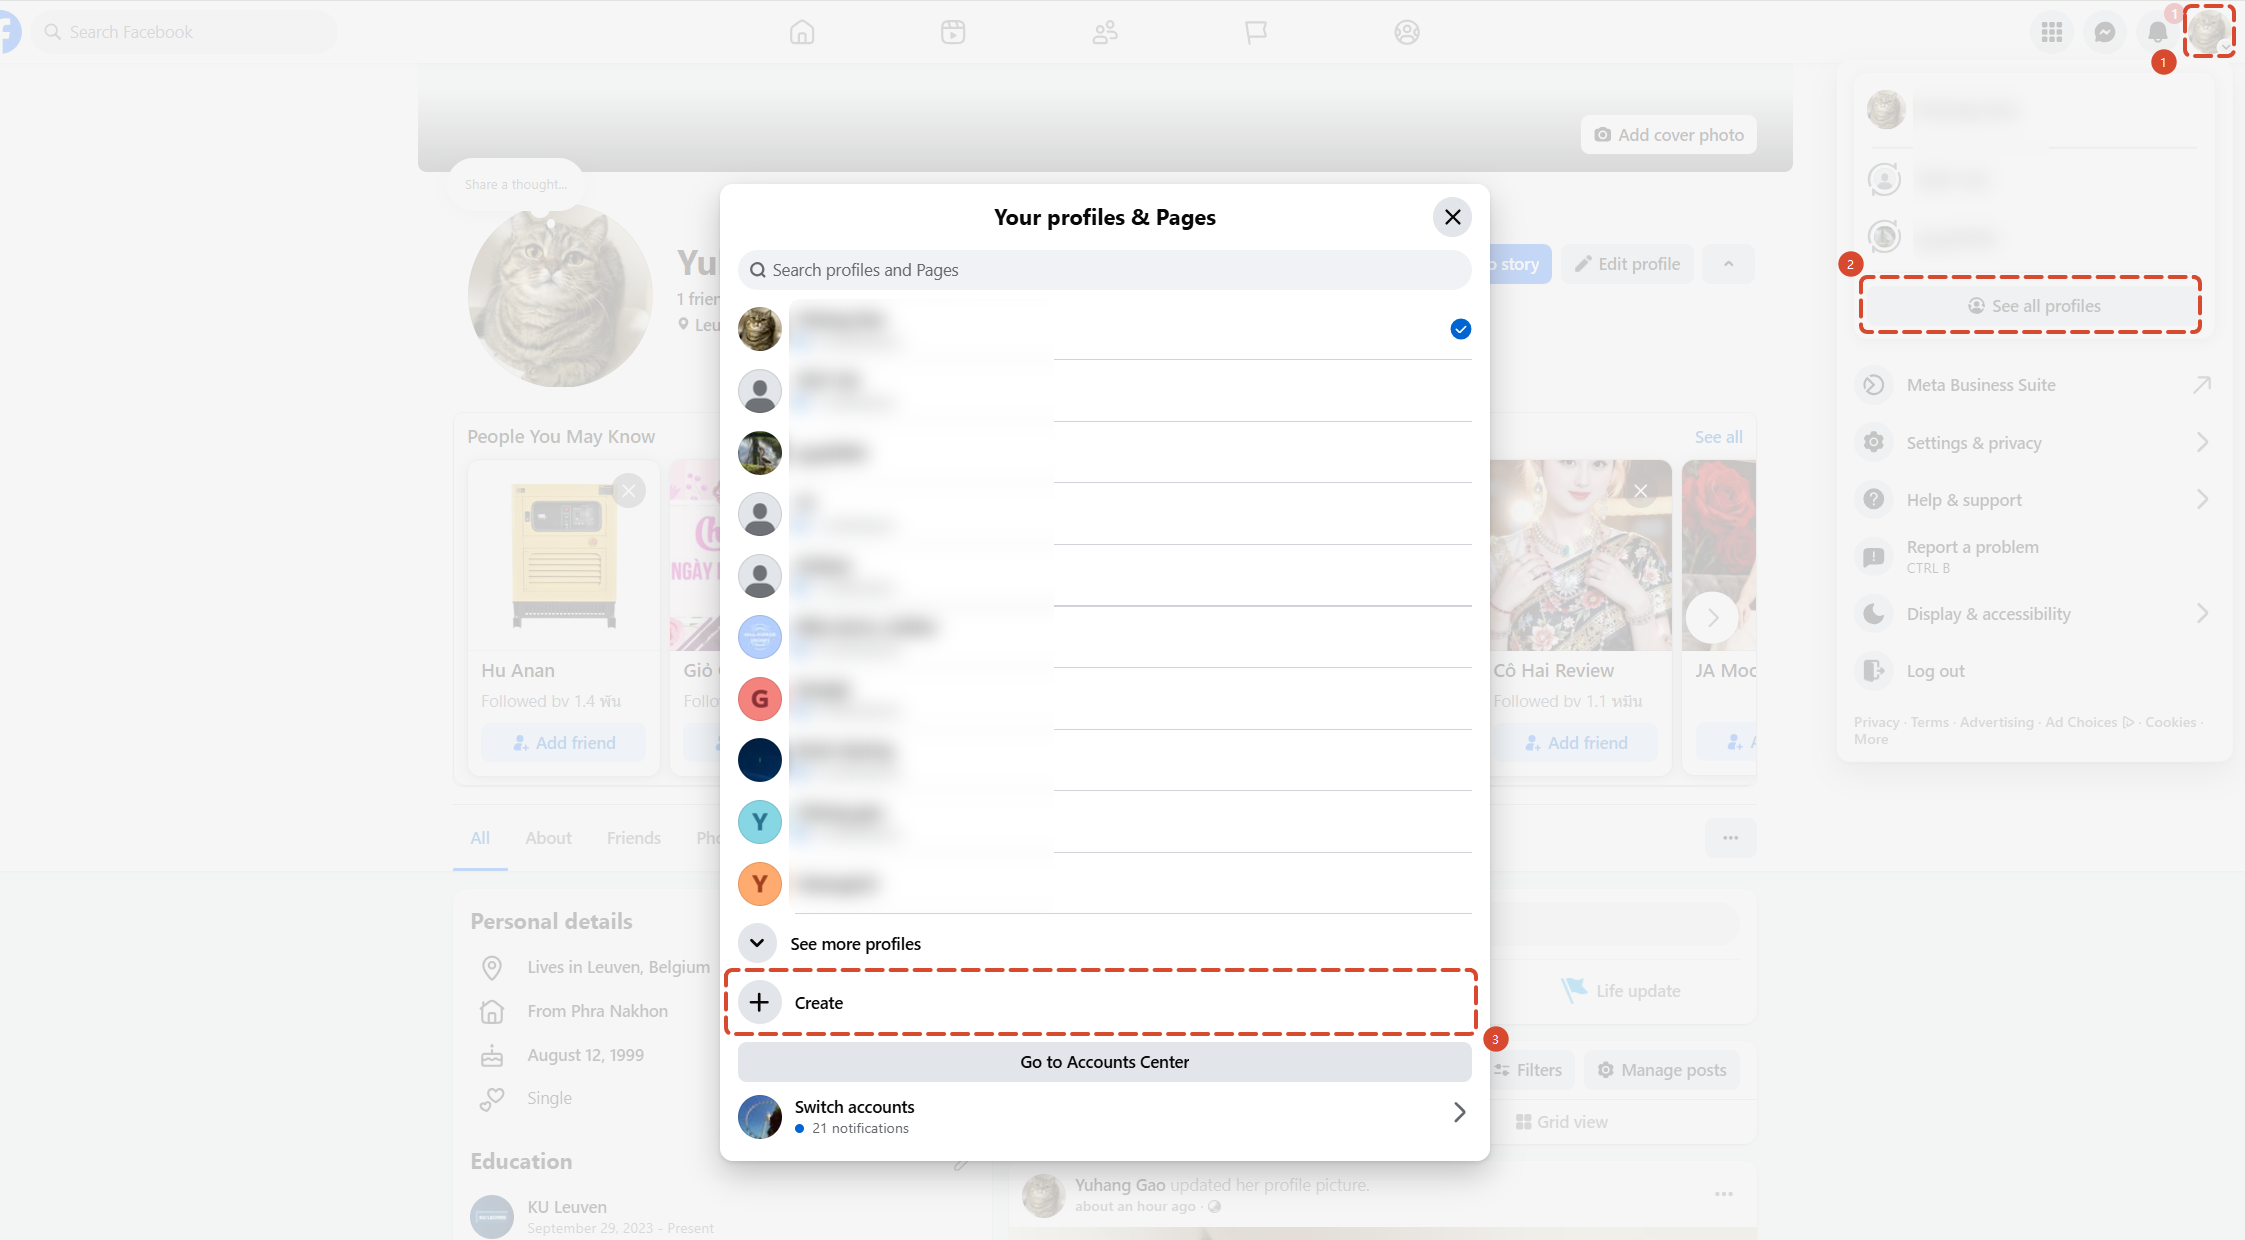
1) Go to http://facebook.com/pages/create
2) Click Create Page to finish creating your Page
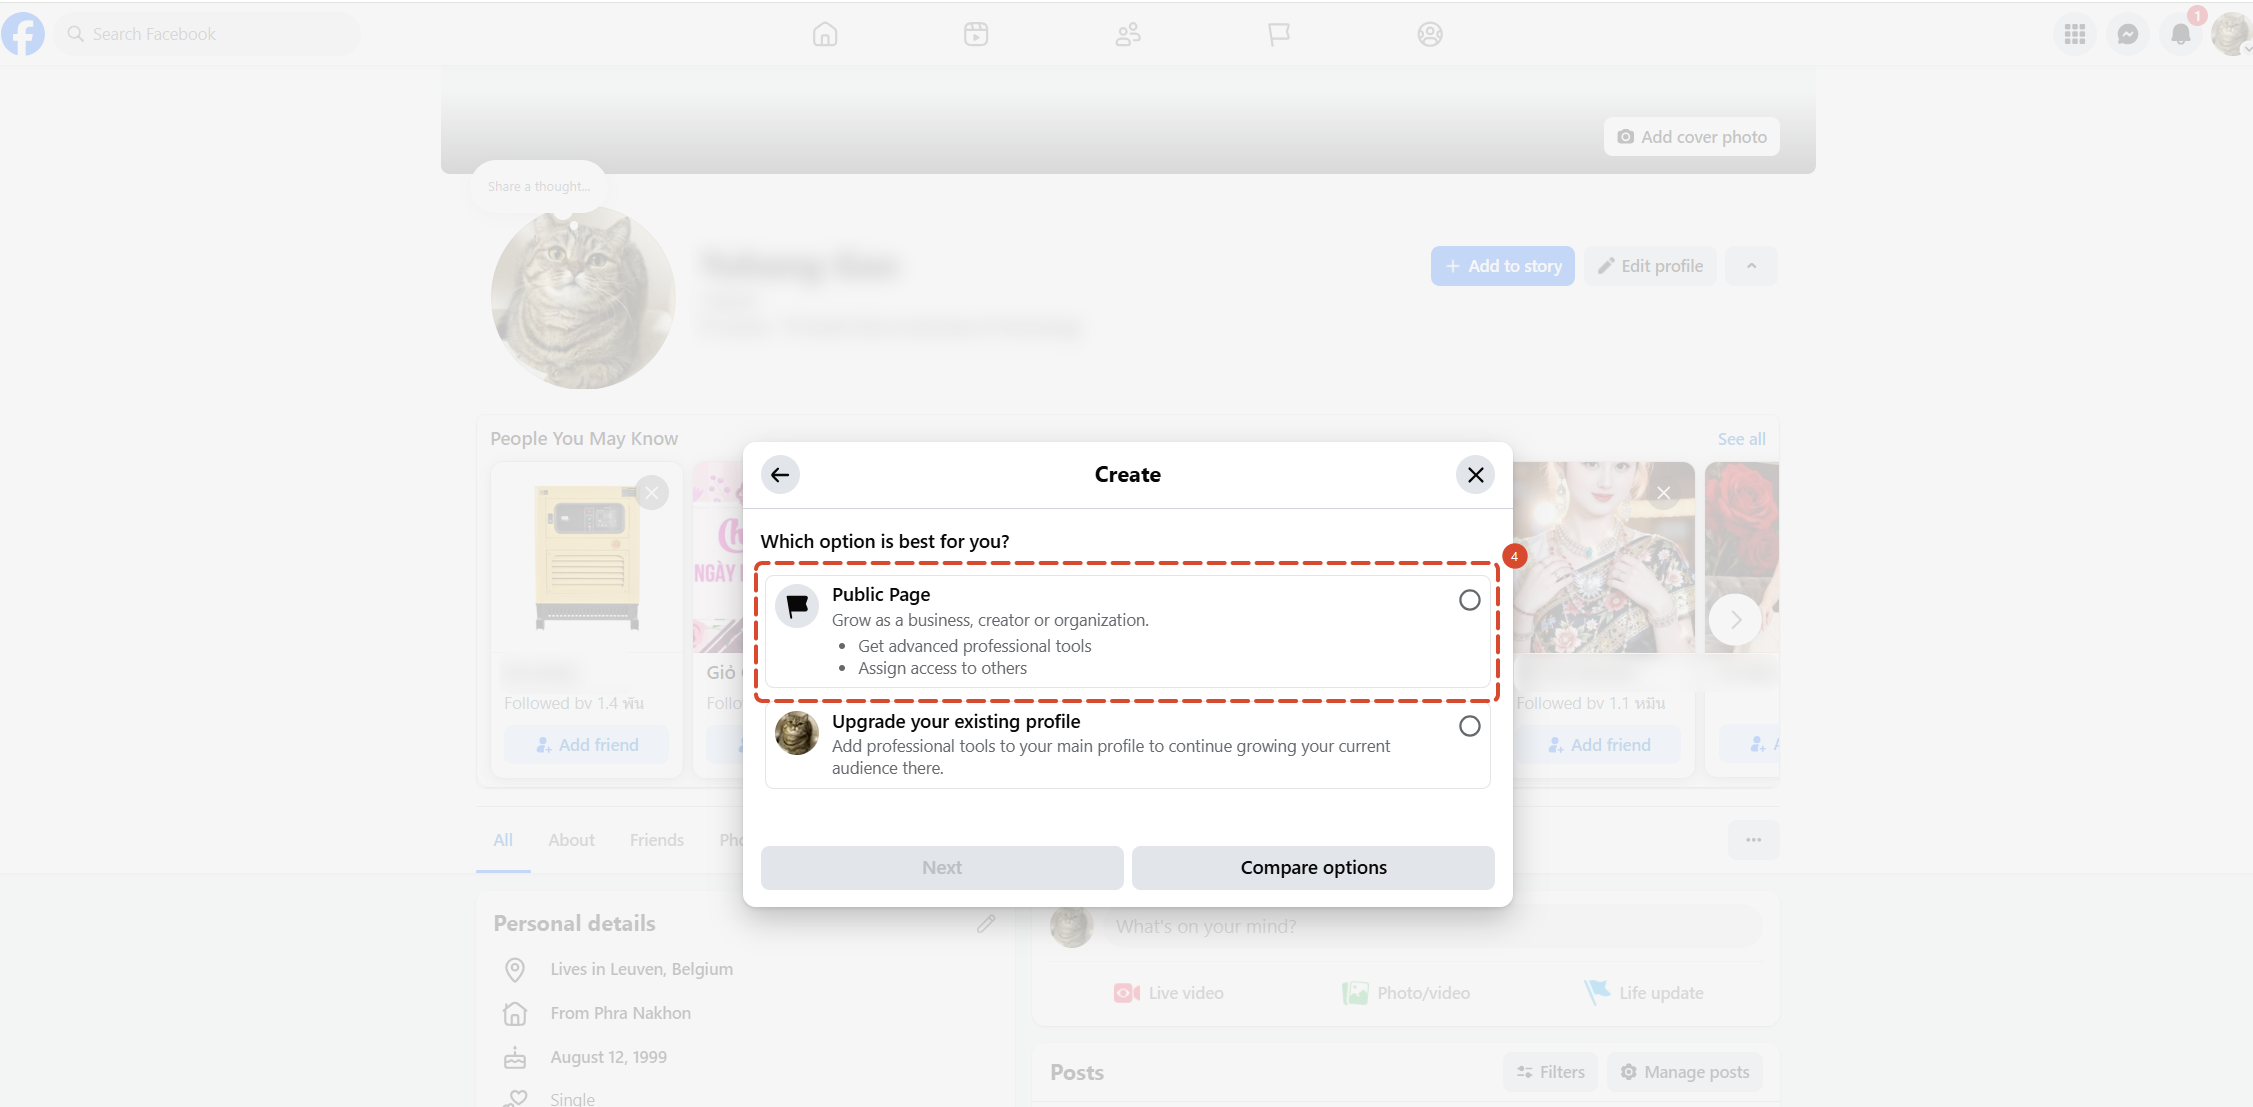
3) Select the Public Page to create
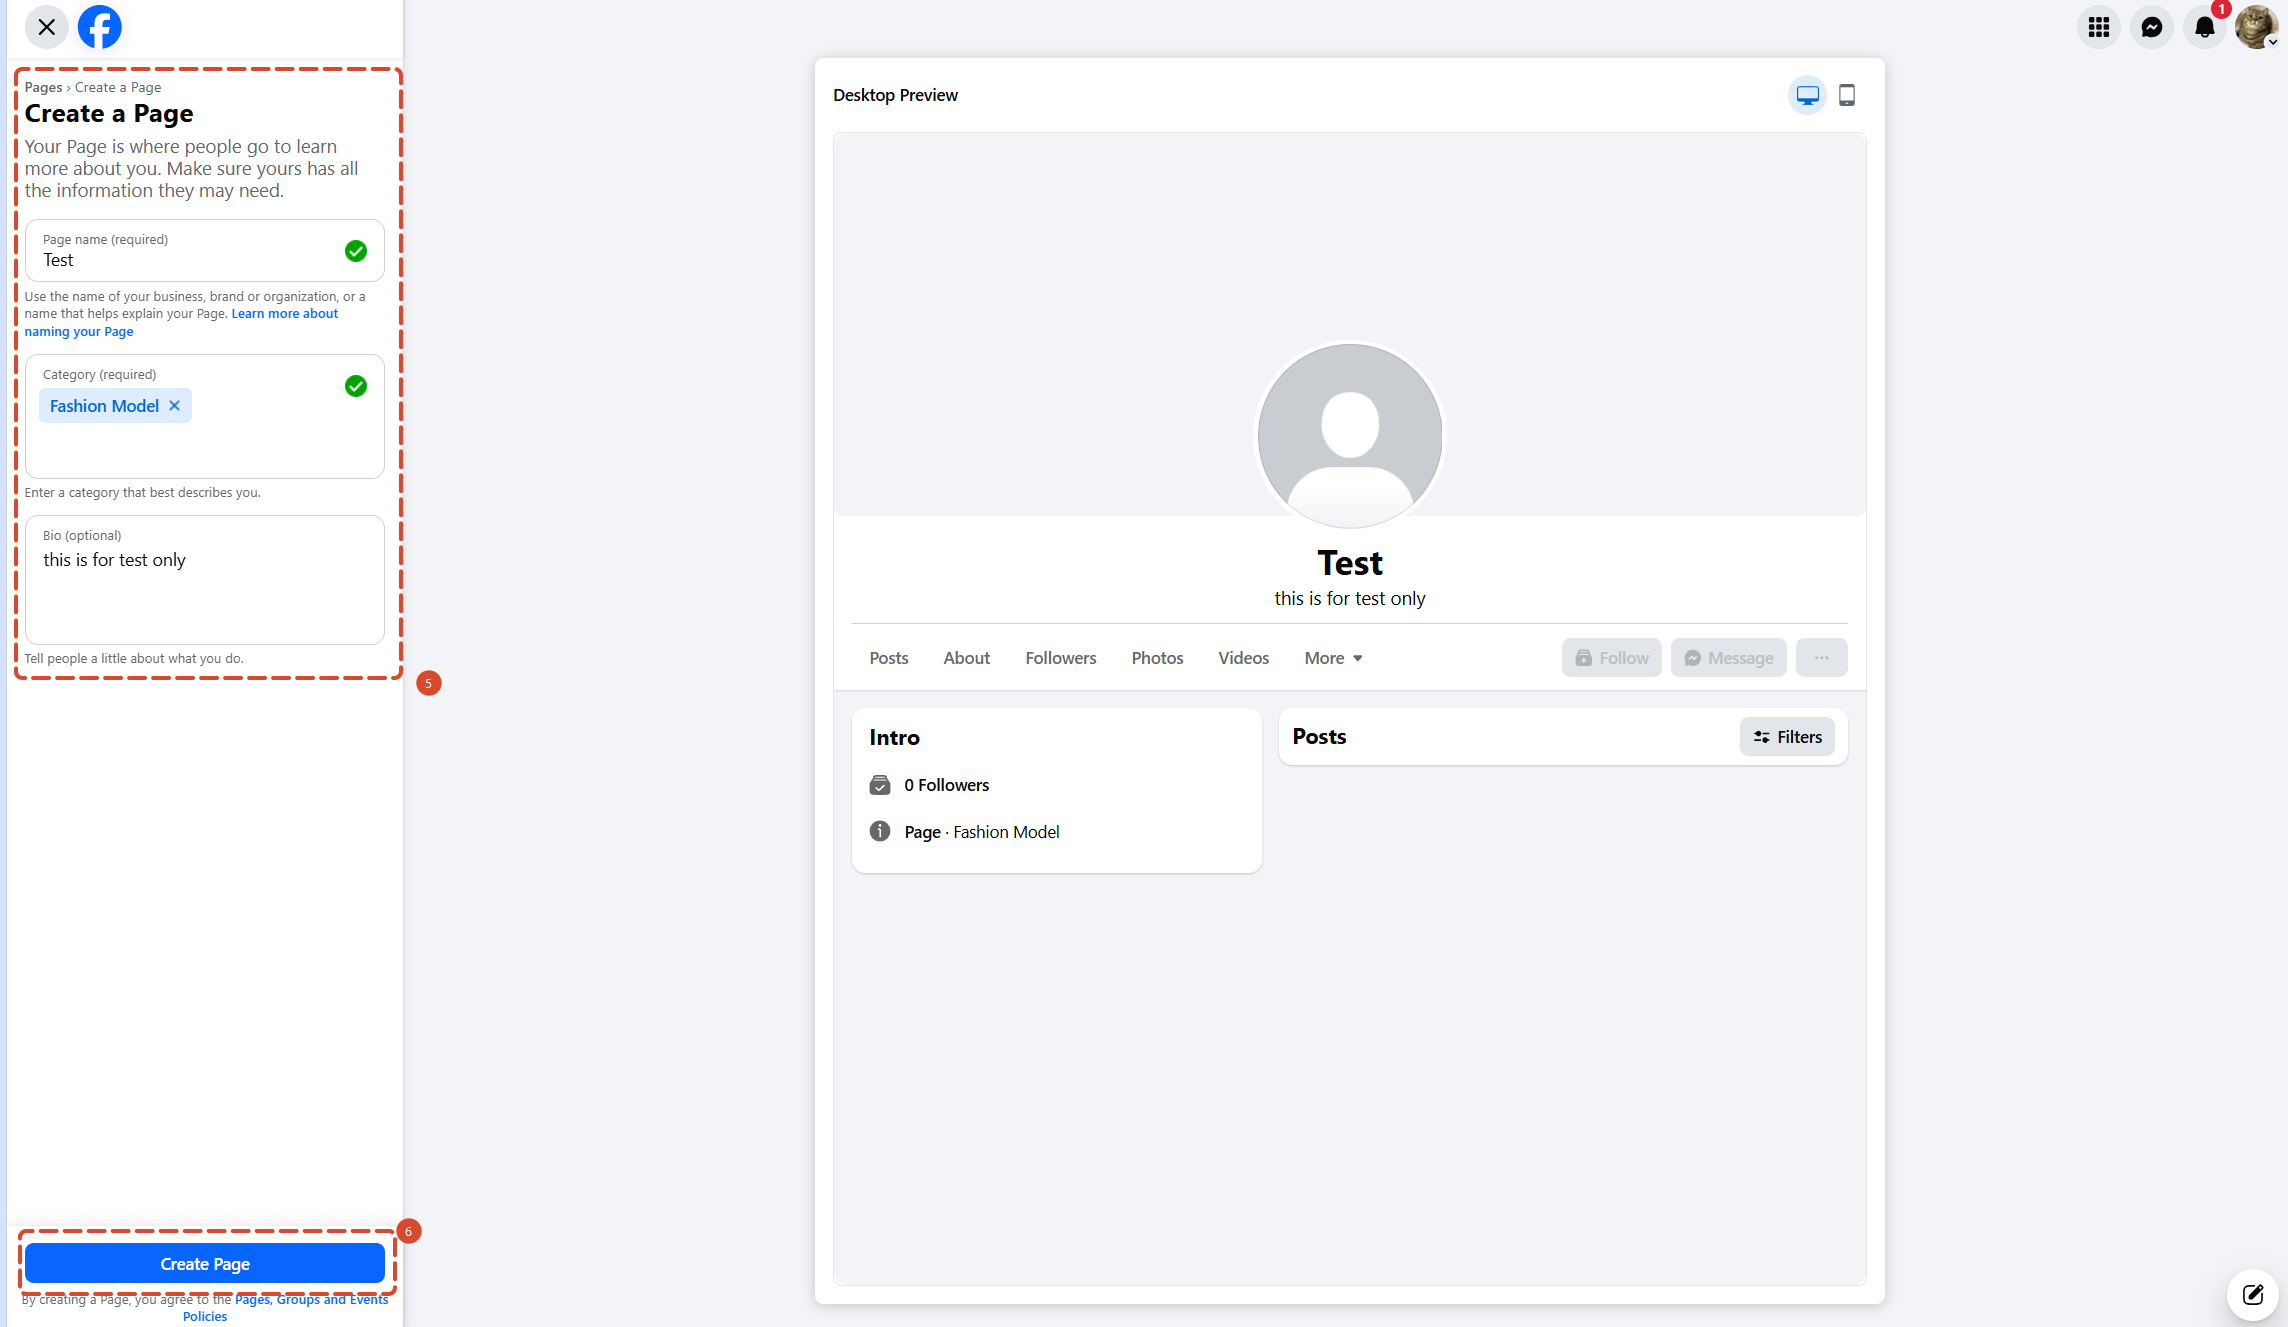
4) Fill in the Page name, Category and Bio
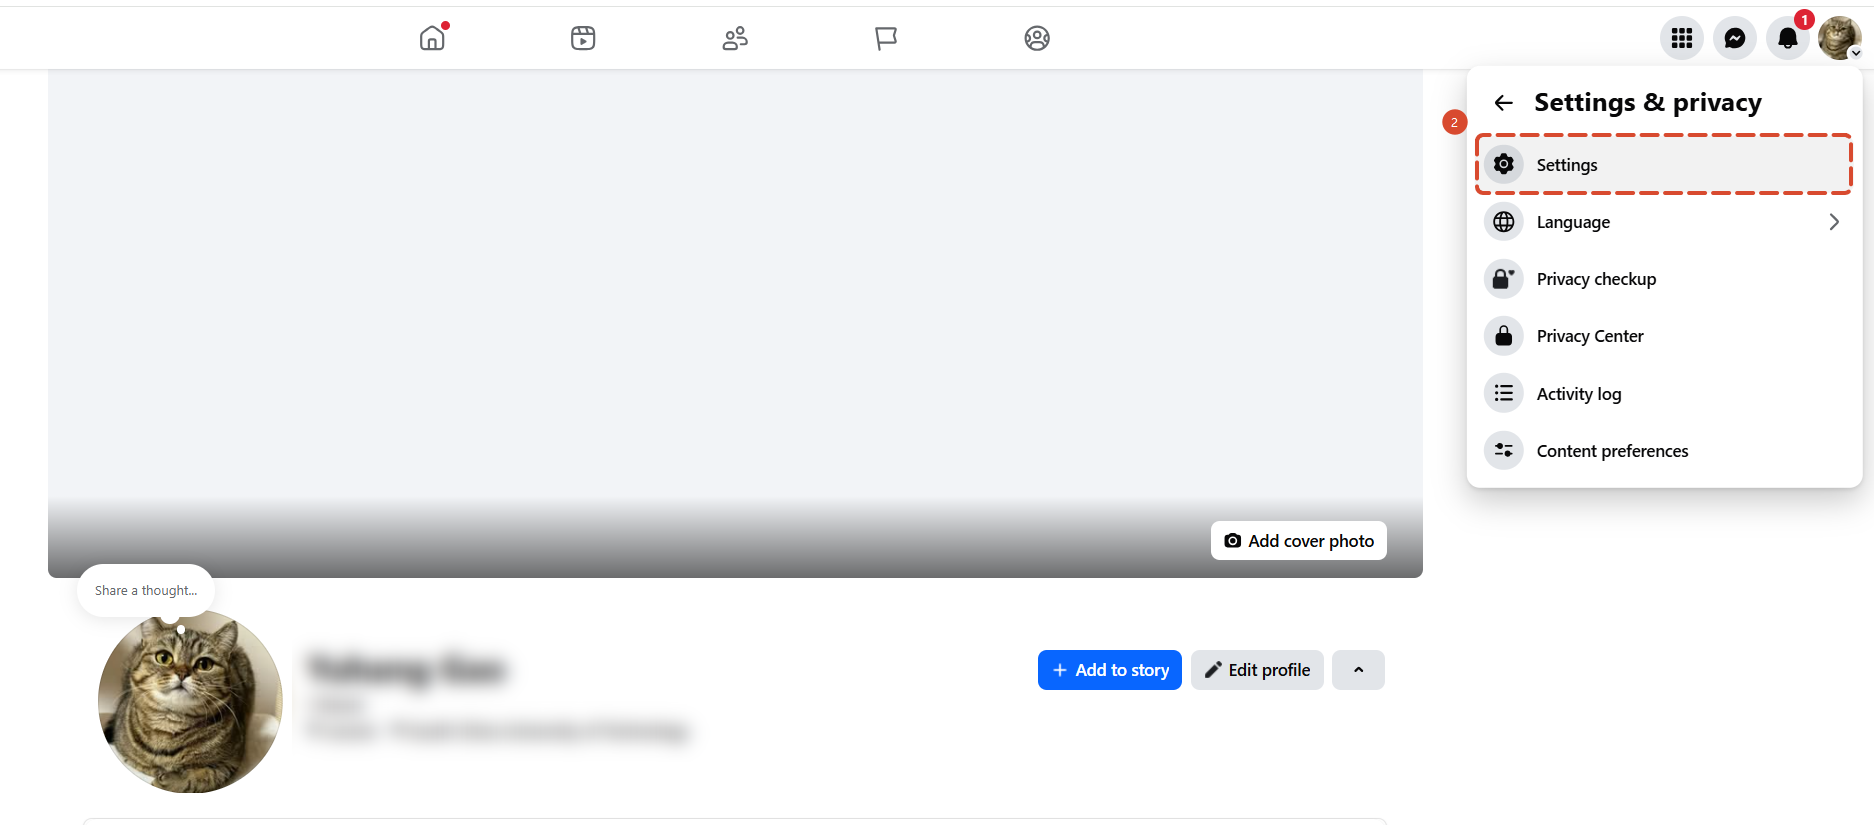
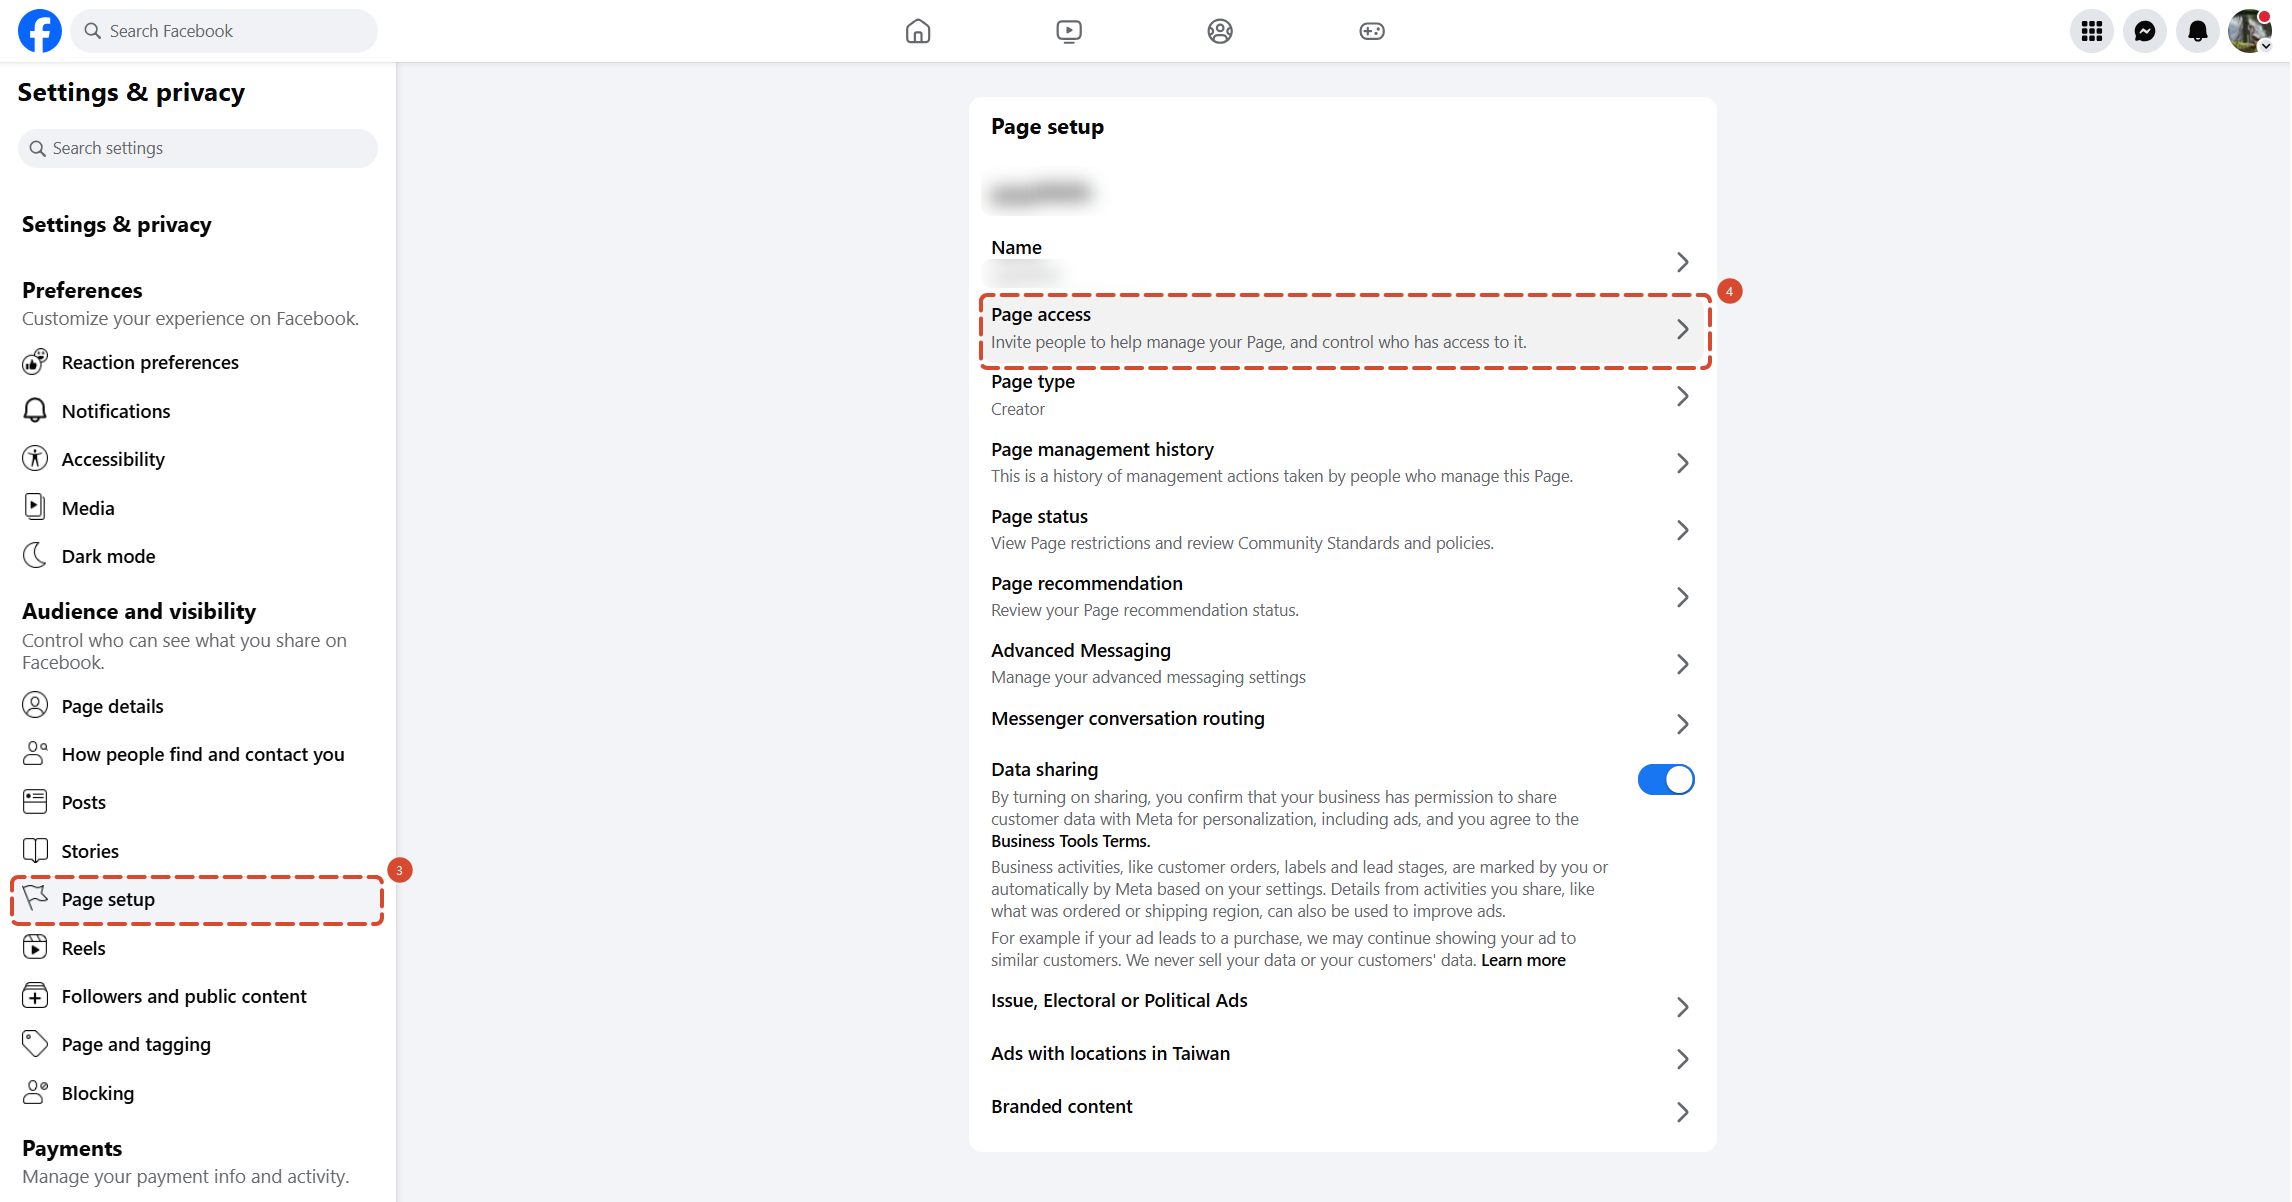
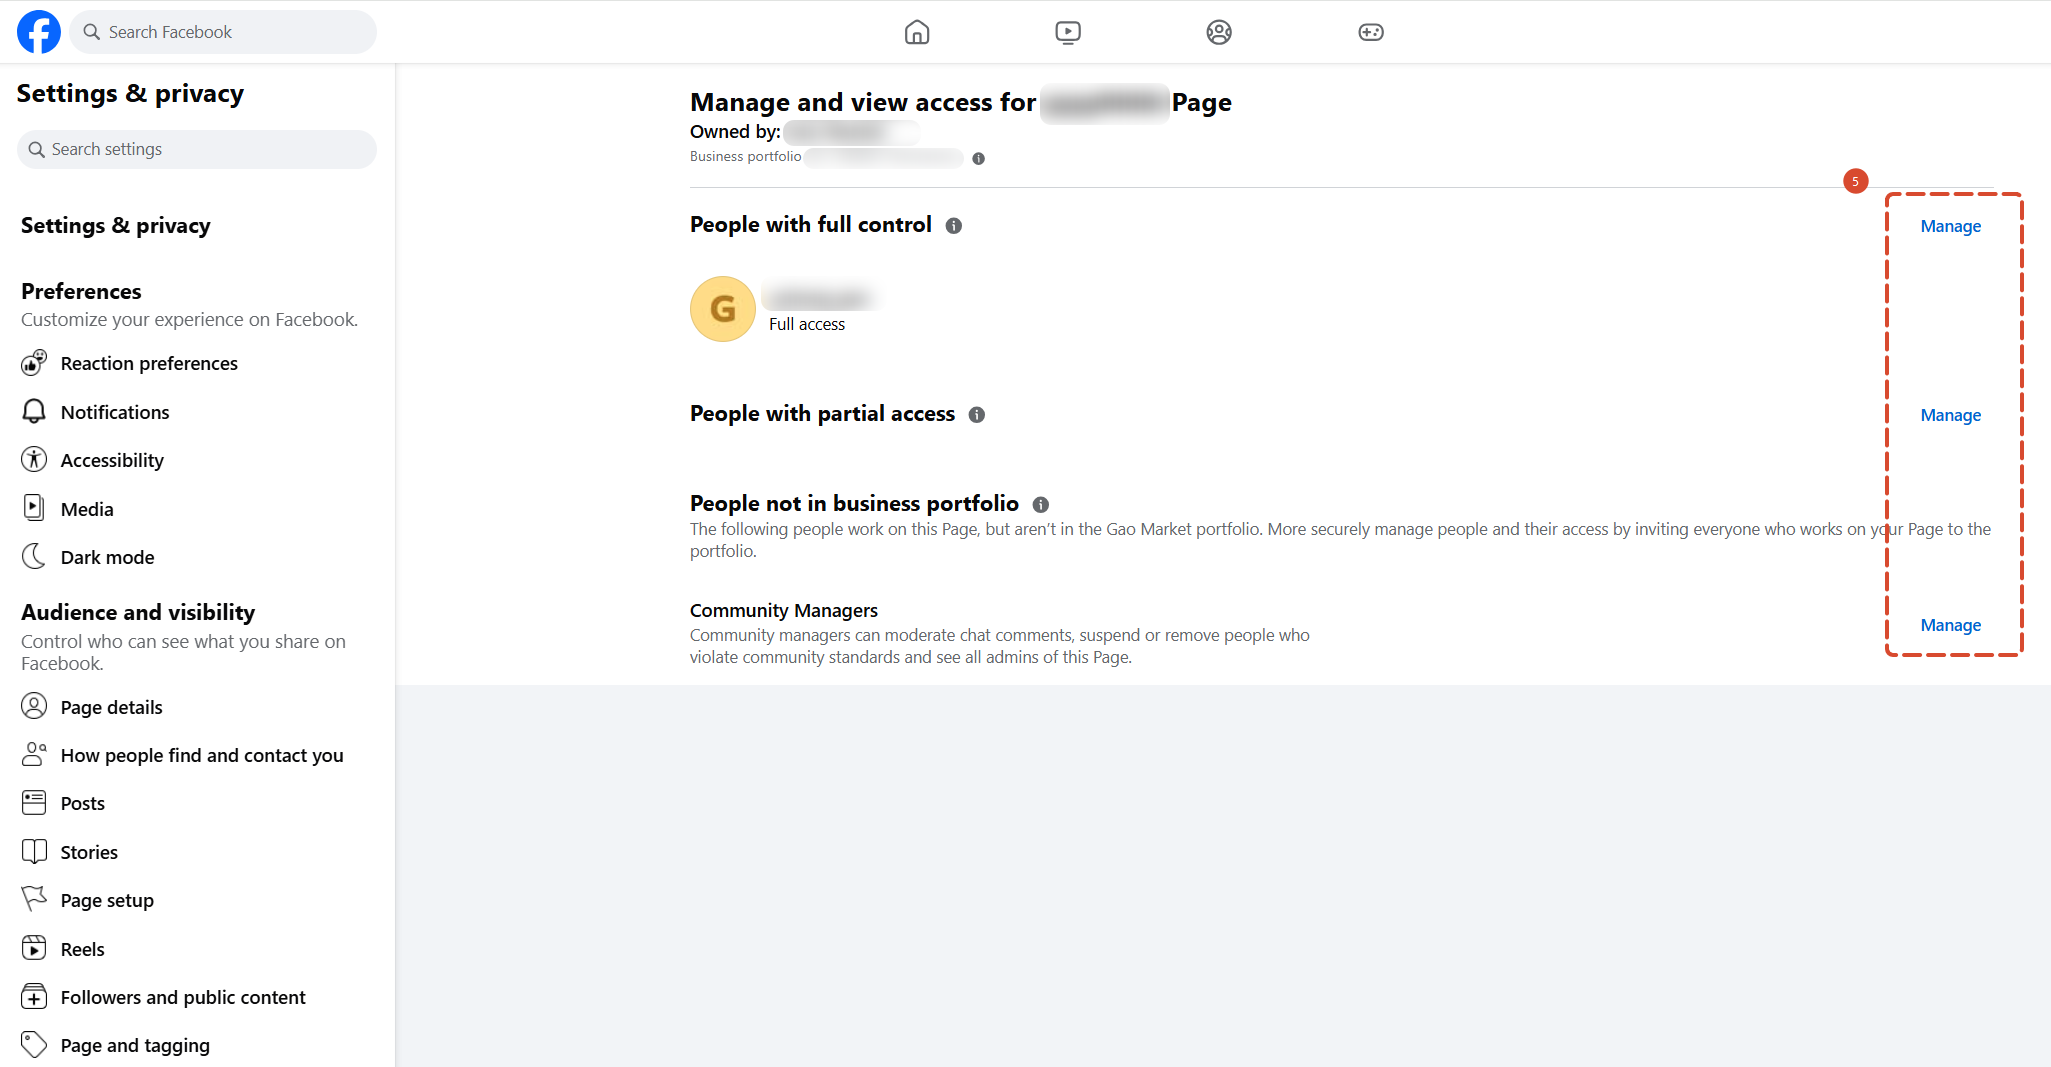
We also recommend configuring access permissions before you go live, so you do not need to grant temporary authorization in the middle of a live session.
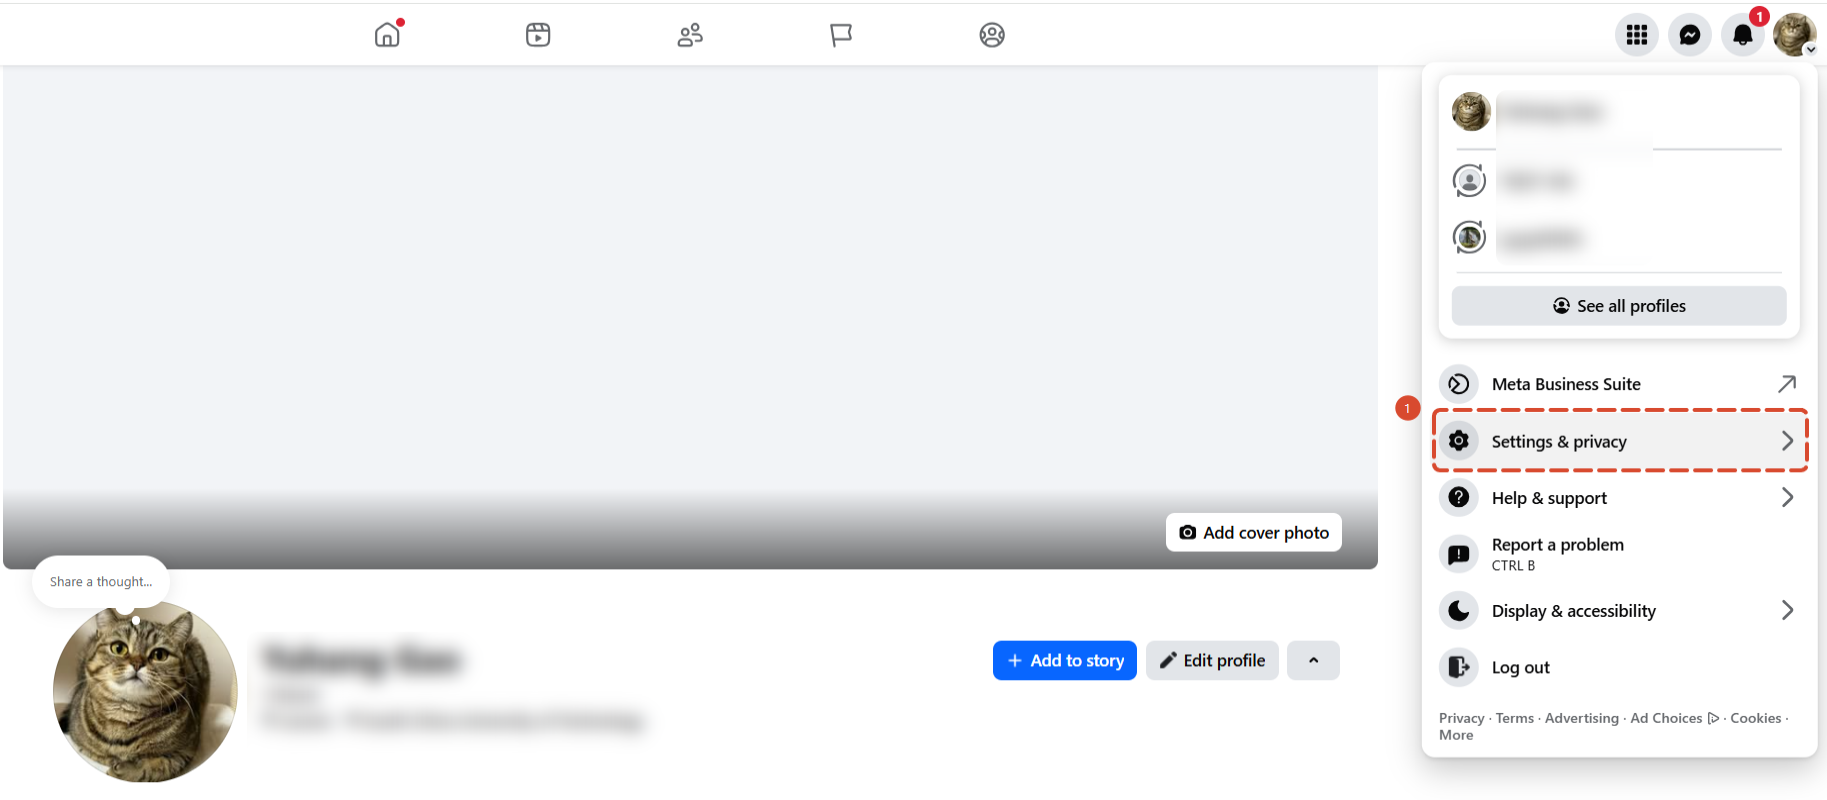
You may go to Settings & Privacy > Settings > Page Setup > Select Page access
3. Create an Ad Account
1) Go to http://business.facebook.com and create a Meta Business Suite account
2) Go to Business settings > Accounts > Ad accounts > Add > Create a new account
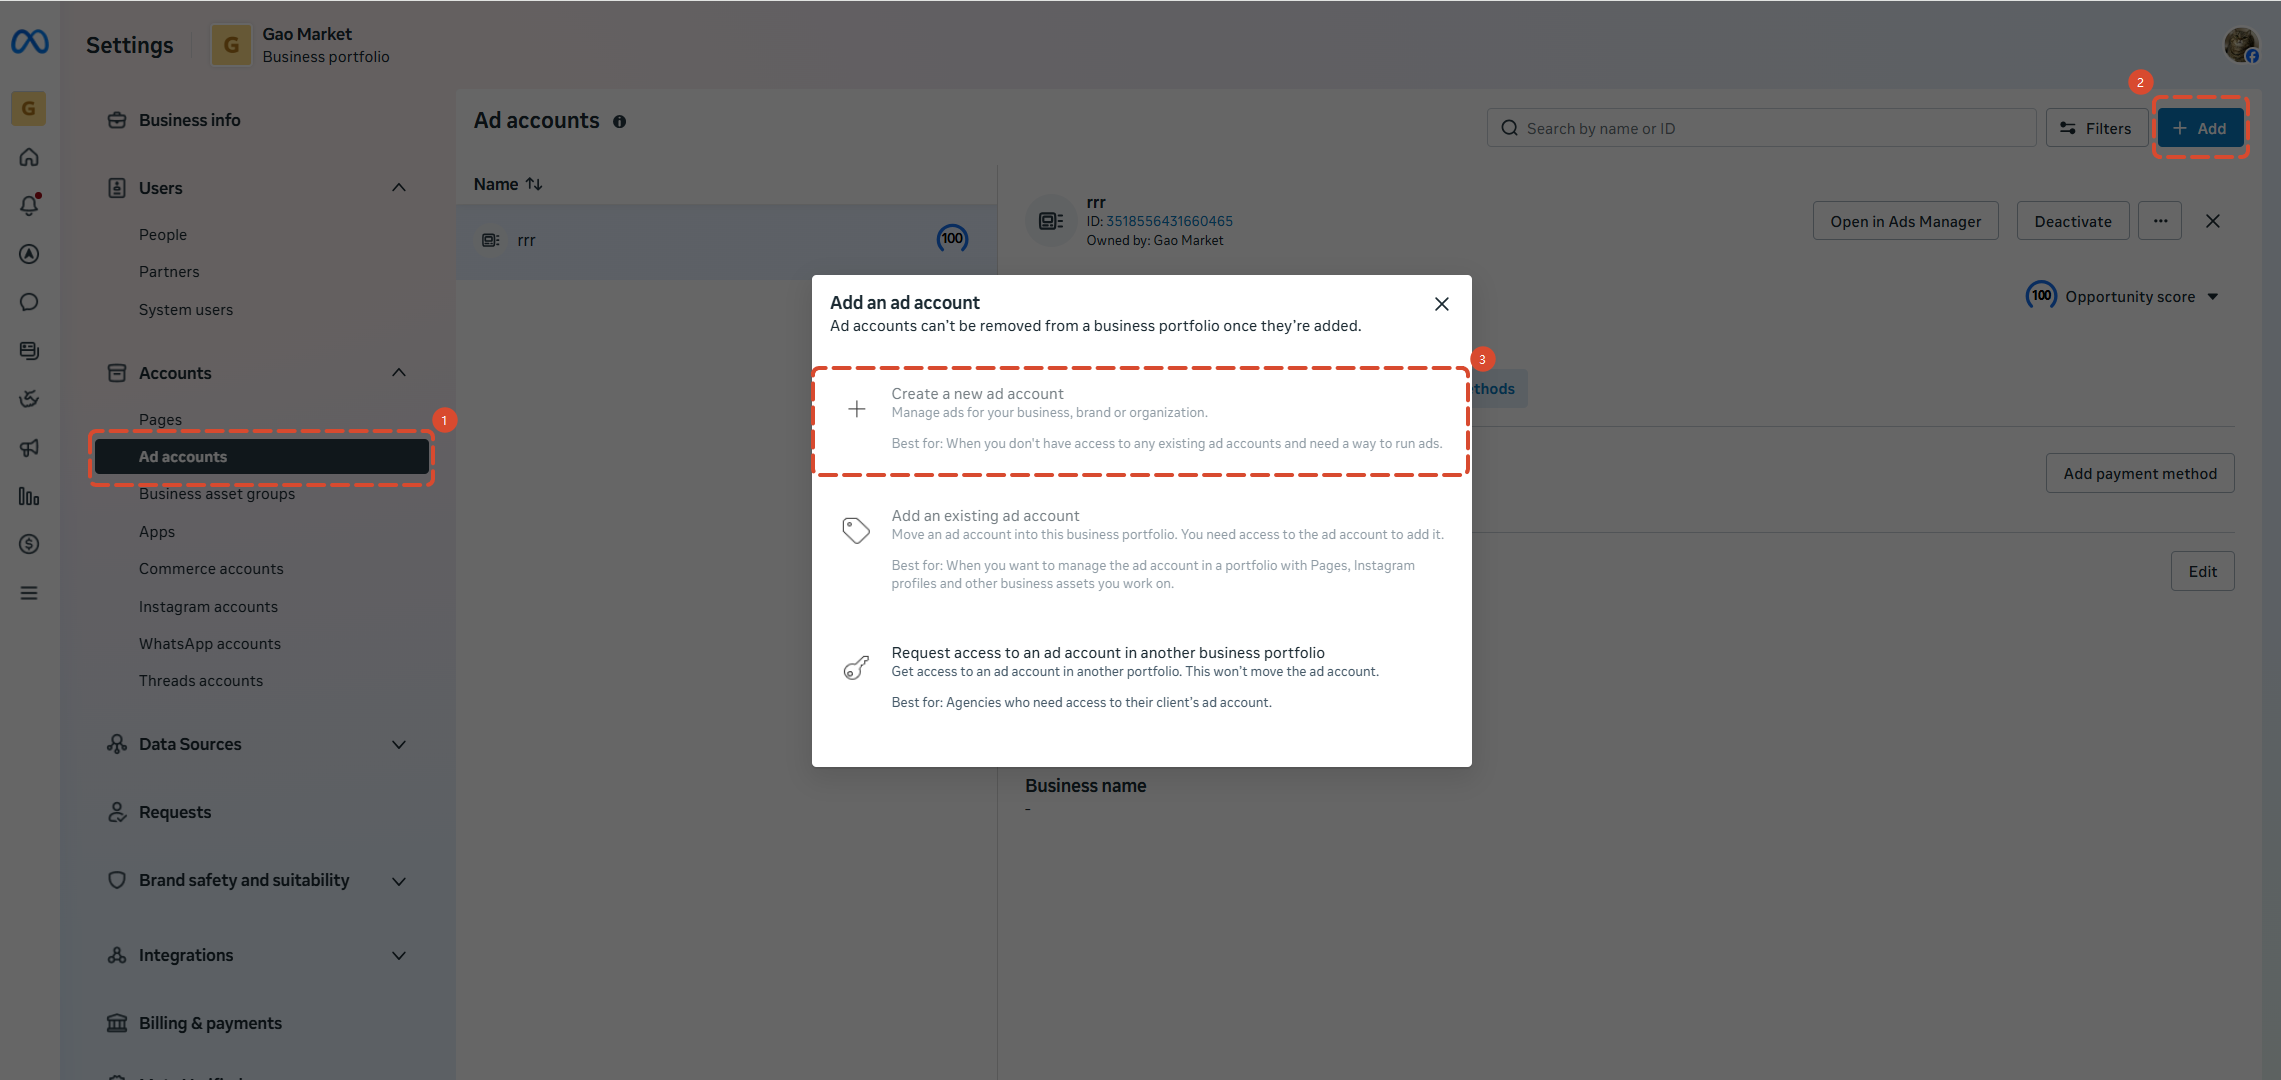
When creating a new account, you may set the currency and time zone first, and then add your page to the ad account. After creating successfully, you need to add a payment under payment methods.
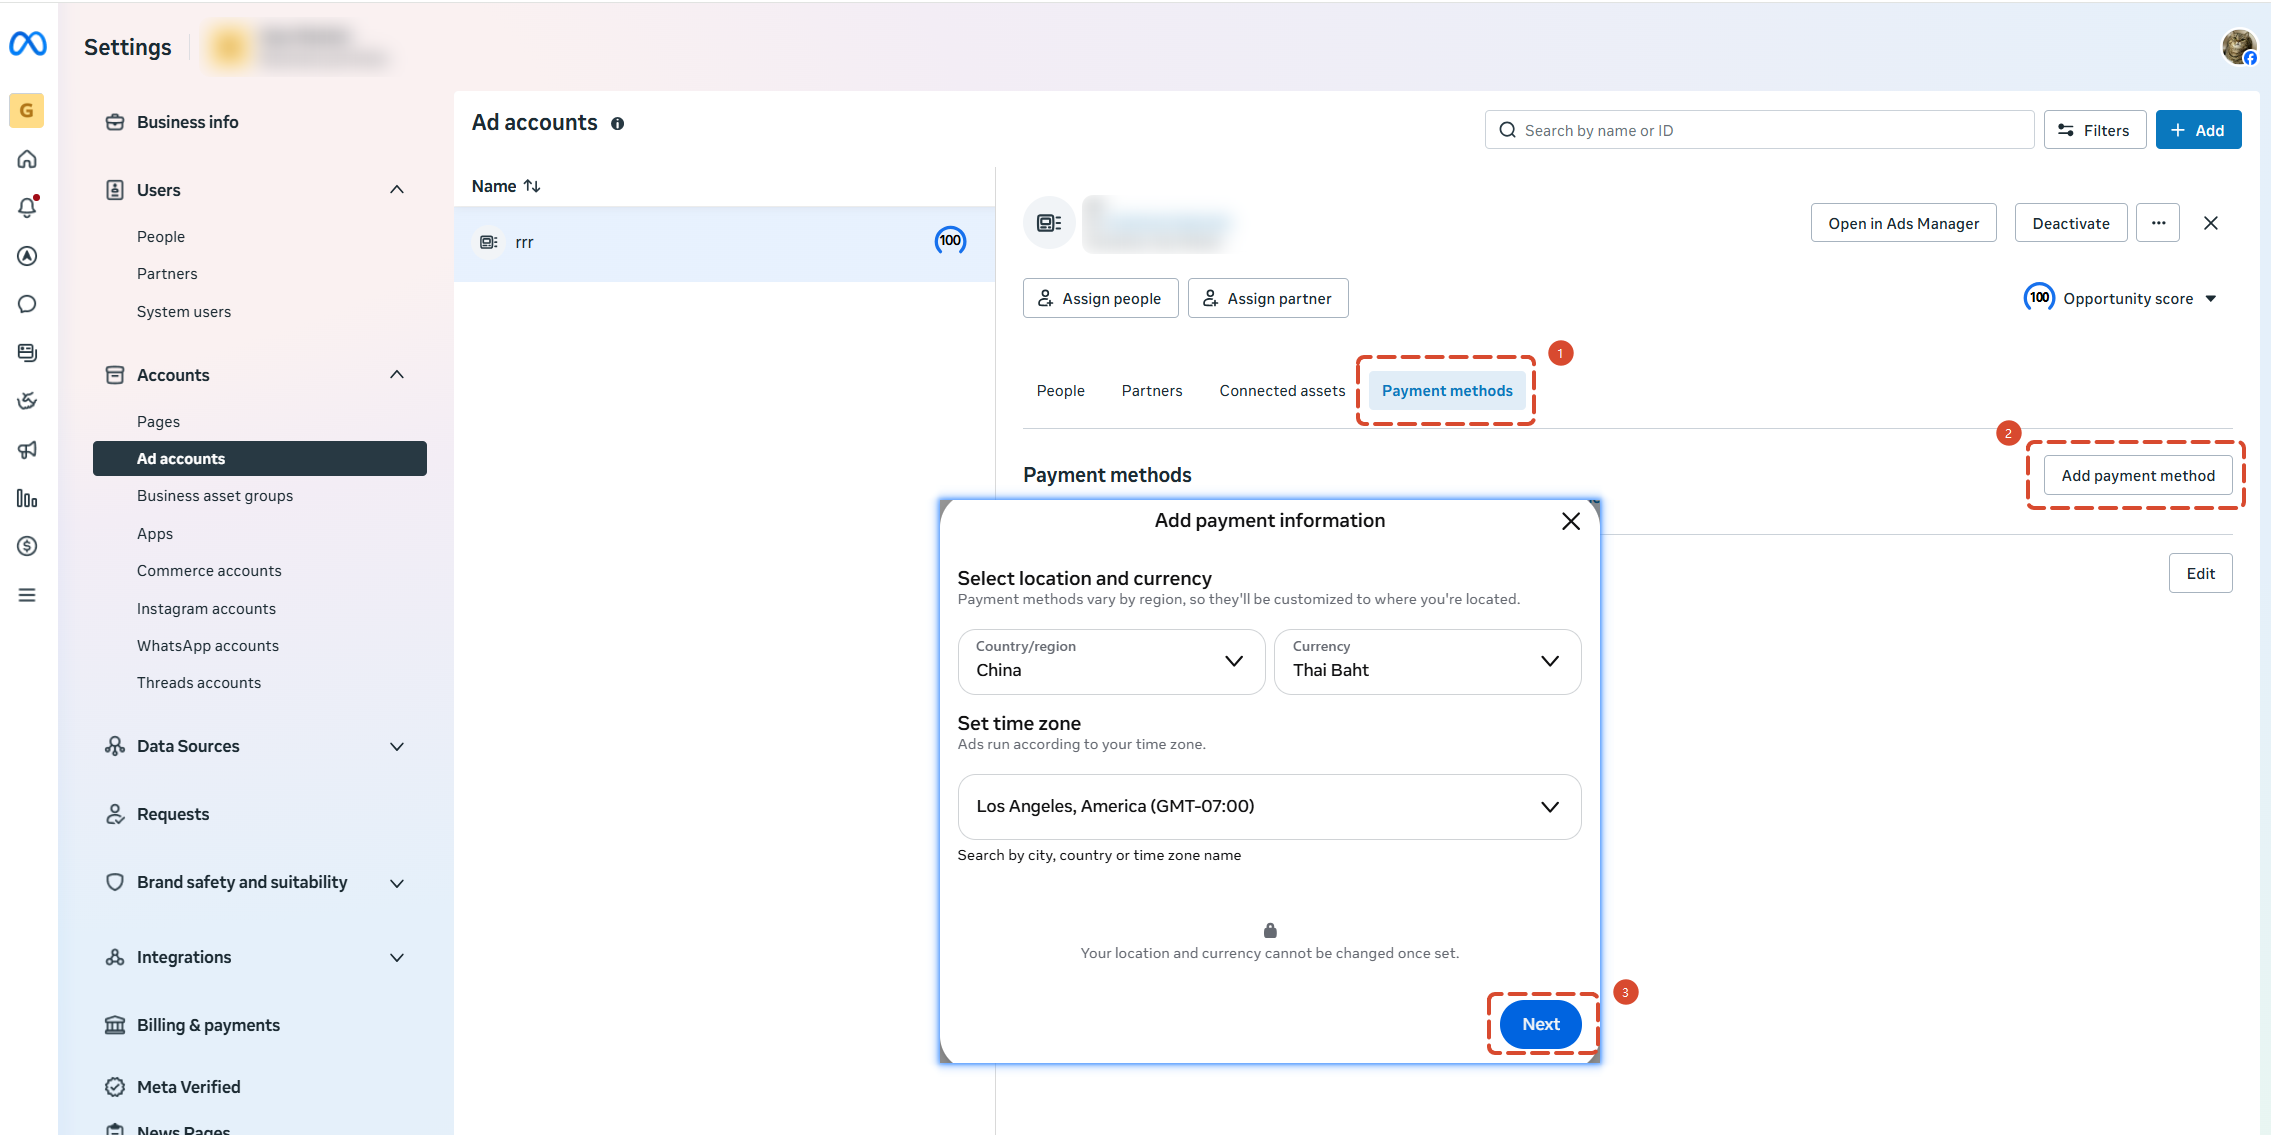
Note: The currency and time zone of an ad account cannot be changed after creation, so it is worth confirming your settings before creating the account.
Newly created ad accounts, or accounts that have remained at a low spending level for a long time, have a system-defined daily spending limit. Within this limit, actual spending cannot exceed the cap even if you set a higher daily budget.
The limit increases gradually based on your account's advertising history and on-time payment record. It cannot be adjusted directly through settings. If you have a clear advertising plan, starting with small campaigns early lets your account's limit reach the target level in time.
The average daily spend required is your total planned budget divided by the number of days you plan to run ads. This figure can then be compared with the account spending limit shown under Payment settings.
If your required average daily spend is higher than the current limit, you need to start advertising earlier to raise the limit.
Adding a payment method does not incur any charge; fees are only deducted when ads actually run. Before you start advertising, make sure your payment method has not expired and its available balance is higher than your planned spend.
4. Connect a Product Catalog
You can connect products in either of the following two ways:
- Sync via a partner platform: the integration is configured in the e-commerce management system you use; product information, prices and stock are then synced automatically
- Create manually in Commerce Manager: a Catalog can be created at http://business.facebook.com/commerce , with products added manually or uploaded in bulk
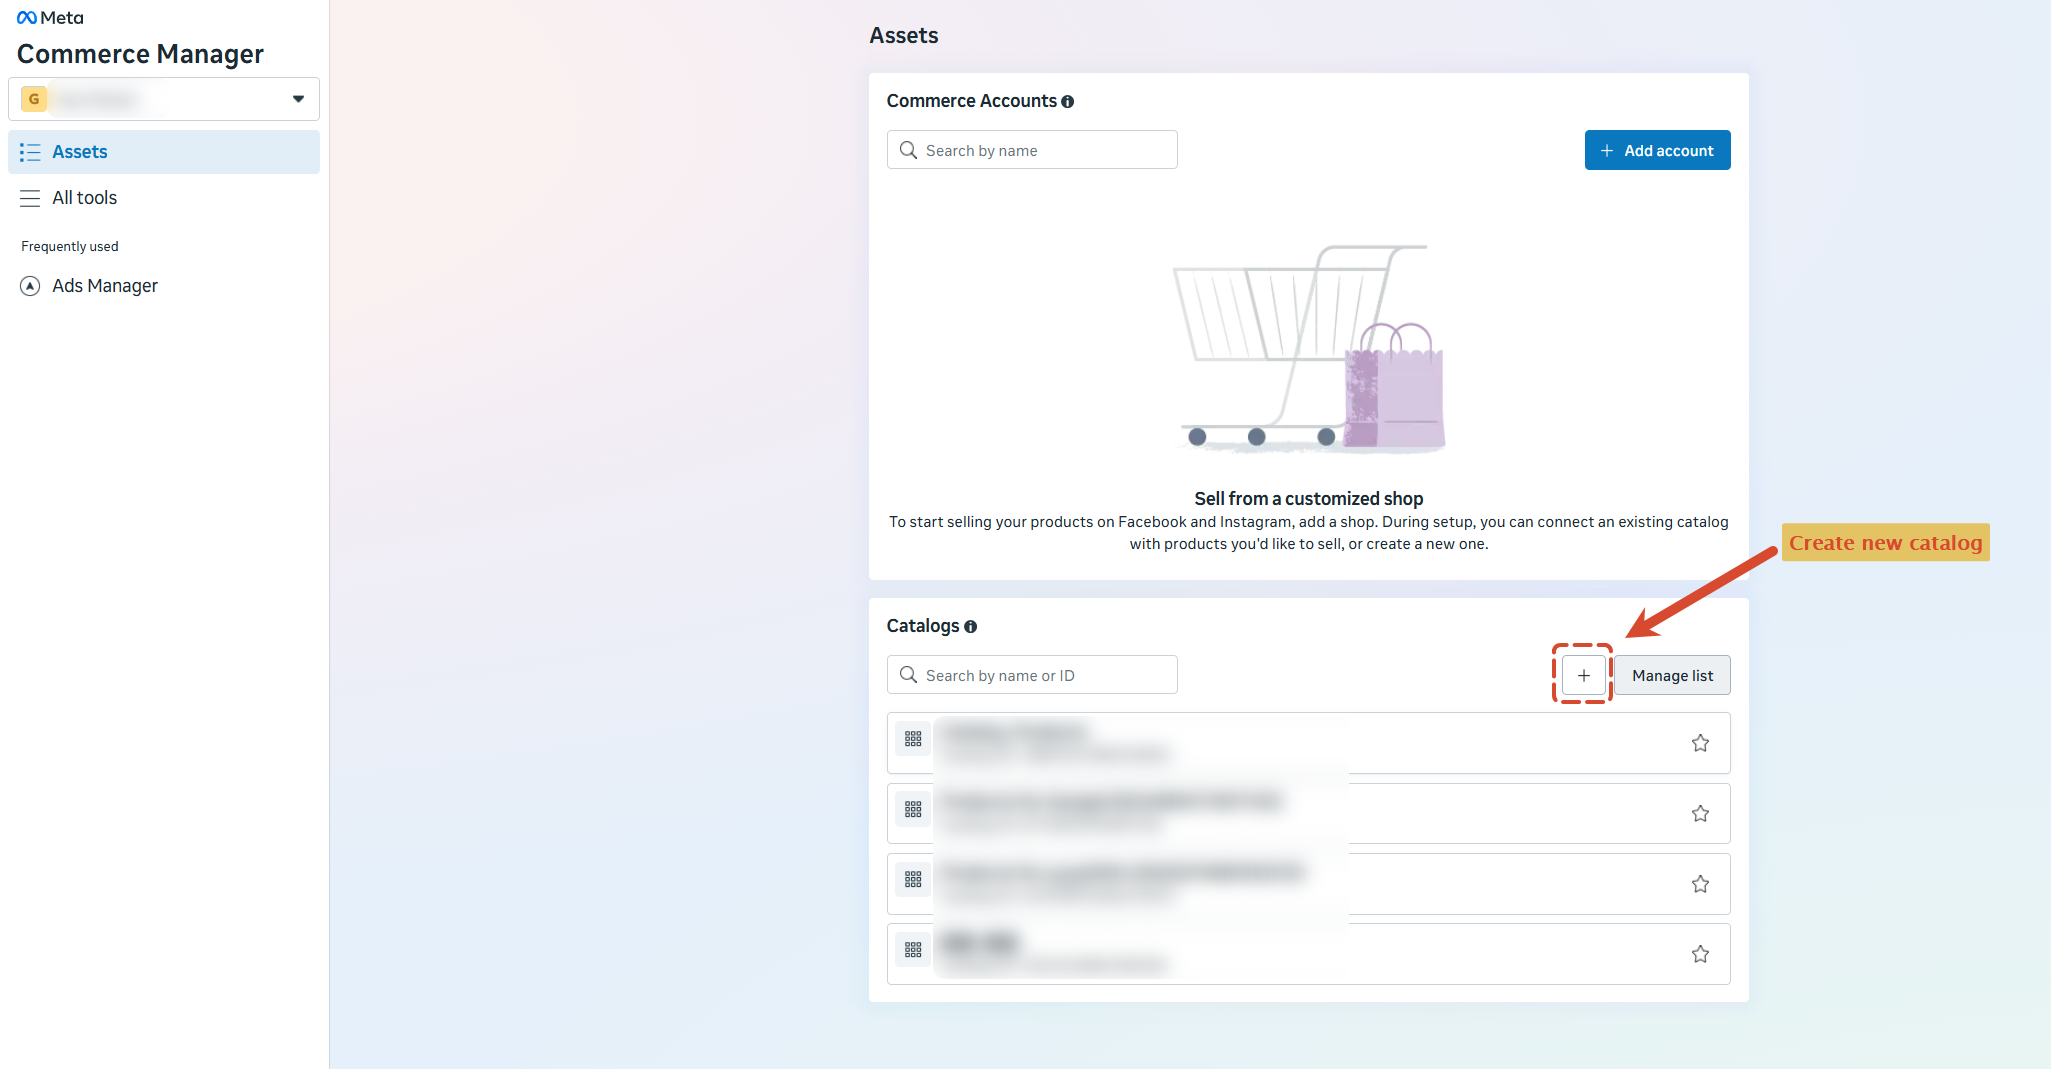
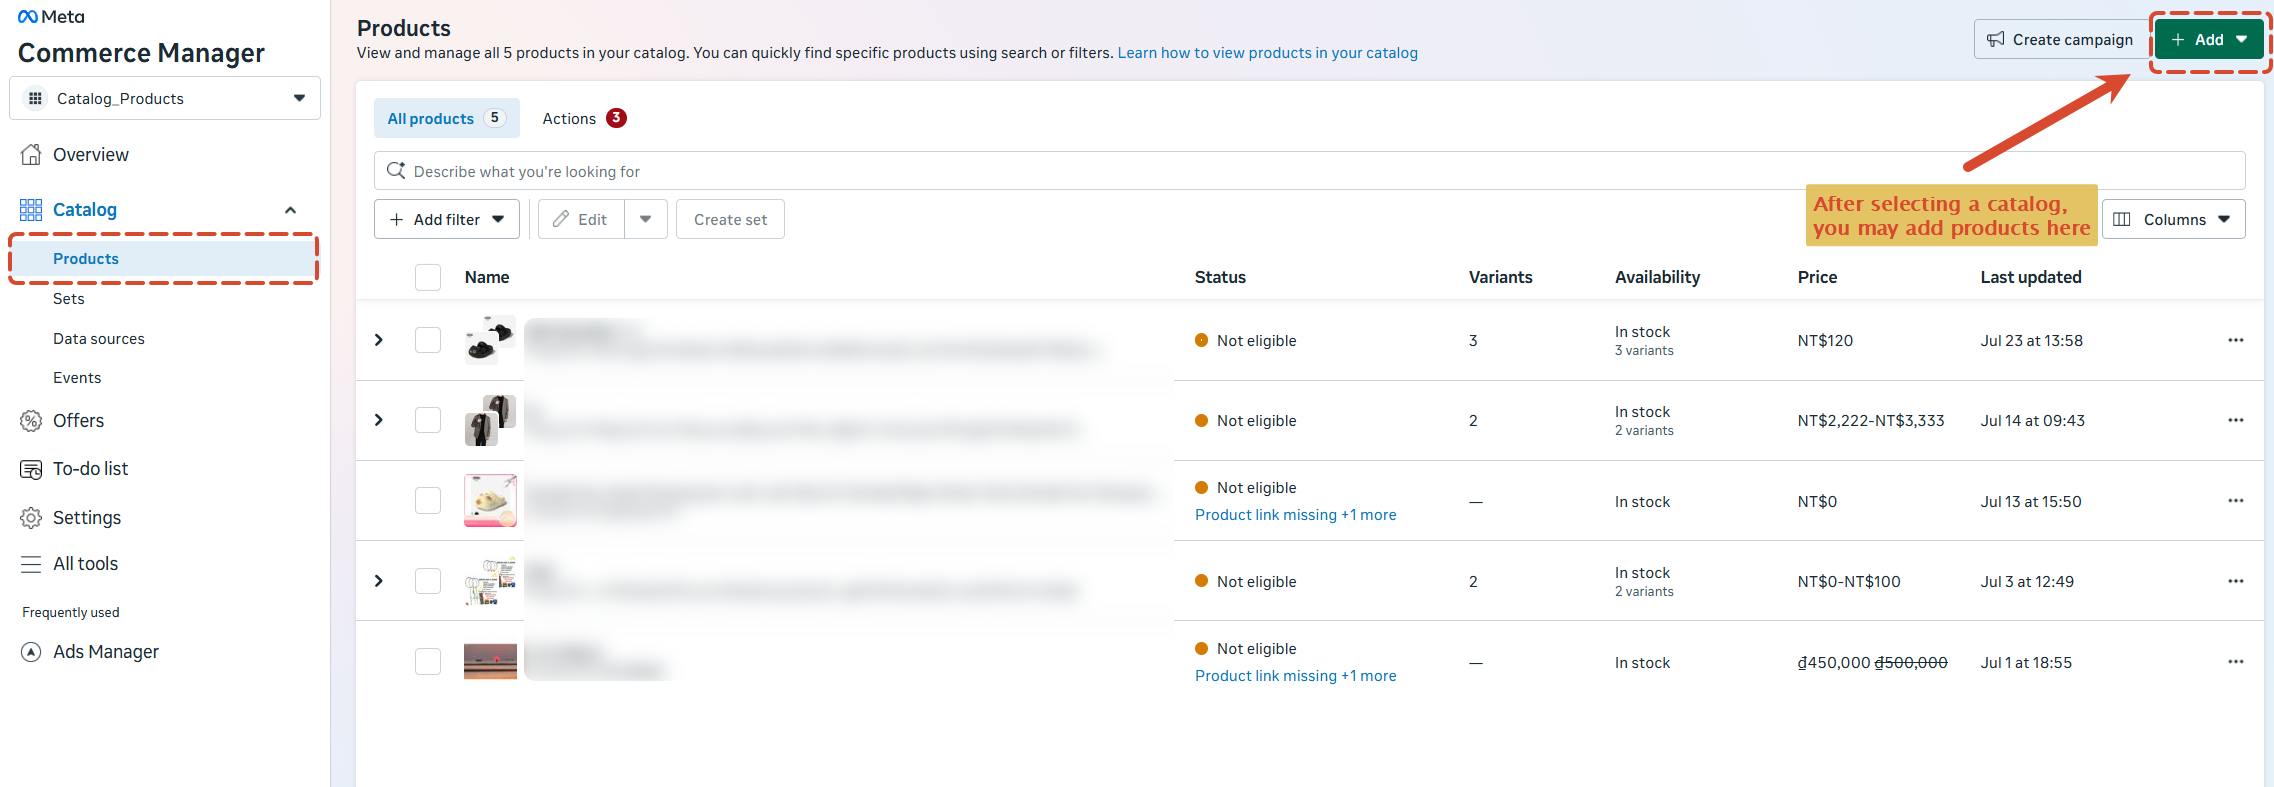
Once the catalog is synced, viewers can click the product overlay during the live to start the purchase process. Checkout happens on your website, in a Messenger conversation, or in your partner tool.
For sellers using BigSeller, product information, prices and stock are already maintained in the BigSeller system. Once the integration is configured, data is synced to Facebook automatically — no need to maintain both sides separately. Stock changes are synced in real time, and quantities sold through the live are deducted across your other sales channels as well.
5. Start a Live Session
Option 1: Go live from a mobile phone
1) Open the Facebook Pages manager app on your phone
2) Select Live video
3) Enter a title for your live
4) Tap Go live
Option 2: Go live with Live Producer
1) Go to http://facebook.com/live/producer
2) Select Webcam as the video source
3) Enter the live title and description
4) Click Go live
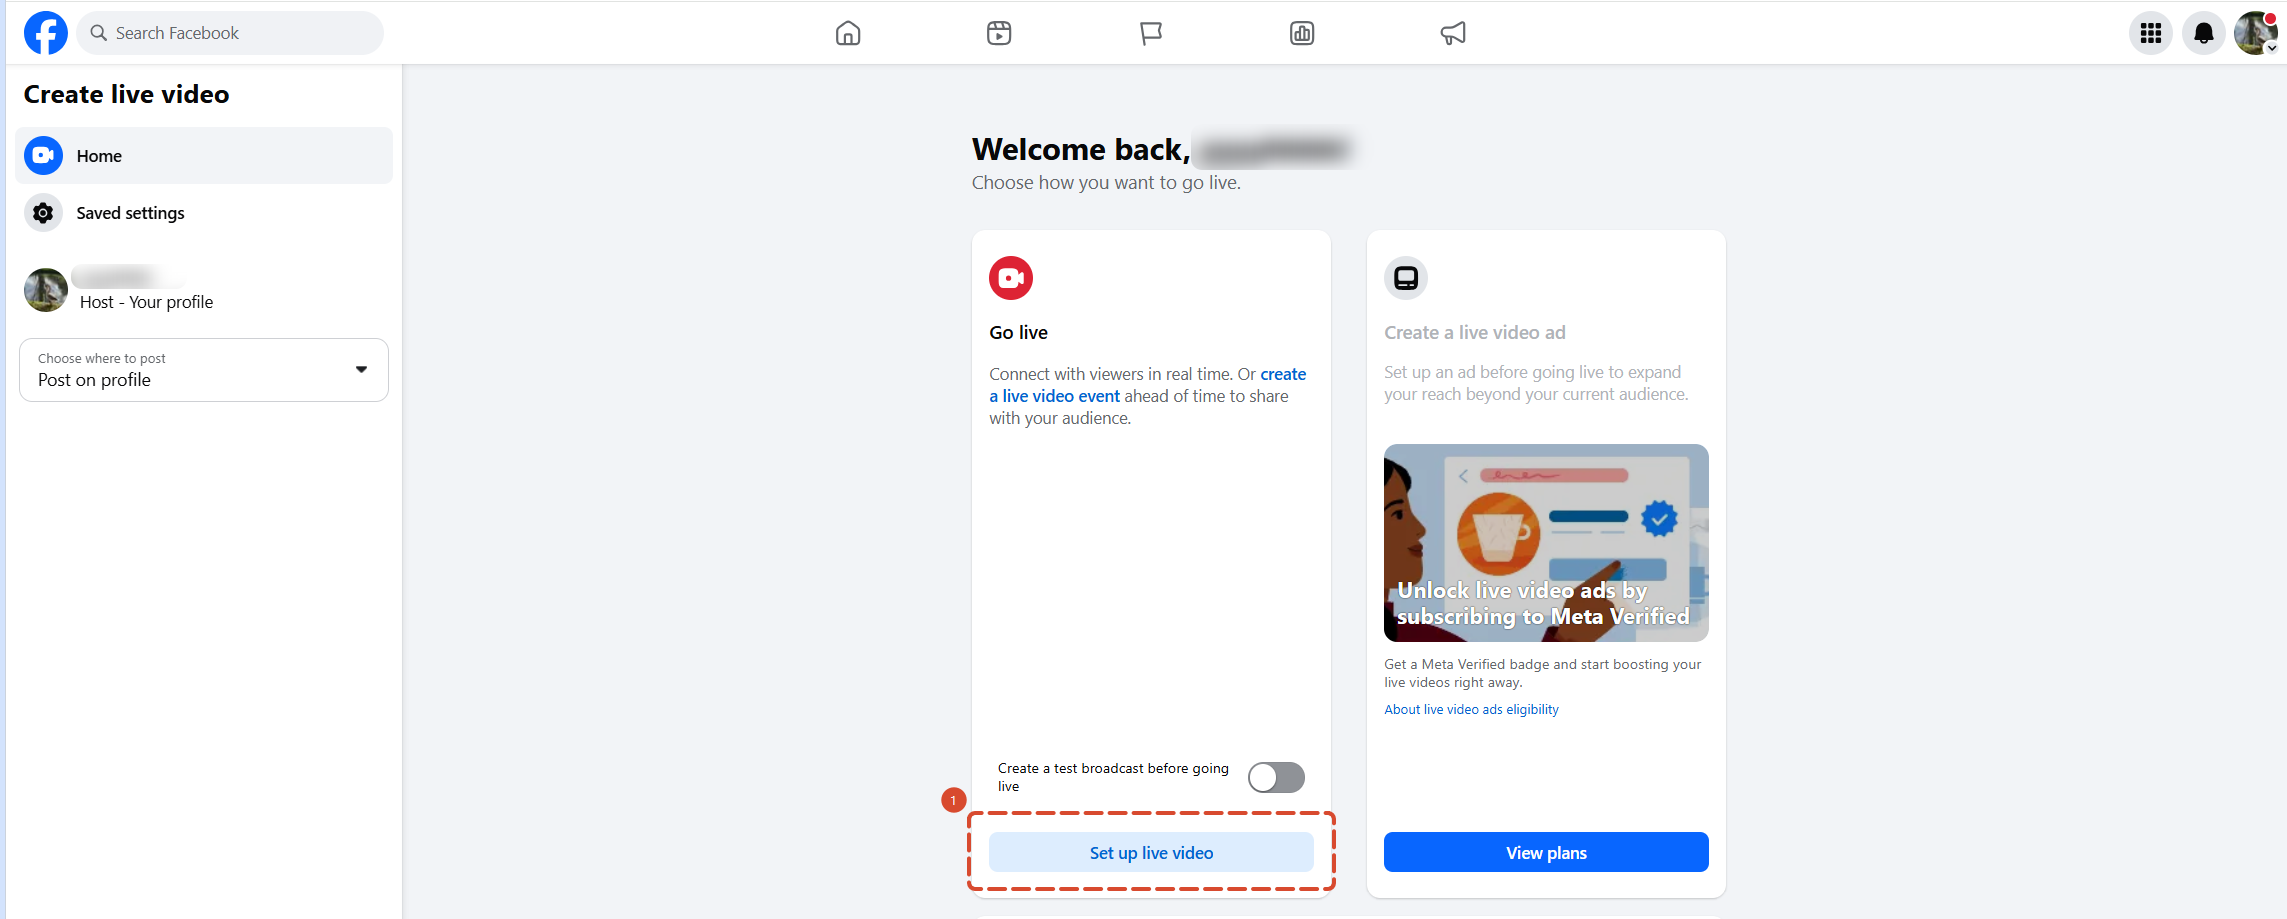
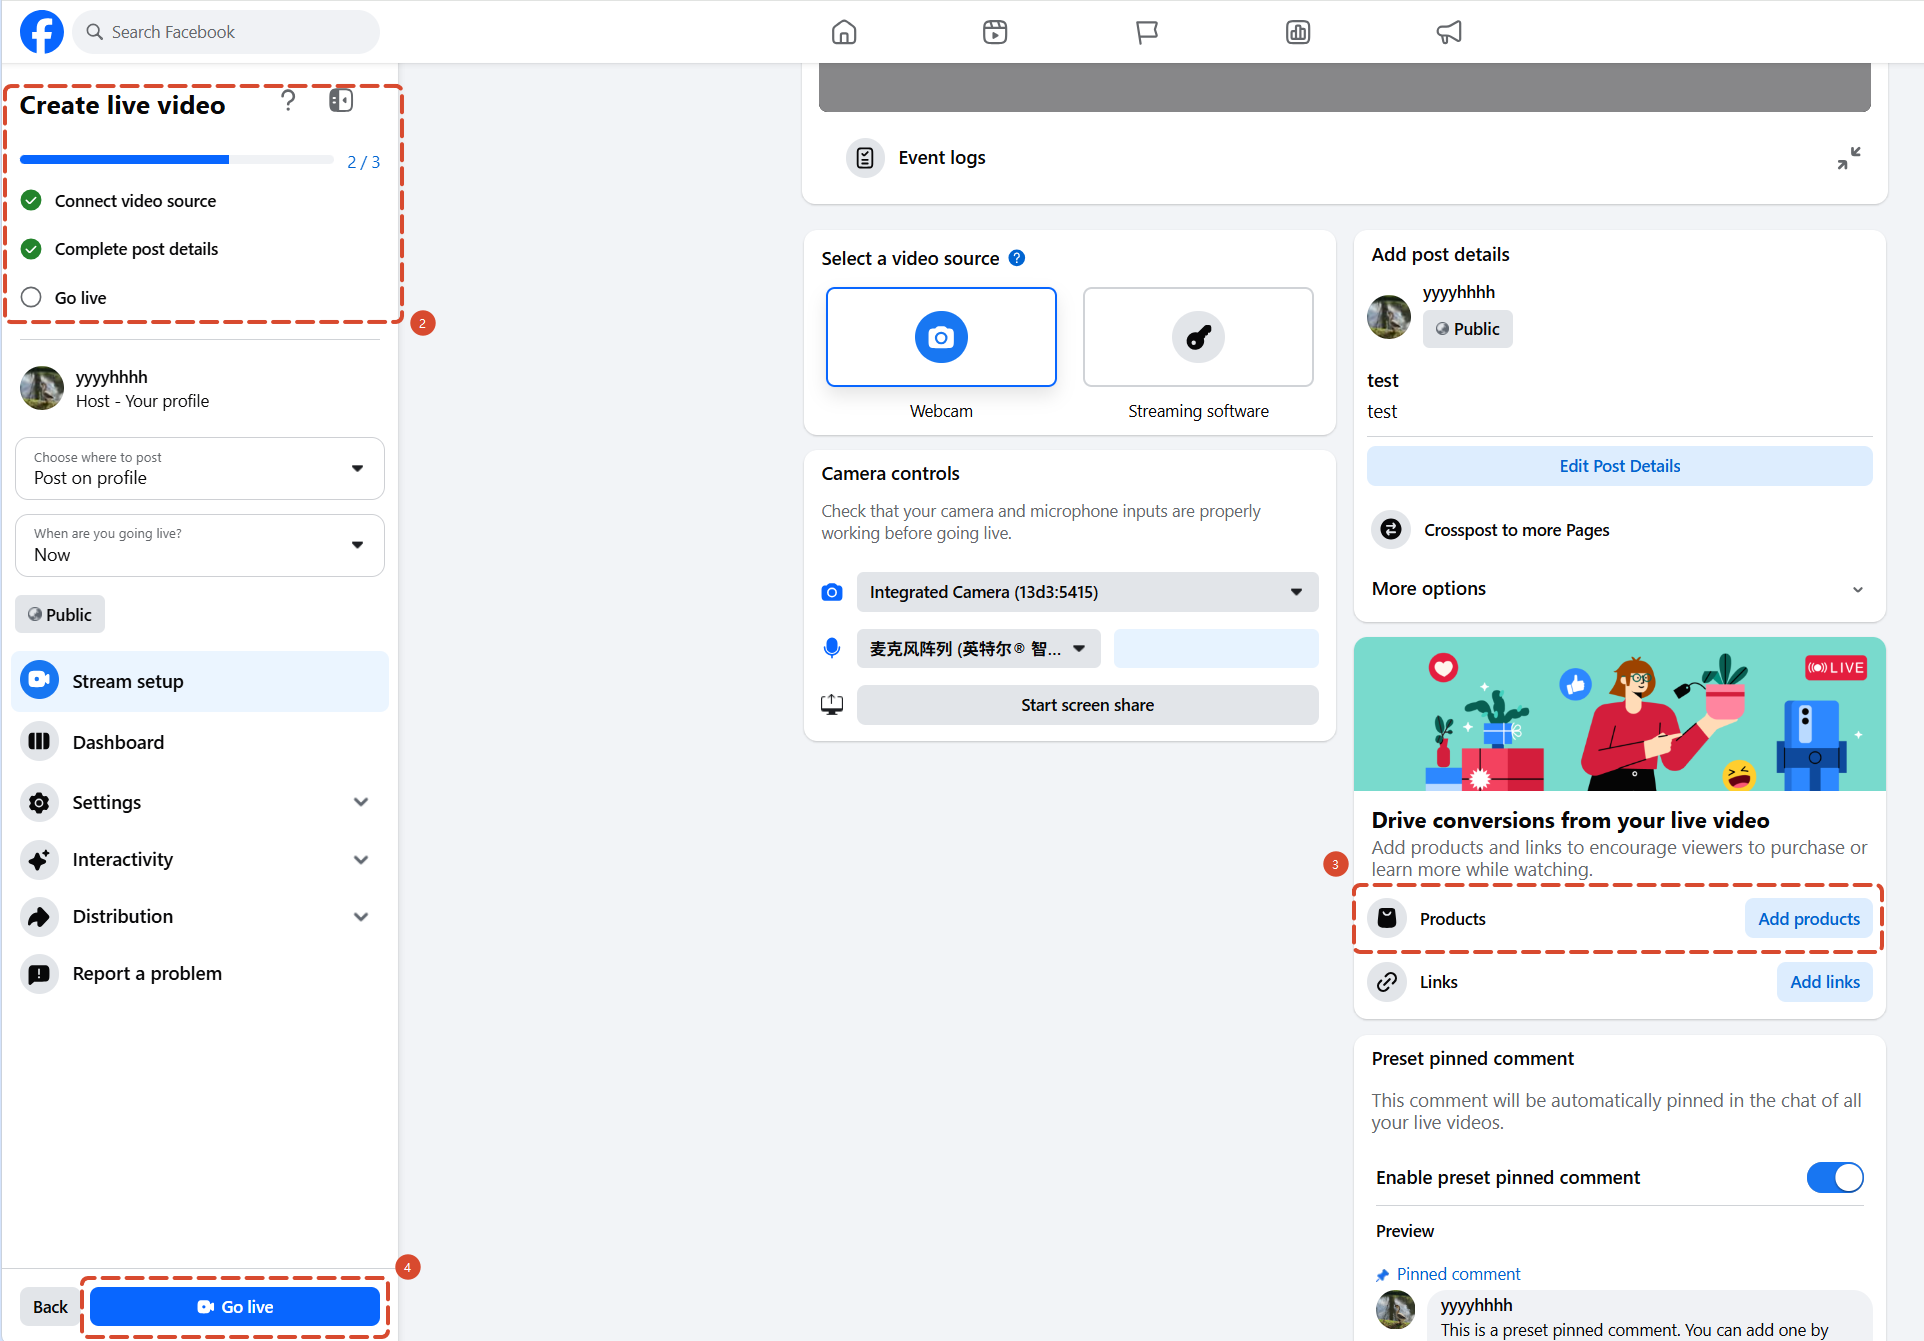
Option 3: Stream with OBS
1) Go to http://facebook.com/live/producer and select Streaming software as the video source
2) Copy the Stream key and Server URL shown on the page
3) In OBS, go to Settings > Stream
4) Select Facebook Live as the Service and paste the stream key
5) Click Start Streaming in OBS
6) Return to Live Producer and confirm the preview window shows your video
7) Once the picture looks good, click Go live
After installing a multi-RTMP plugin in OBS, you can push the same live session to Facebook and other live-streaming platforms simultaneously. If you already stream on other platforms, this lets you add Facebook as a channel without adding extra live sessions.
Material requirements
Please note that video material used for Facebook must not contain watermarks from third-party platforms. Content with watermarks is restricted in distribution and performs worse when used for ads, so original files without watermarks are recommended.
6. Actions During the Live Session
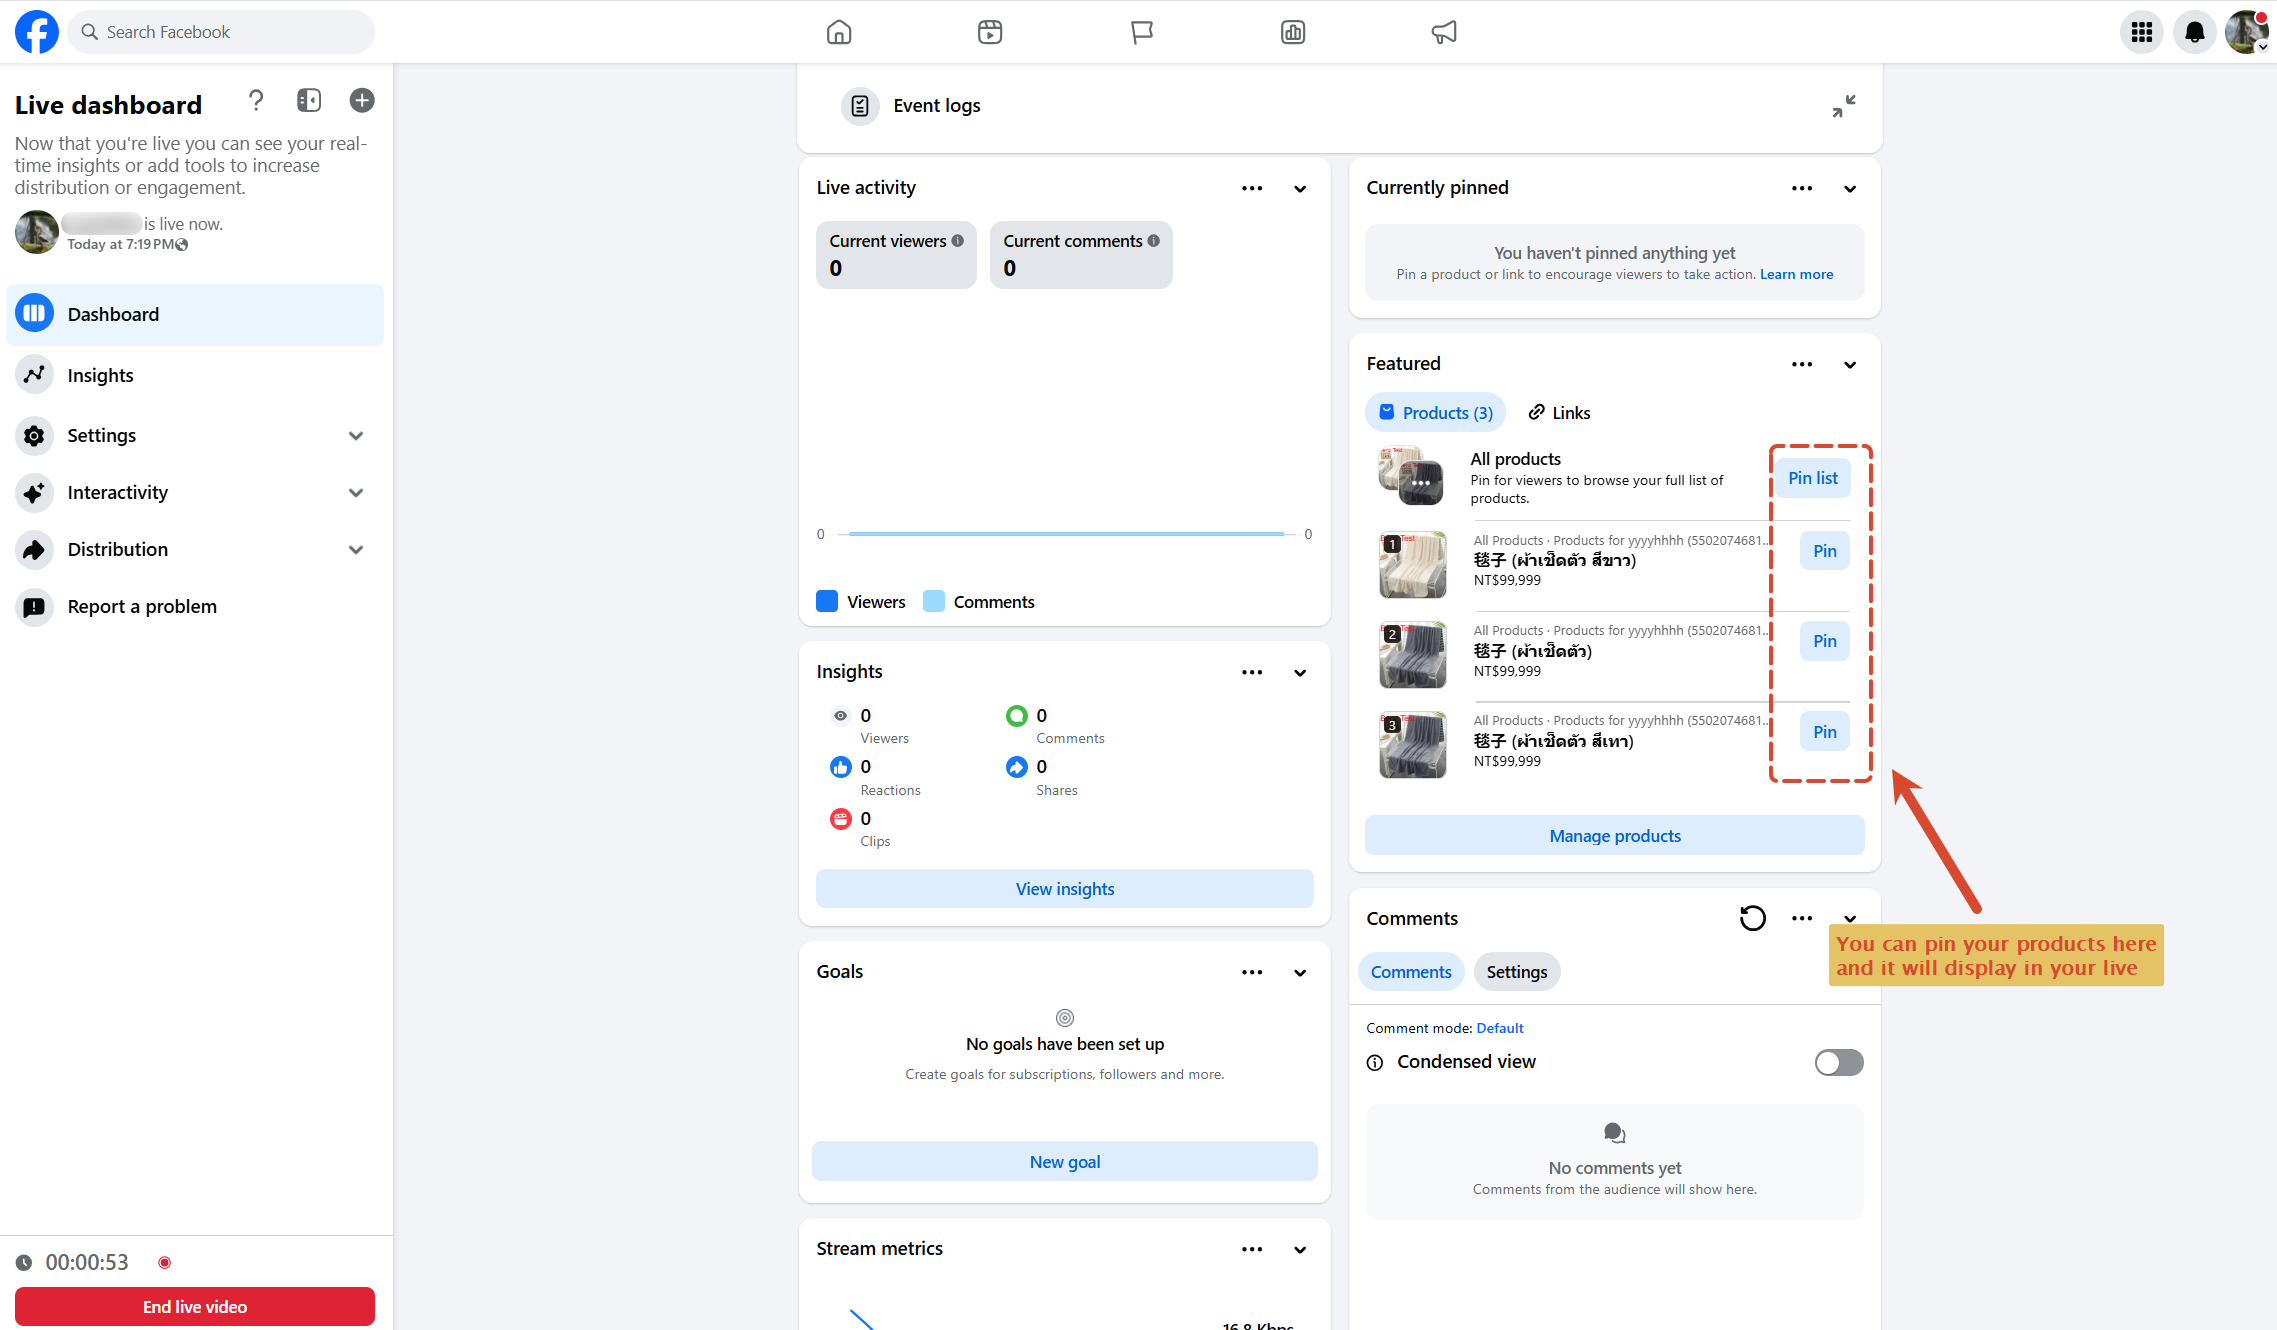
6.1 Display products
We recommend switching the displayed product to keep pace with your presentation, so the overlay always matches what you are talking about.
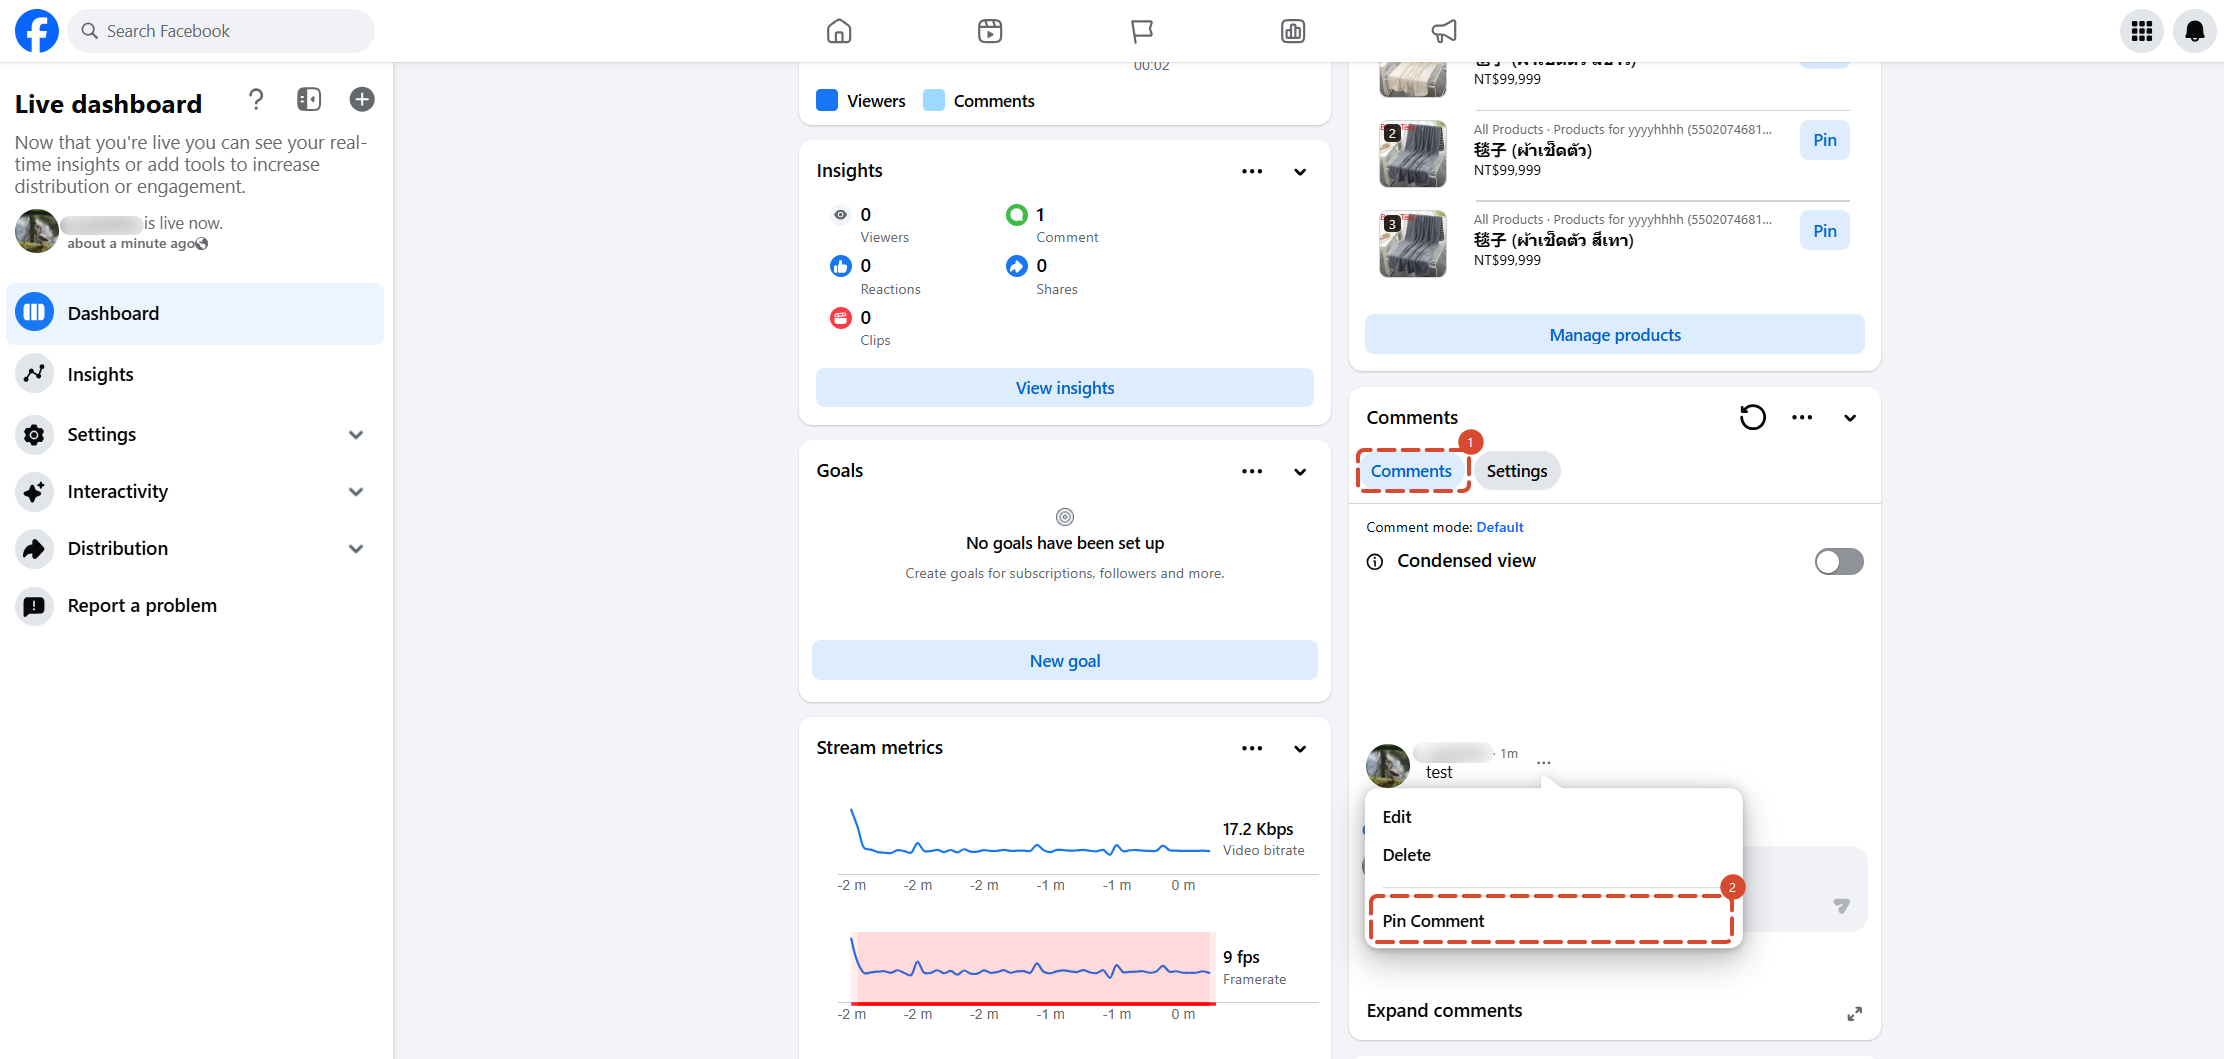
6.2 Pin comments
- Shipping time and shipping-fee policy
- Promo codes and campaign rules
- How to place an order and contact information
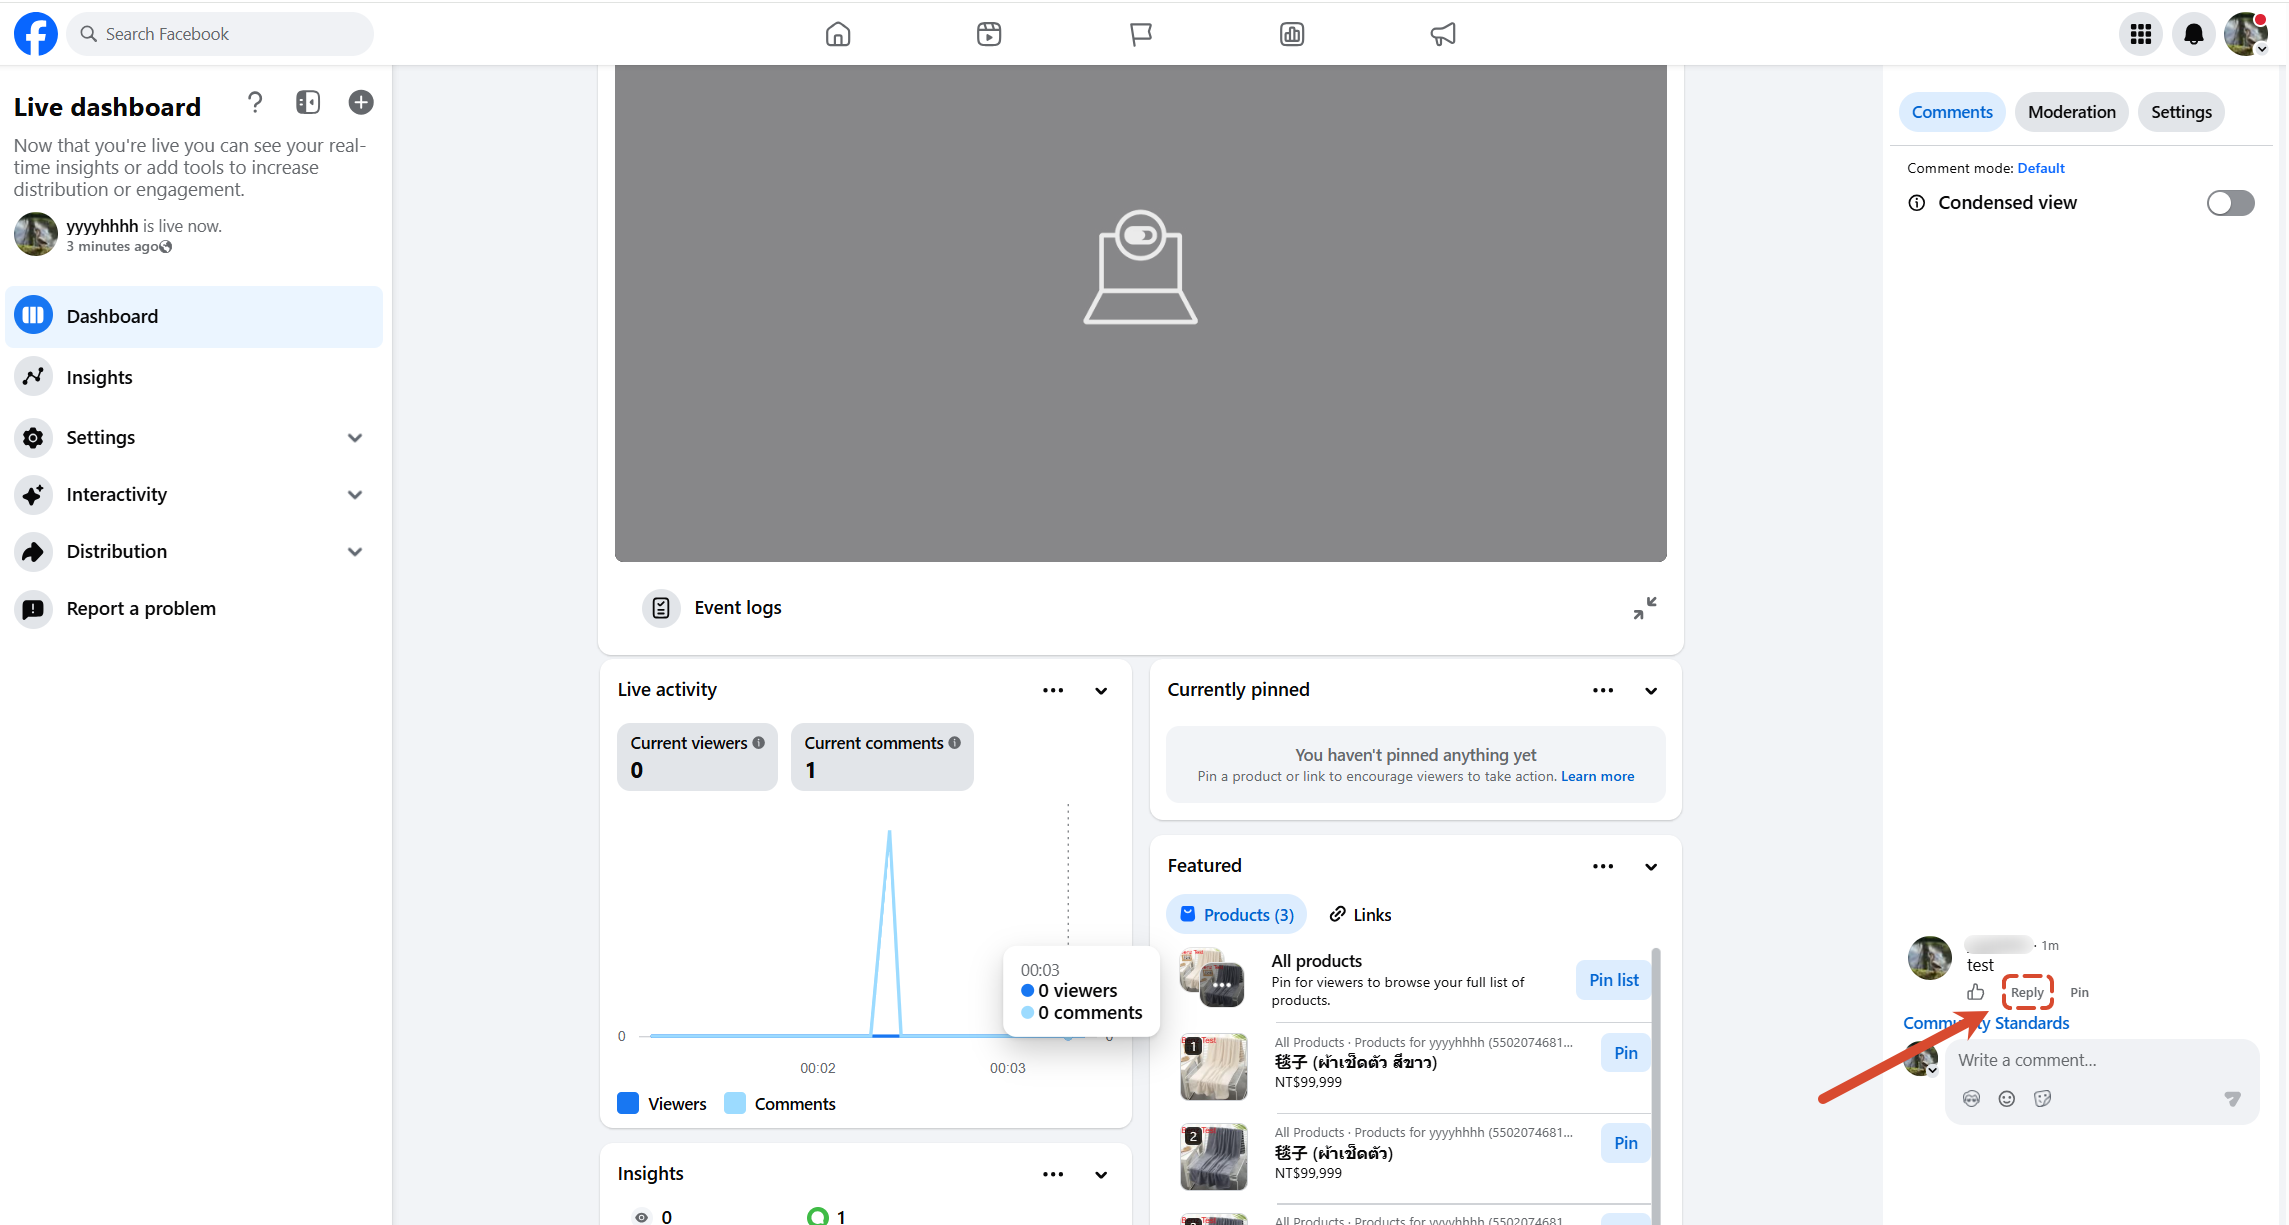
6.3 Interact with viewers
7.Promotion
7.1 Create Live Video Ads
- Quick start: use an ad proposal template
After creating from a template, you still need to check the following items one by one — they cannot be pre-filled by the template:
- The actual start and end time of the live session
- The budget amount
- The conversion location and landing page URL
- Whether the selected live video is this live session
- If you prefer not to use a template, the steps below cover creating the ad manually.
- Live video ads come in two types: immediate and scheduled. The differences between them are as follows.
Creation steps
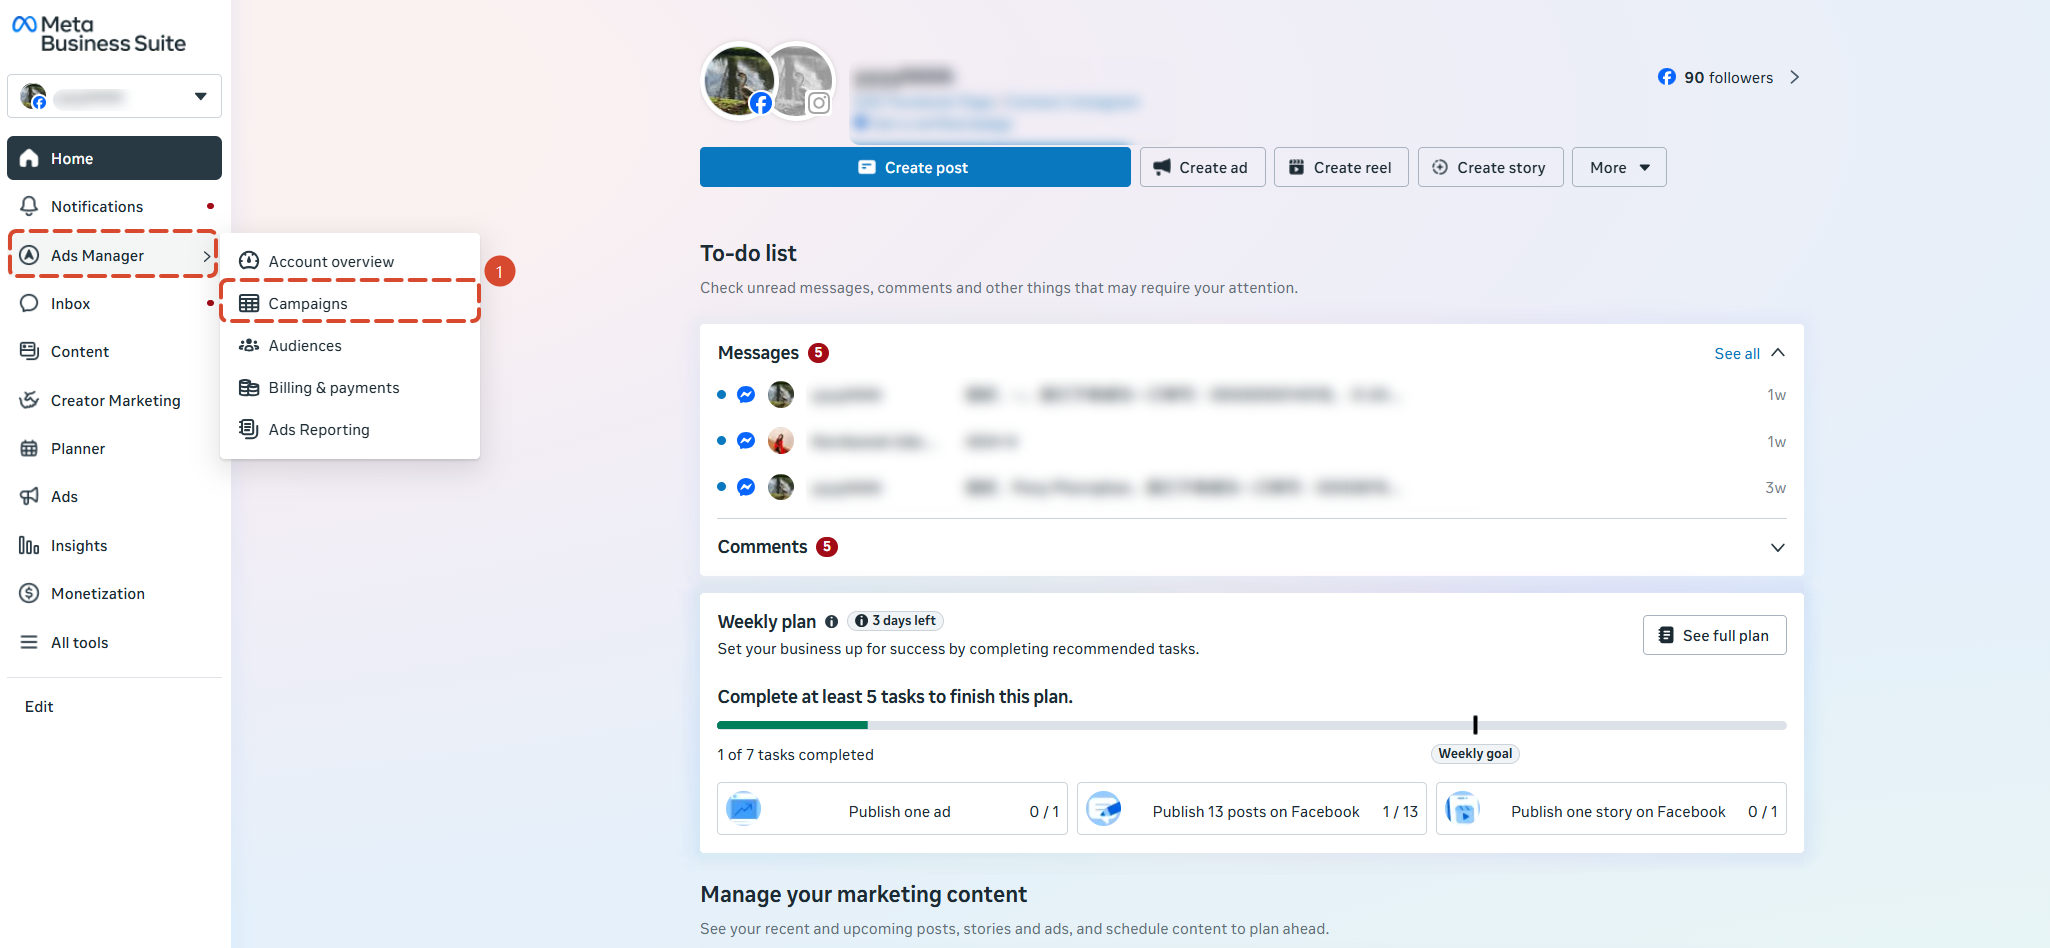
1) Go to Ads Manager and create a new Campaign
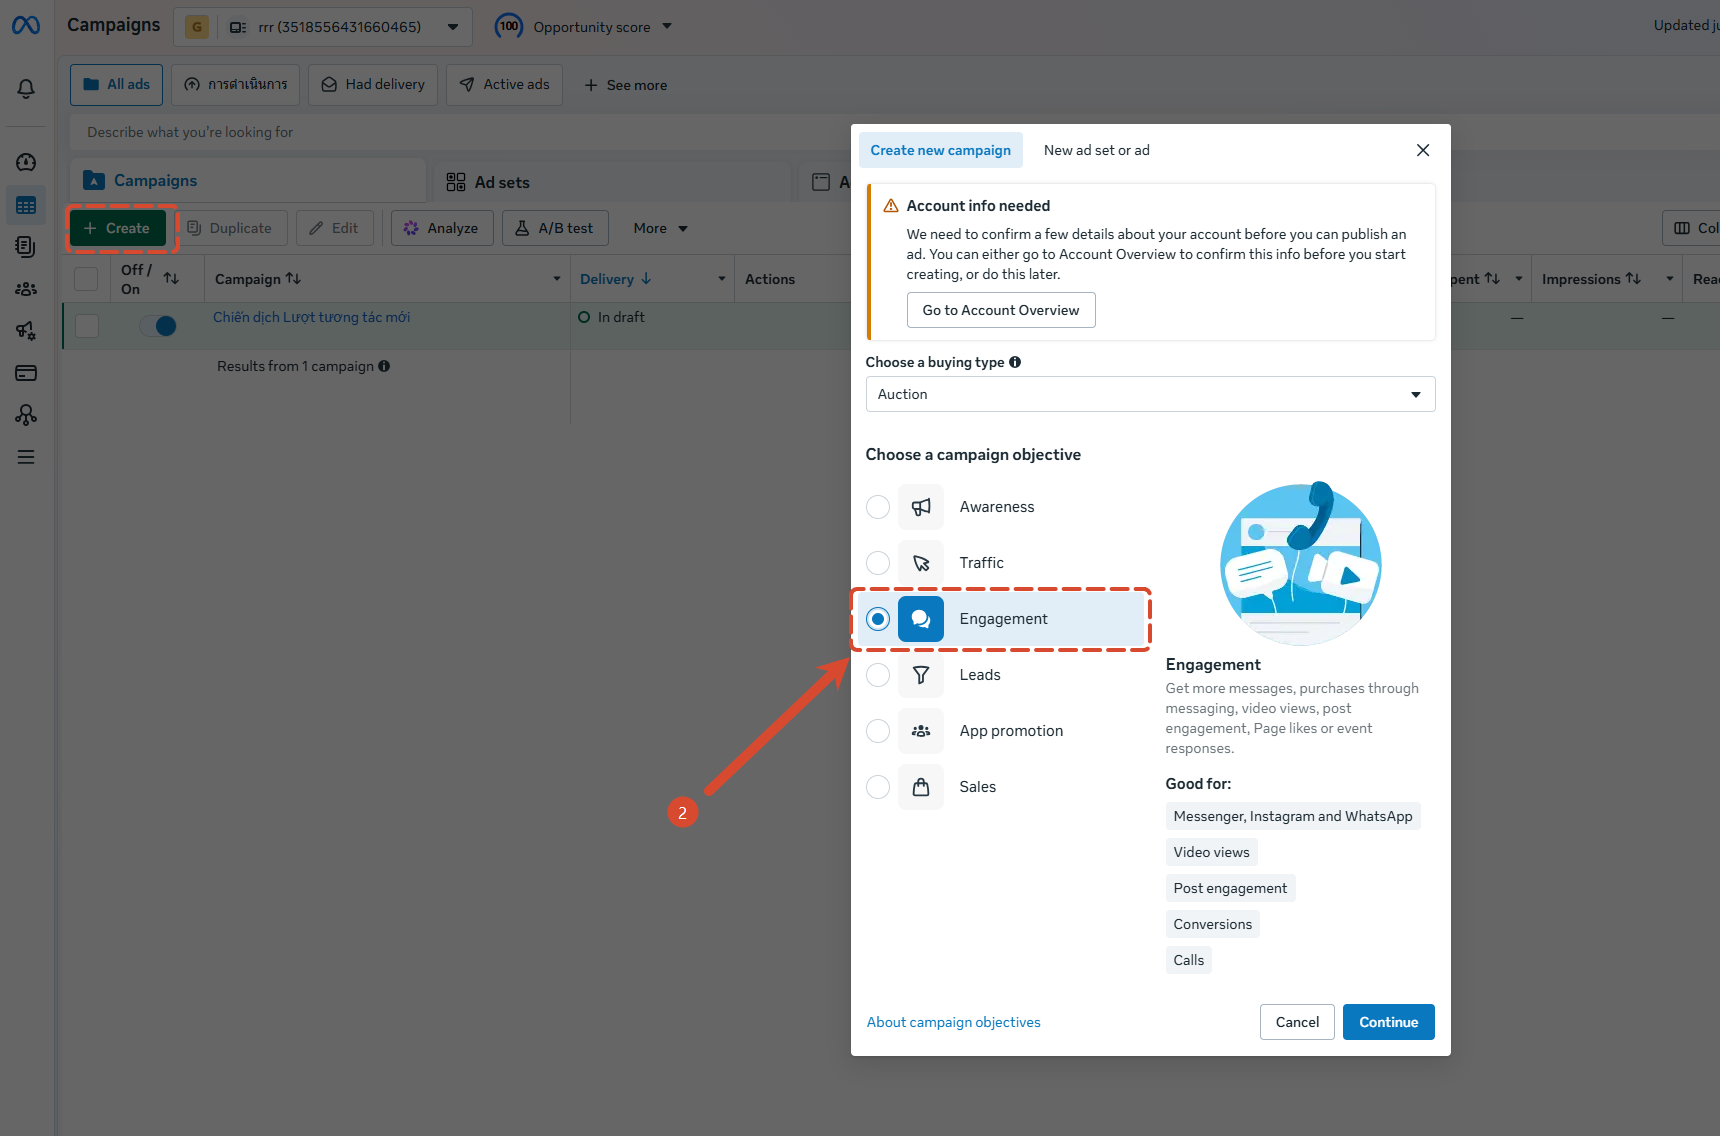
2) Select Engagement as the Campaign objective
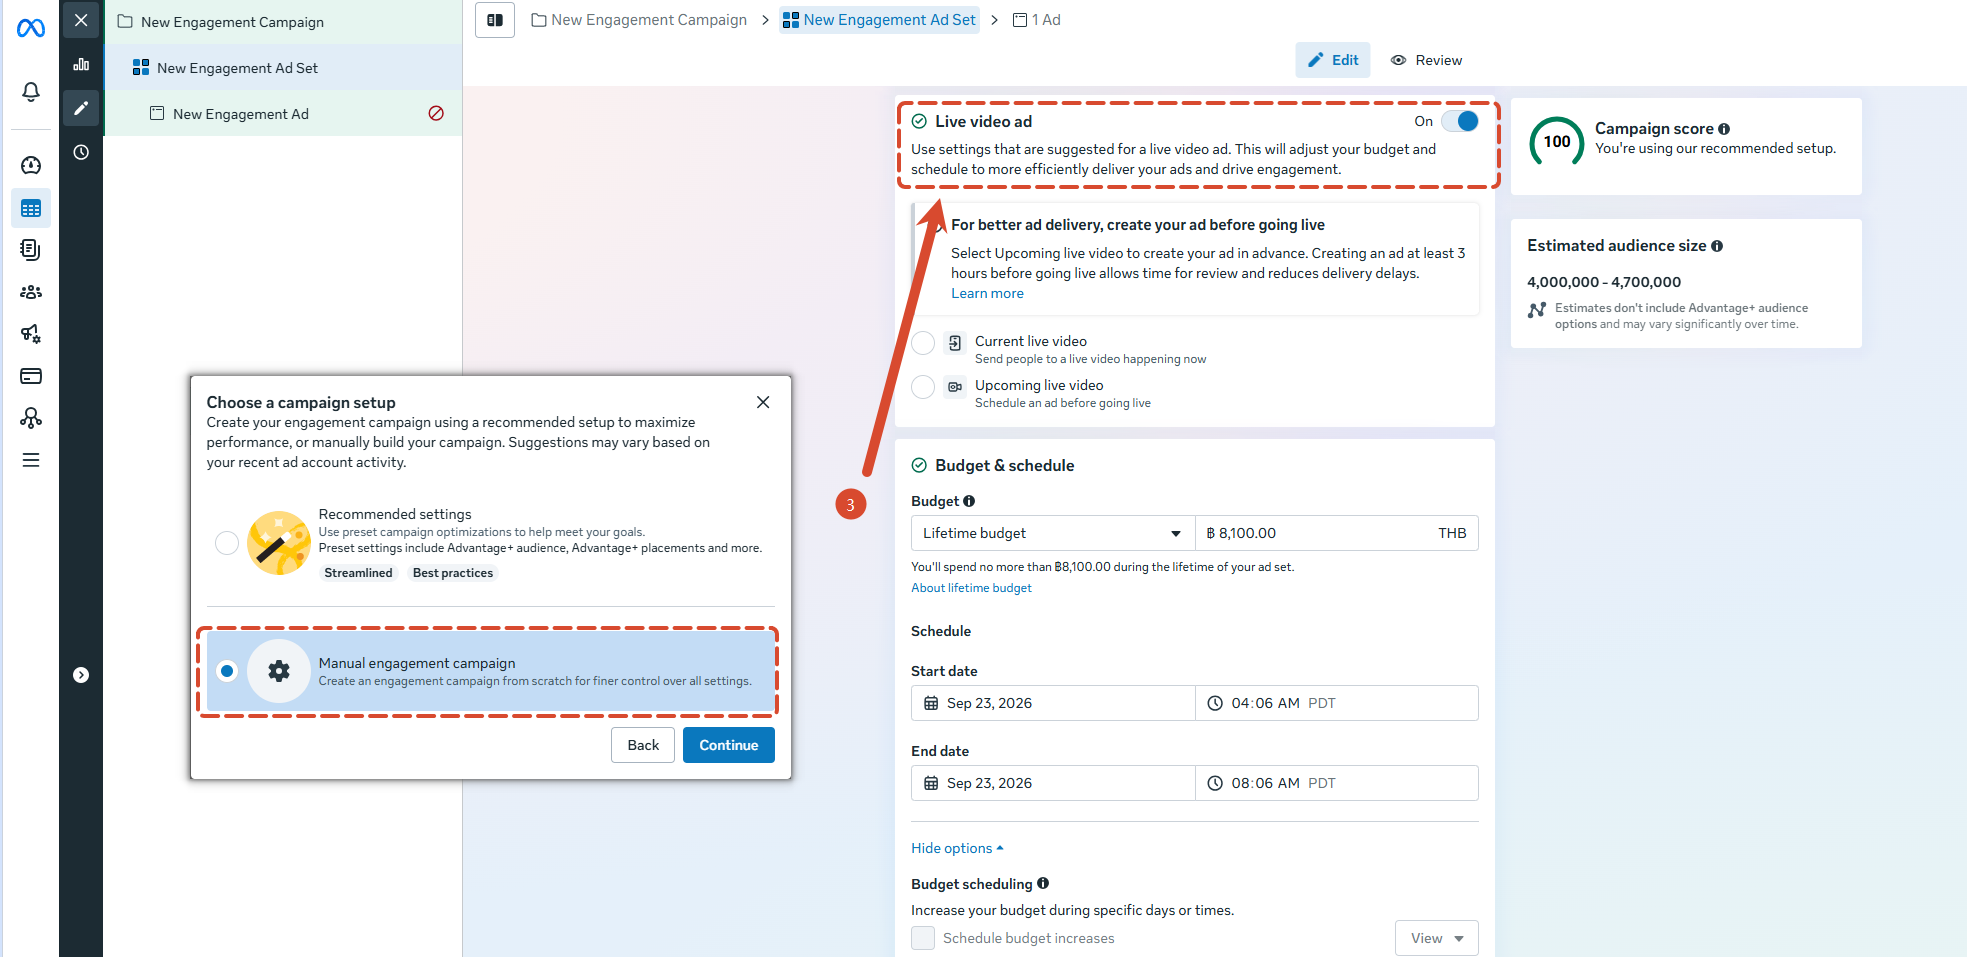
3) Turn on the Live video ad toggle
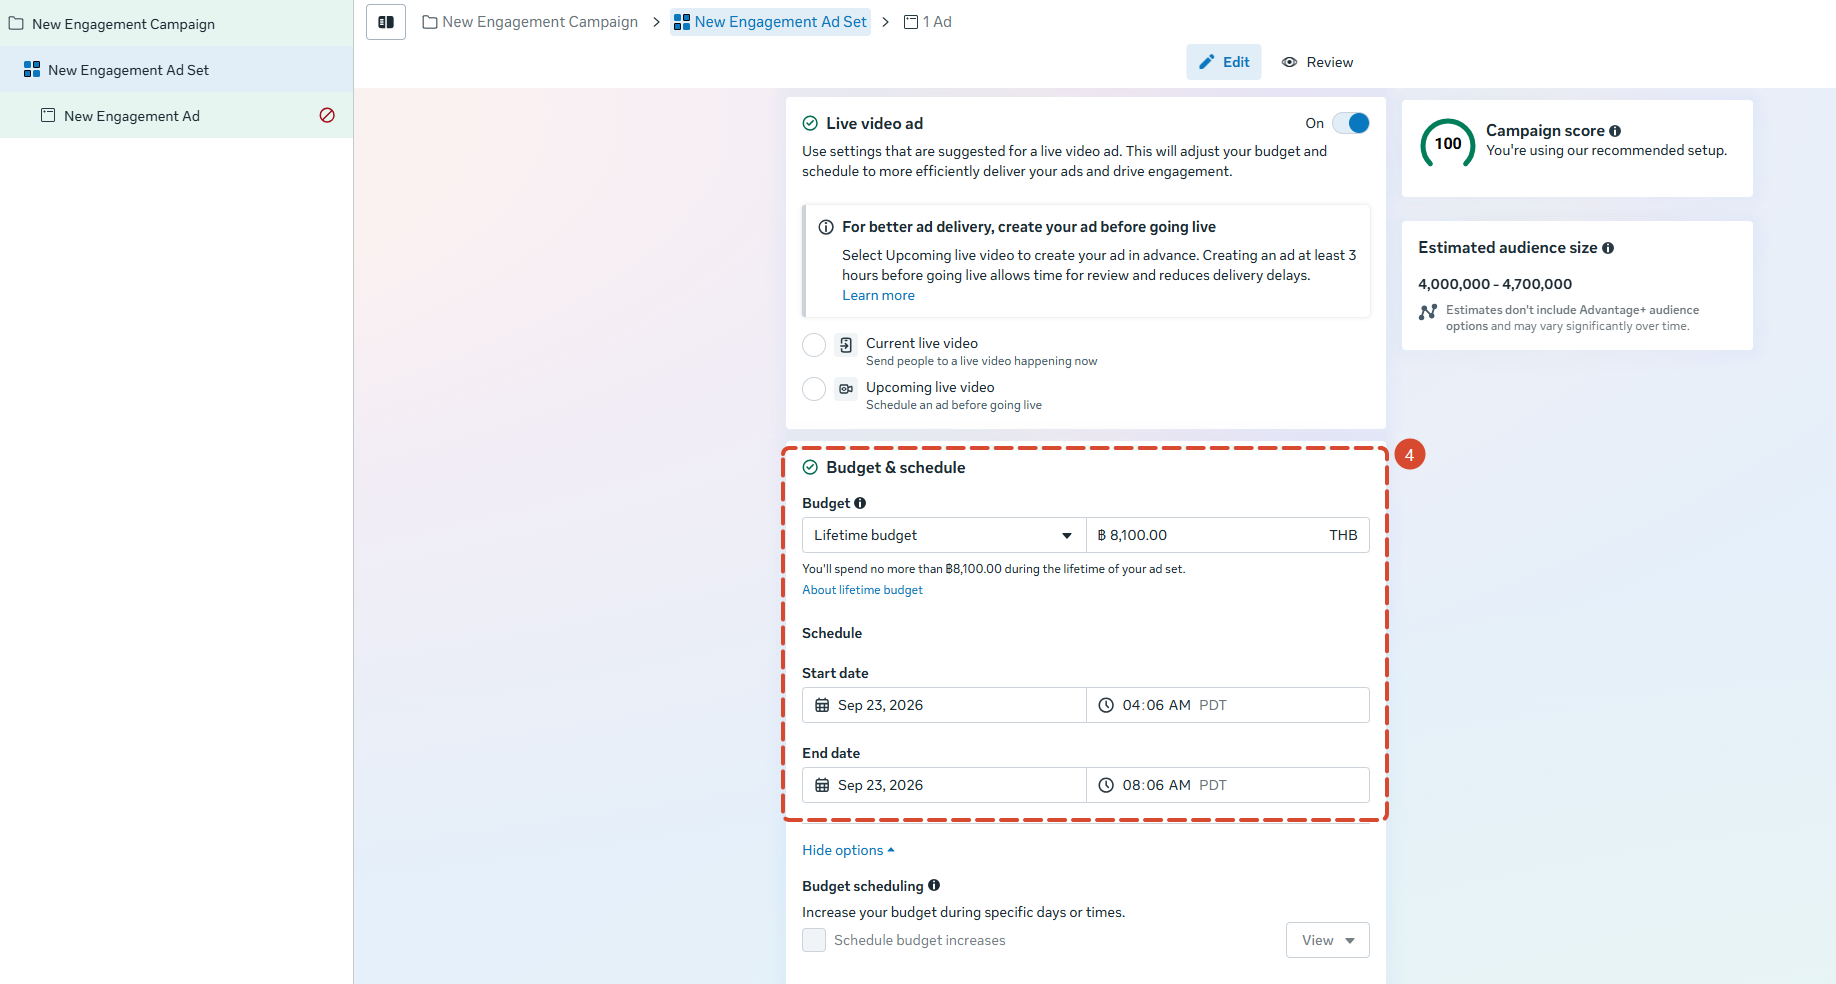
4) Select Lifetime budget as the budget type, and set the start and end time to match the live session window
5) Select Website or Messaging apps (Messenger / WhatsApp) as the Conversion location
6) At the ad level, in the creative source, select the live video that is about to start
7) If you want to track conversions, configure Meta Pixel or the Conversions API
8) Click Publish to publish the campaign
The campaign should be turned on at least 2 hours before the live starts.
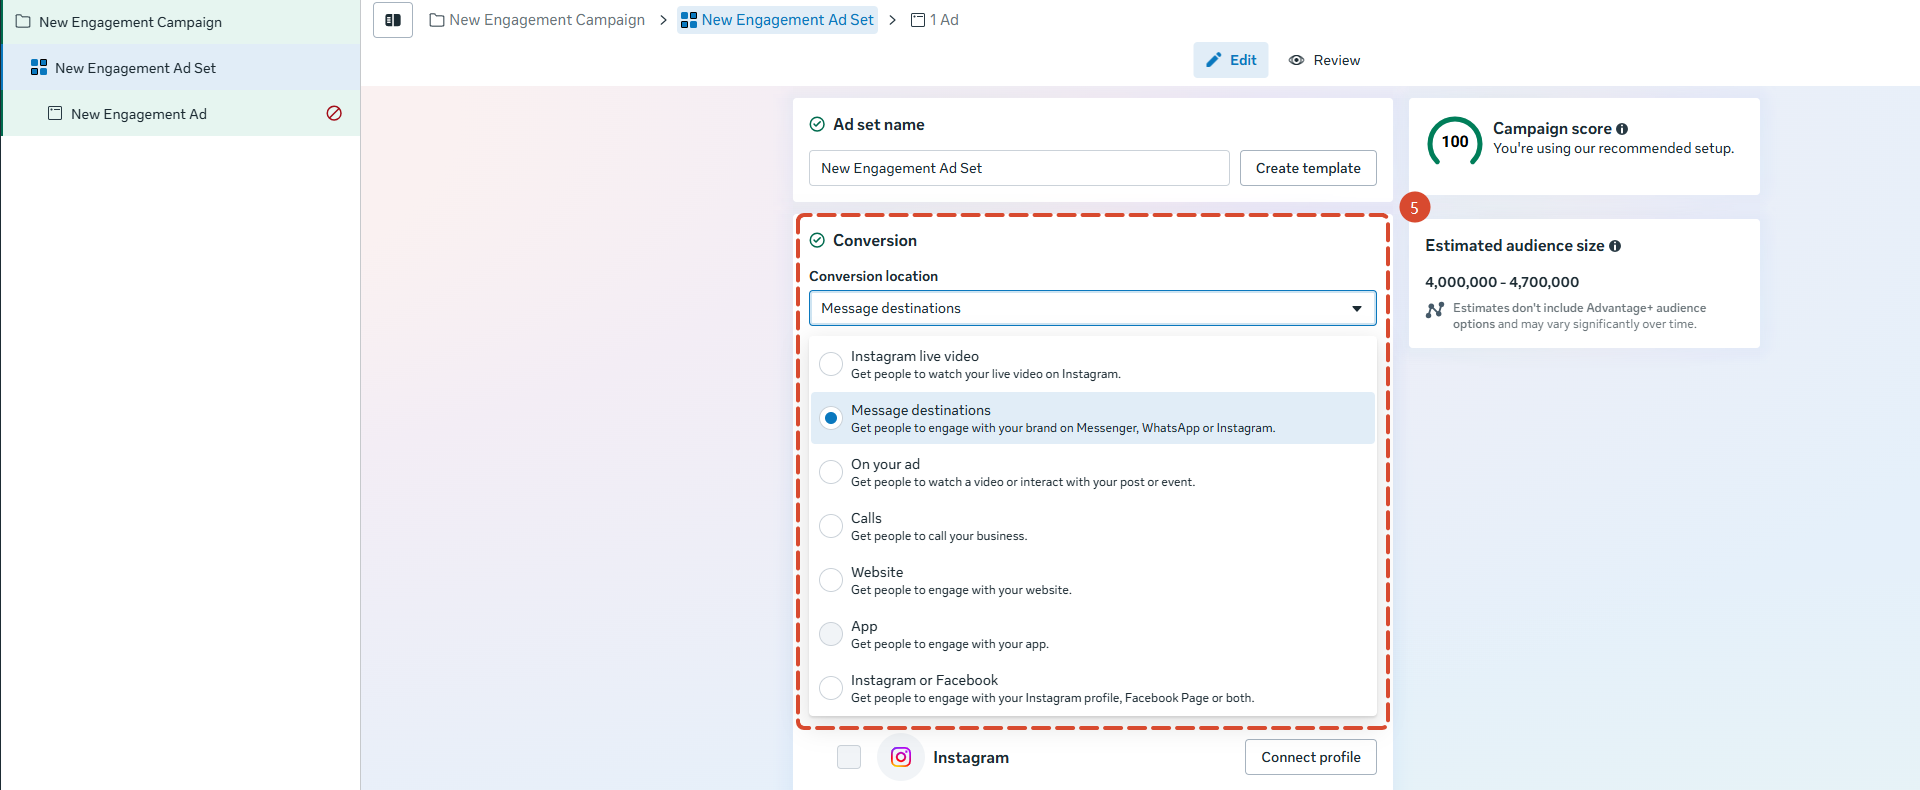
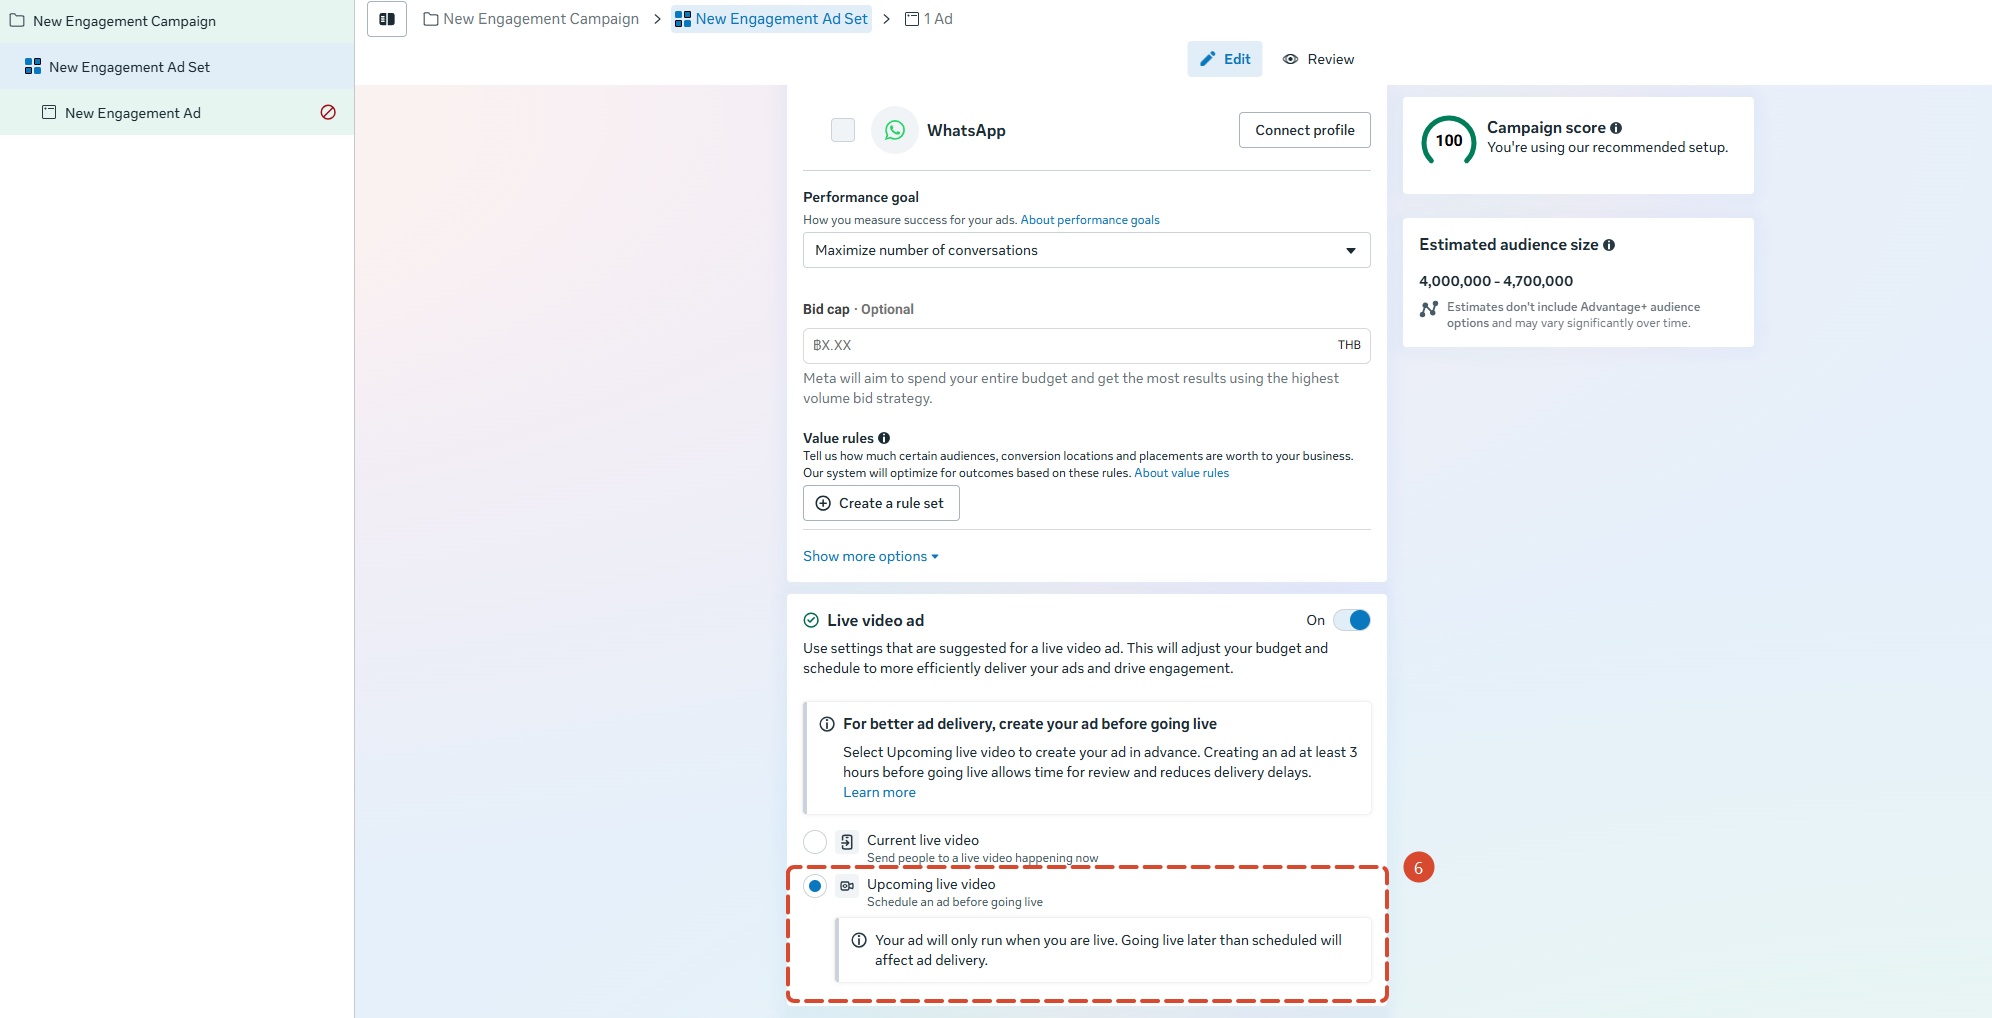
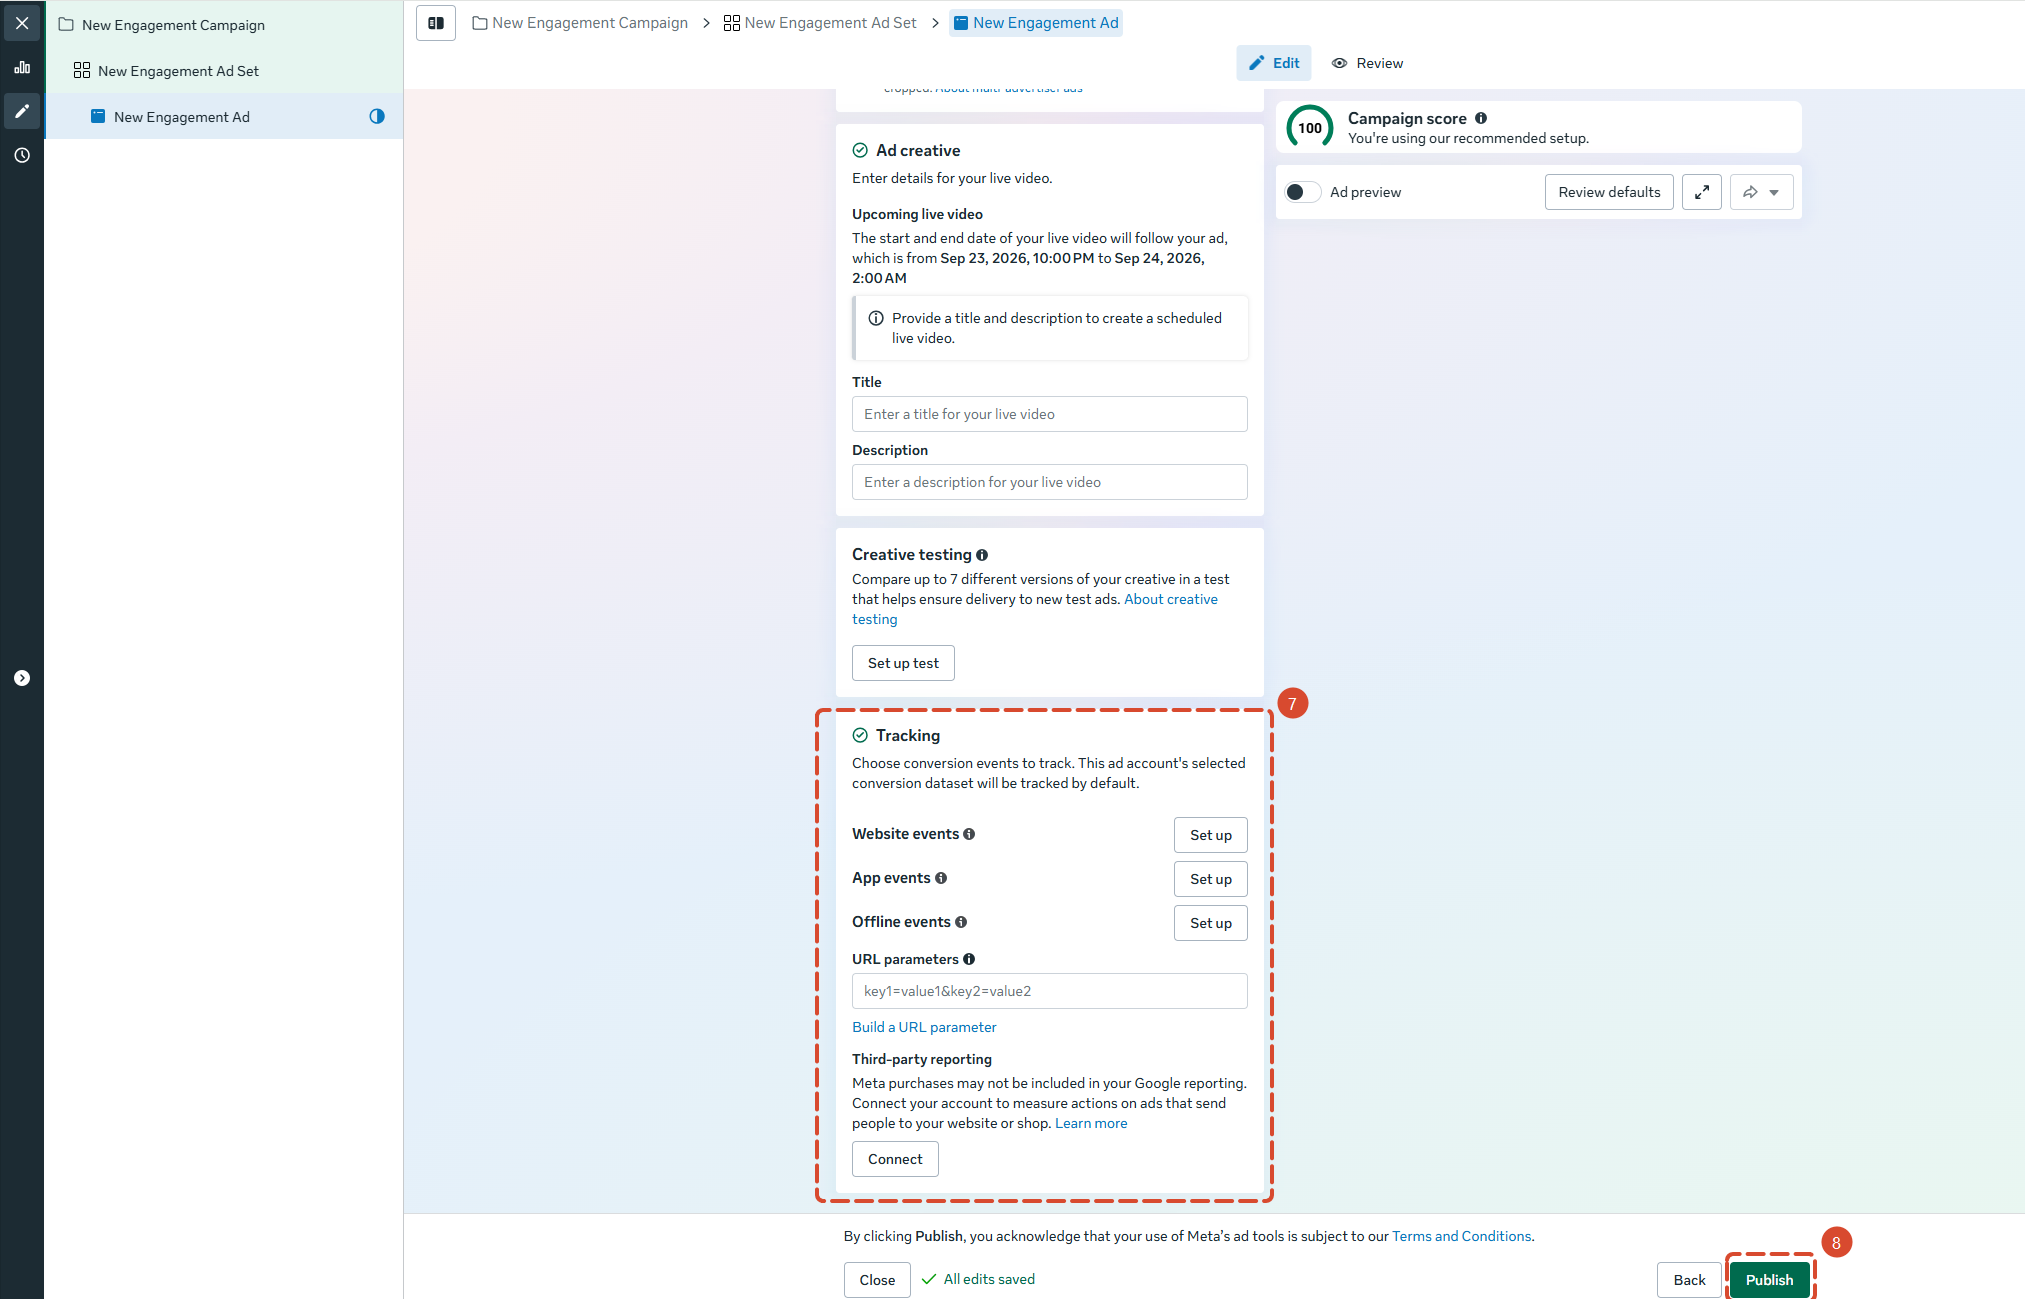
About the "Live video ad" toggle
This is a required step in the new Ads Manager interface. Only after this toggle is turned on will the optimization settings specific to live video ads appear, including options for scheduled delivery. If the toggle is not turned on, the flow continues as a normal video ad and settings such as scheduled delivery are unavailable.
About step 6
The option names for creative source and call-to-action at the ad level vary slightly depending on the Ads Manager version and the market of your account. The corresponding live video entry should be selected in the creative source, with the call-to-action set to an option that guides viewers to watch the live. If the names shown on your screen differ from this manual, follow what is actually displayed.
About turning on the campaign early
Ads only start delivering after the live actually begins; turning the campaign on early does not incur any spending. The purpose of turning it on early is to reserve time for review and system preparation. If you turn it on shortly before going live, the ad may still be under review, and the beginning of your live may not receive ad traffic.
Repeat live sessions: save settings for next time
If you go live on a fixed schedule, you can check Save these settings for next time when creating the ad in Live Producer.
Once checked, your ad settings for this session are carried over automatically the next time you go live. After confirming everything is correct, you can go live directly without reconfiguring budget, audience, creative and other options. This feature suits live sessions with a fixed weekly schedule and noticeably reduces repetitive setup work.
7.2 Suggested Delivery Settings
- For live time, we suggest 7–9 PM local time, when buyers are most active and conversions are best.
- We suggest streaming on weekends; if you stream on weekdays, Friday is the best choice. Try to keep a fixed time slot so viewers build a habit.
- AI digital-human live hosts are not yet supported by Facebook. We recommend starting with a real host, as real-person live hosts achieve better conversions.
- The recommended minimum total budget for the live is the cost per conversion of your other campaigns multiplied by 10. For example, if your cost per conversion is USD $2, we recommend a total budget of no less than USD $20 for the live. If you have no historical data yet, one or two sessions with a smaller budget are a reasonable starting point, with the budget adjusted afterward based on the actual cost per conversion you obtain.
- At least one ad exists in the ad set
- The campaign is turned on
- The payment method is valid, with available balance higher than the planned spend
- The scheduled start time of the live matches the ad delivery start time
Ad creative should not be edited after the live has started. Any creative edit sends the ad back into review and interrupts delivery. If adjustments are needed, they are best made before the next live session.
8.Wrap-Up
8.1 After the Live Session Ends
Promote the live replay
The live video stays on your Page and can be promoted further as a normal video ad. This is available to all advertisers and requires no additional eligibility.
1) Create a new campaign in Ads Manager
2) Select the ended live video in the creative source
3) Complete the setup as for a normal video ad and publish it
Publish Live Clip Ads
After the live ends, the system automatically extracts highlight clips from the live content as Live Clip Ads — no separate filming or editing needed.
Trigger conditions:
- The live session lasted at least 10 minutes
- There was viewer interaction during the live
Review live performance data
The Live Shopping Dashboard shows the data for this live session, including:
- Views and watch time
- Number of comments and interactions
- Product clicks and conversion data
Follow up with engaged viewers
Viewers who commented, messaged or clicked products during the live can be followed up with through Messenger or WhatsApp. They can also be reached directly in future live sessions without running ads again.
Save ad settings for the next session
If you go live on a fixed schedule, you can check Save these settings for next time in Live Producer so your ad settings for this session carry over automatically next time. See 4.1 Create Live Video Ads for setup details.
8.2 Scheduling Suggestions
Once a schedule is set, keeping it stable matters more than fine-tuning time slots. After viewers form a fixed watching habit, the stability of your organic traffic improves noticeably.
With a fixed schedule, you can check Save these settings for next time when creating ads, so your ad settings are reused automatically for each live session. See 4.1 Create Live Video Ads for details.
8.3 Content Policy and Account Health
Facebook live sessions are governed by Meta's Community Standards. The following content can cause your live to be interrupted, removed, or your account to be restricted.
Prohibited content
- Selling prohibited items, including tobacco, alcohol, drugs, weapons, live animals, etc.
- False advertising or misleading claims about product efficacy
- Using unauthorized music
- Reposting copyrighted content from other creators
- Hate speech, harassment or adult content
Content that needs labeling
AI-generated images, videos or audio must be labeled as required by the platform.
Ad rejection rate
Your ad rejection rate should stay below 10%. An excessively high rejection rate affects the evaluation of your account status and may affect your eligibility for live video ads. You can check your account status in Account Quality.
Note
Facebook does not operate a seller-rating system and will not restrict your content distribution based on shipping time, return rate or buyer ratings. Account health mainly depends on content compliance and ad review approval rate.
9. Related Resources
https://www.facebook.com/live/producer Go live from a computer, get your stream key, view live clips
https://business.facebook.com/commerce Create and manage product catalogs
https://business.facebook.com Manage ad accounts, Pages and member permissions
https://www.facebook.com/business/help Availability and eligibility of live video ads, ad setup instructions
https://www.facebook.com/business/live-shopping Live shopping solutions and partner directory
Related articles
How to centrally manage Facebook live orders with BigSeller > >
Is this content helpful?
Thank you for your feedback. It drives us to provide better service.
Please contact us if the document can't answer your questions