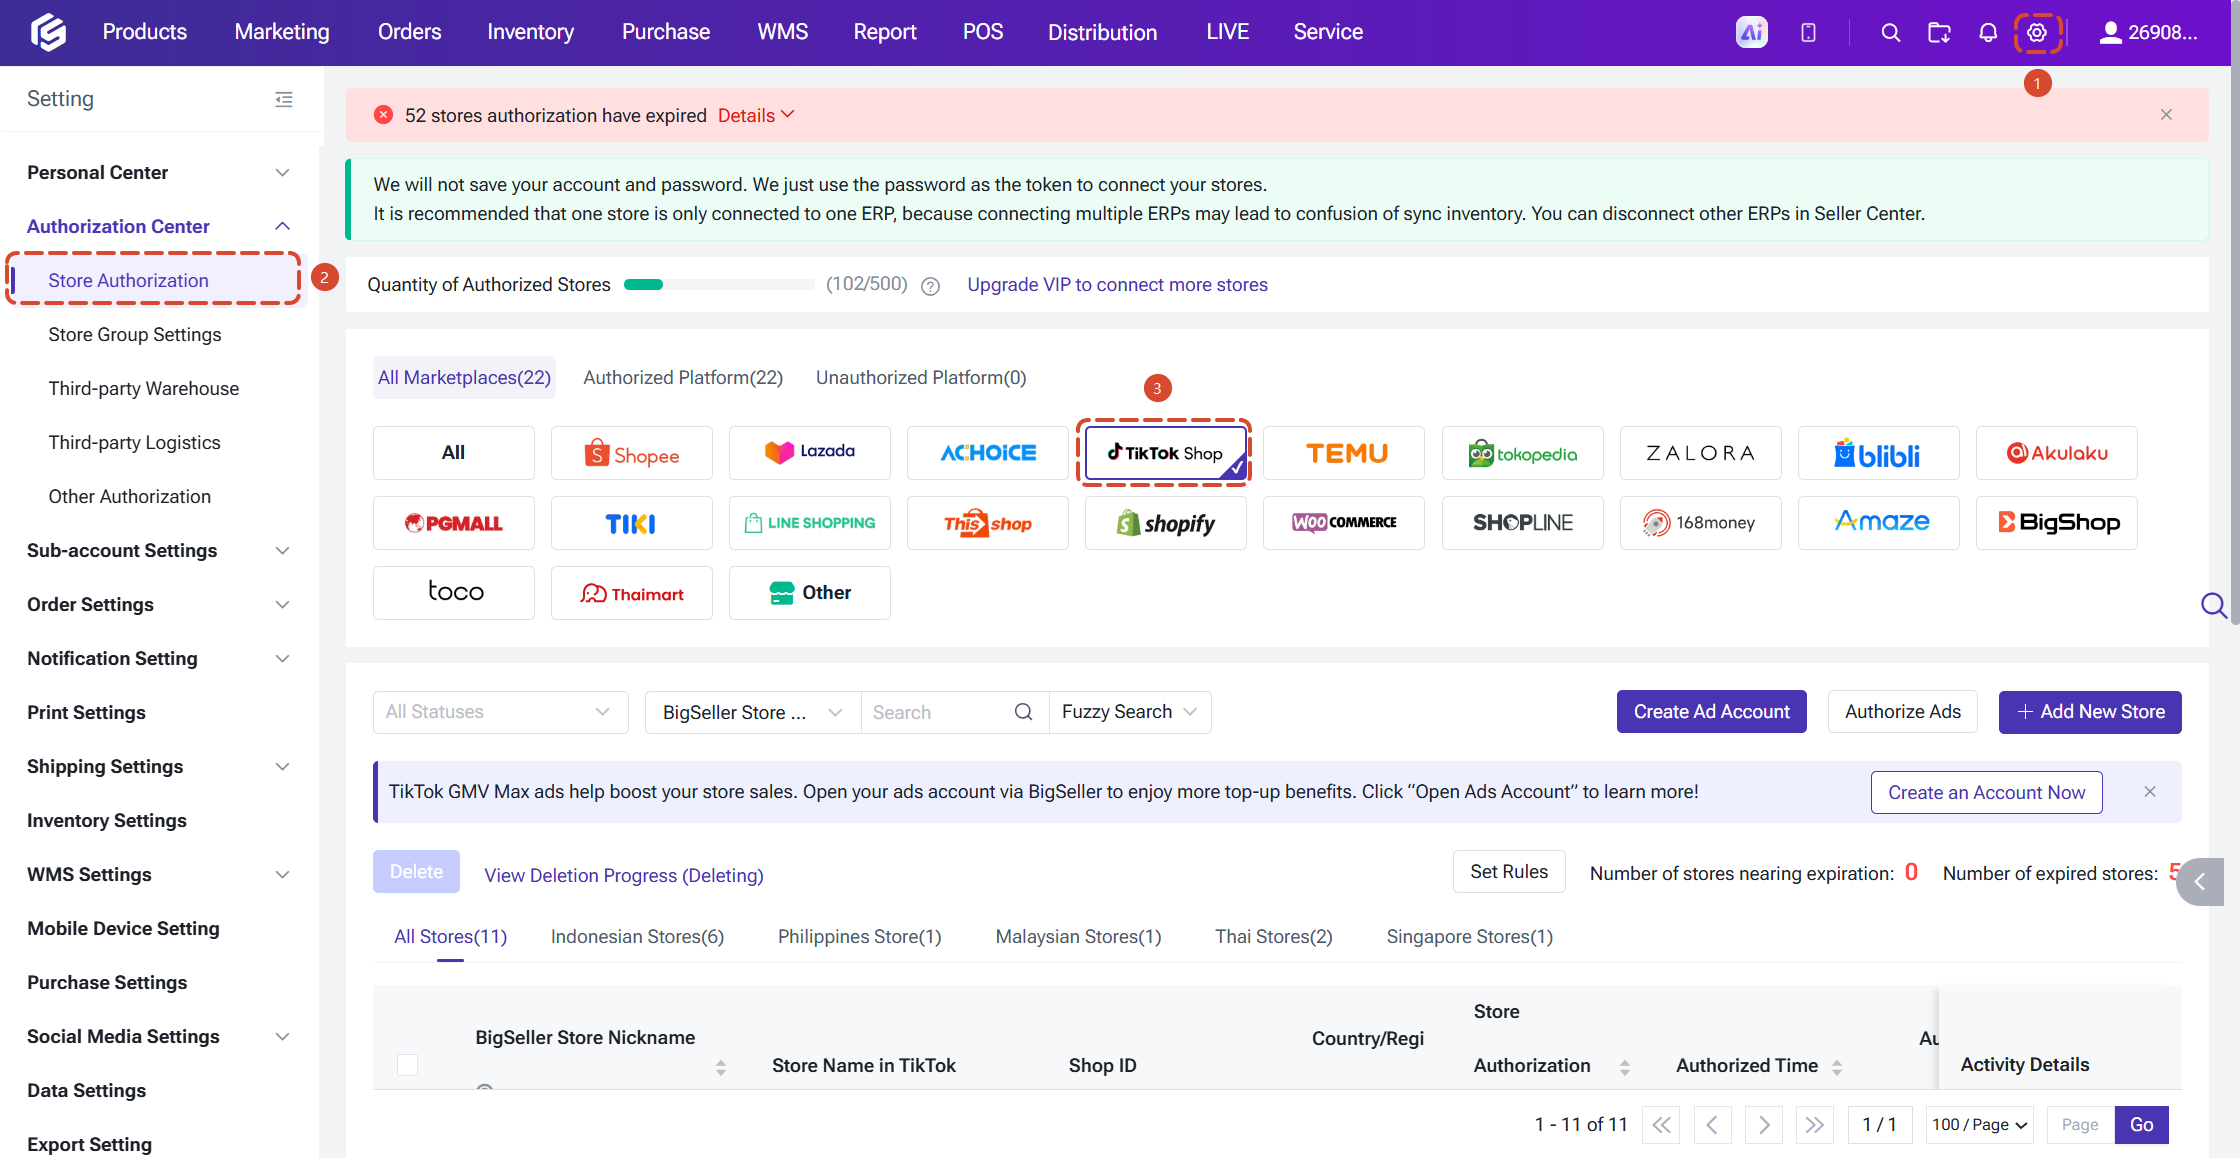
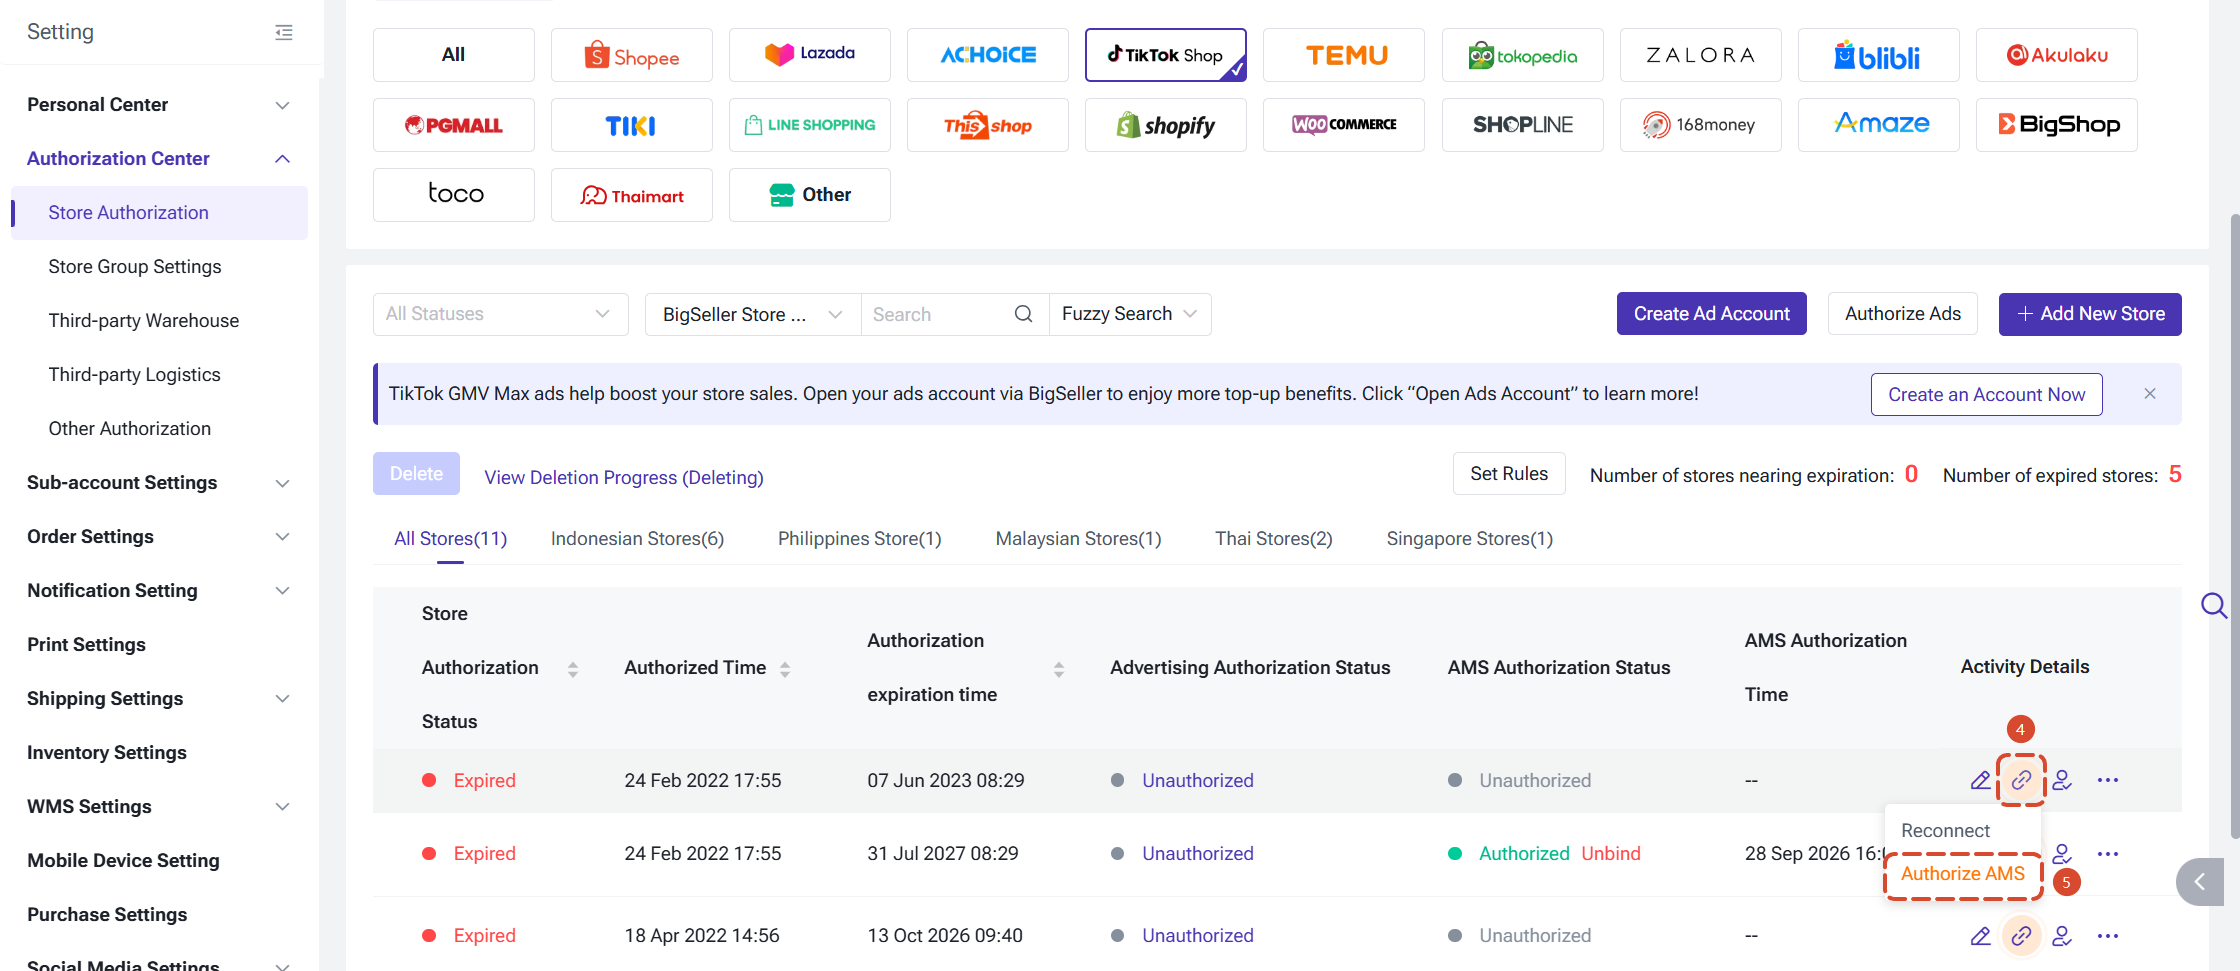
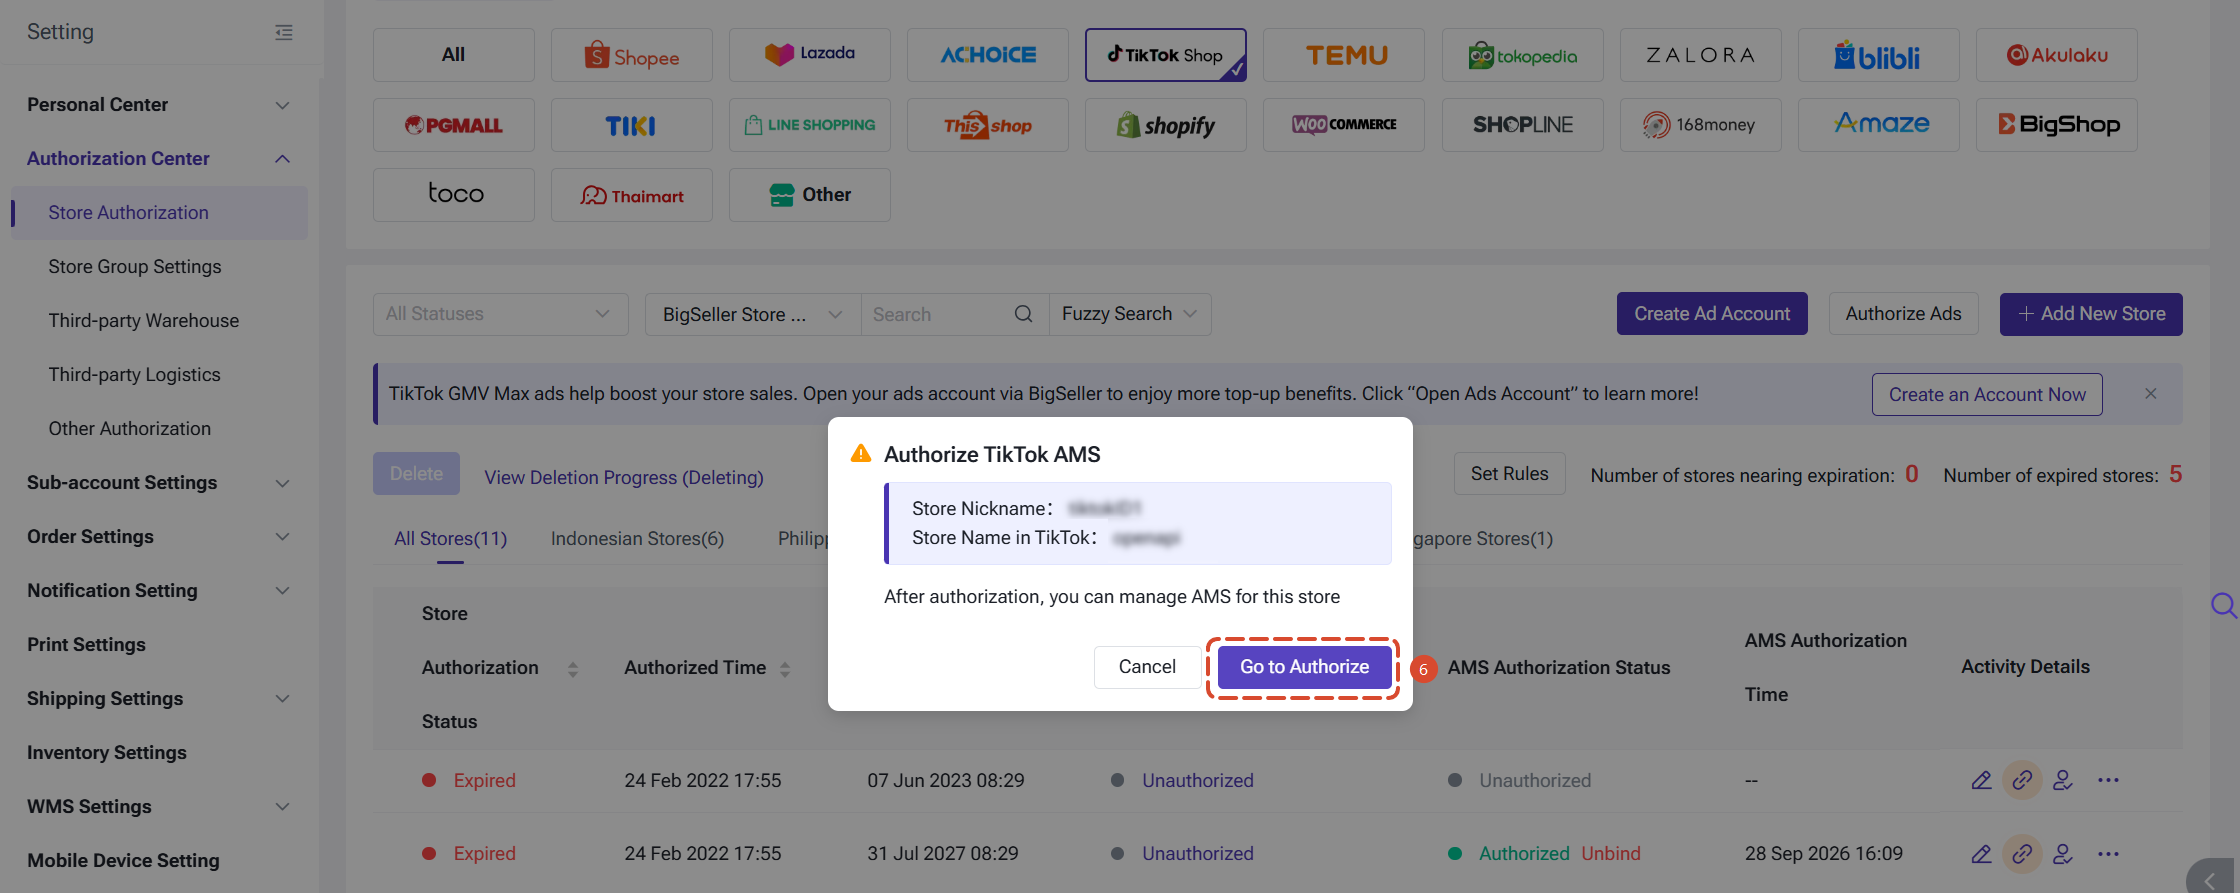
How to Unbind Authorization
Click [Unbind] next to the "Authorized" status, then confirm in the pop-up to unbind the AMS authorization.
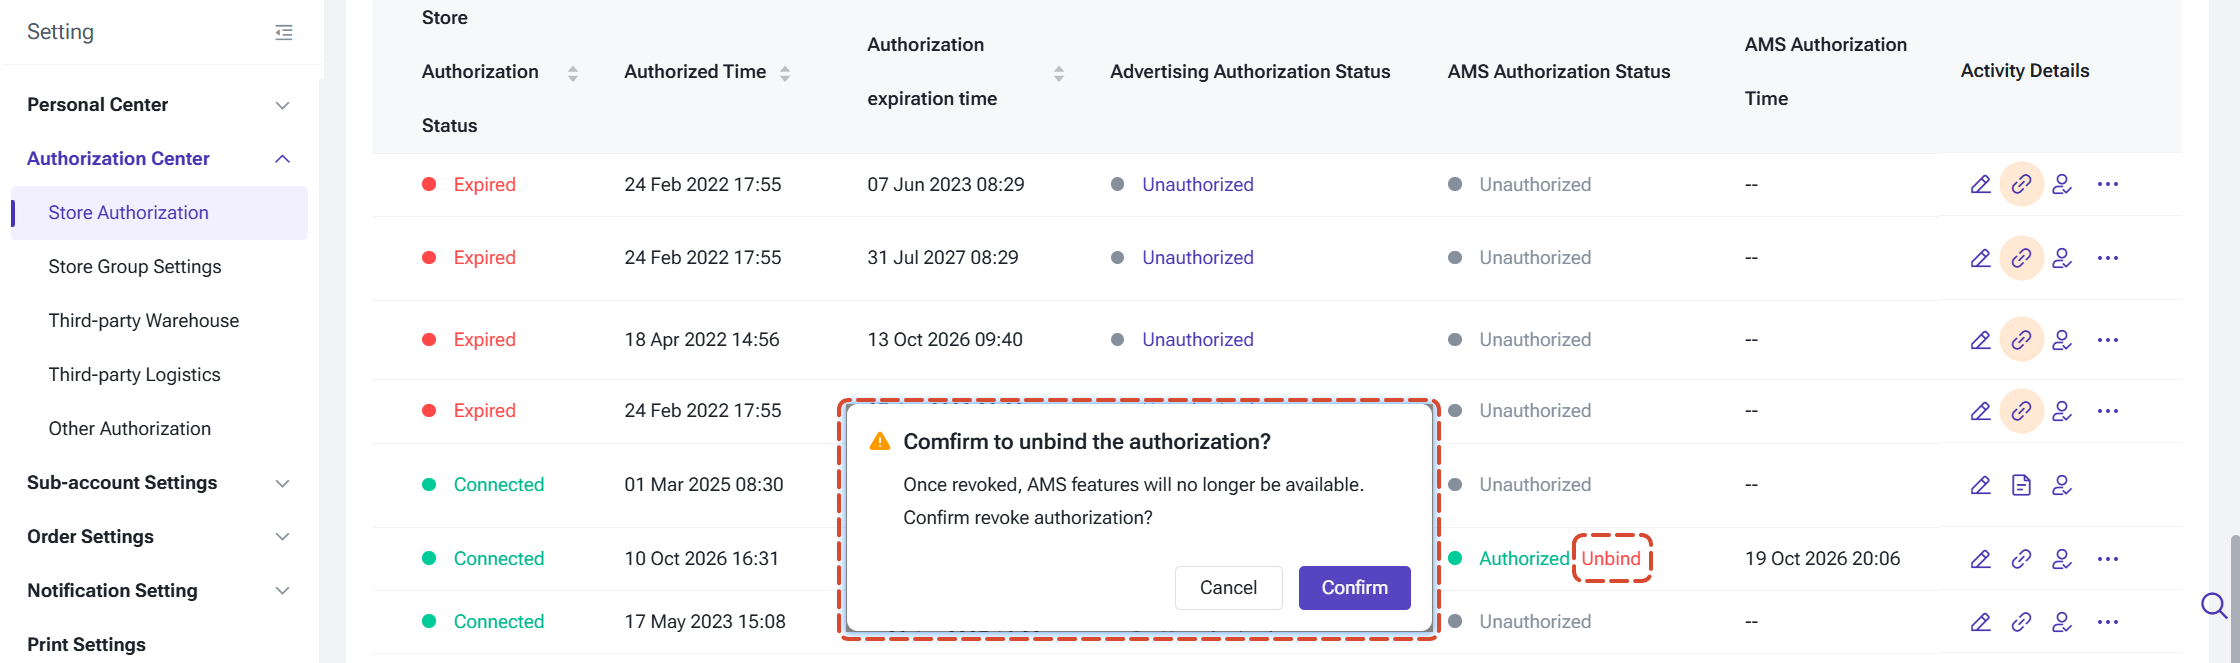
Note: After the authorization is unbound, the store can no longer use the related features of the Affiliate Center.
Creator Management
Discover Creators
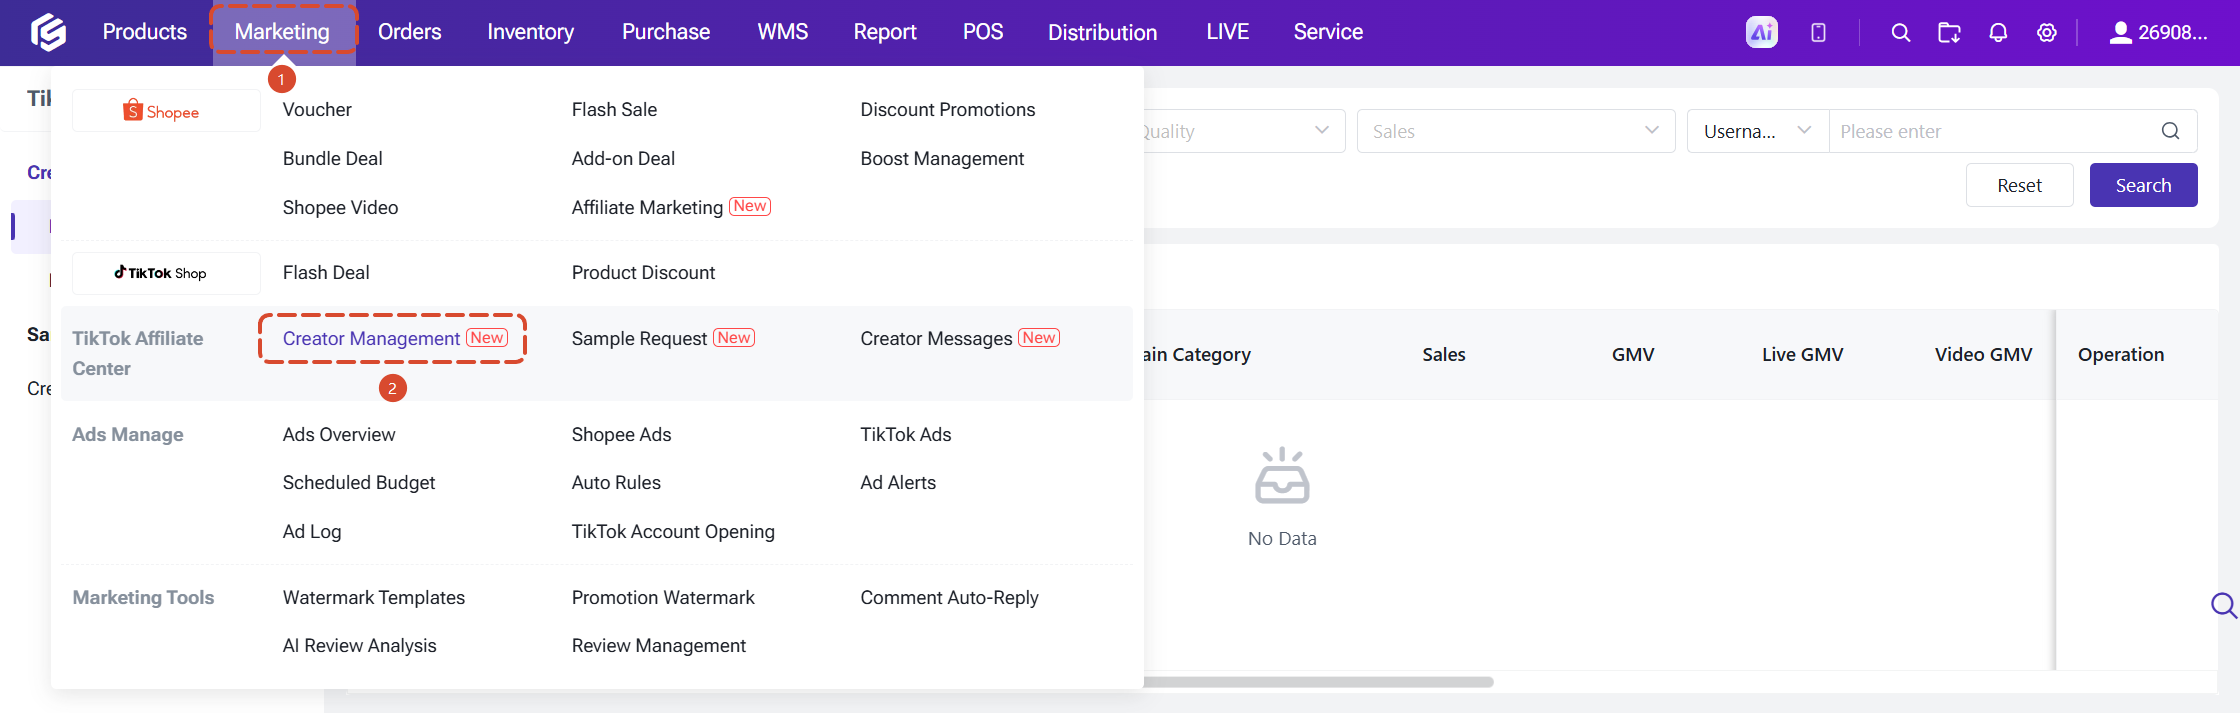
Go to: TikTok Affiliate Center > Creator Management > Discover Creators
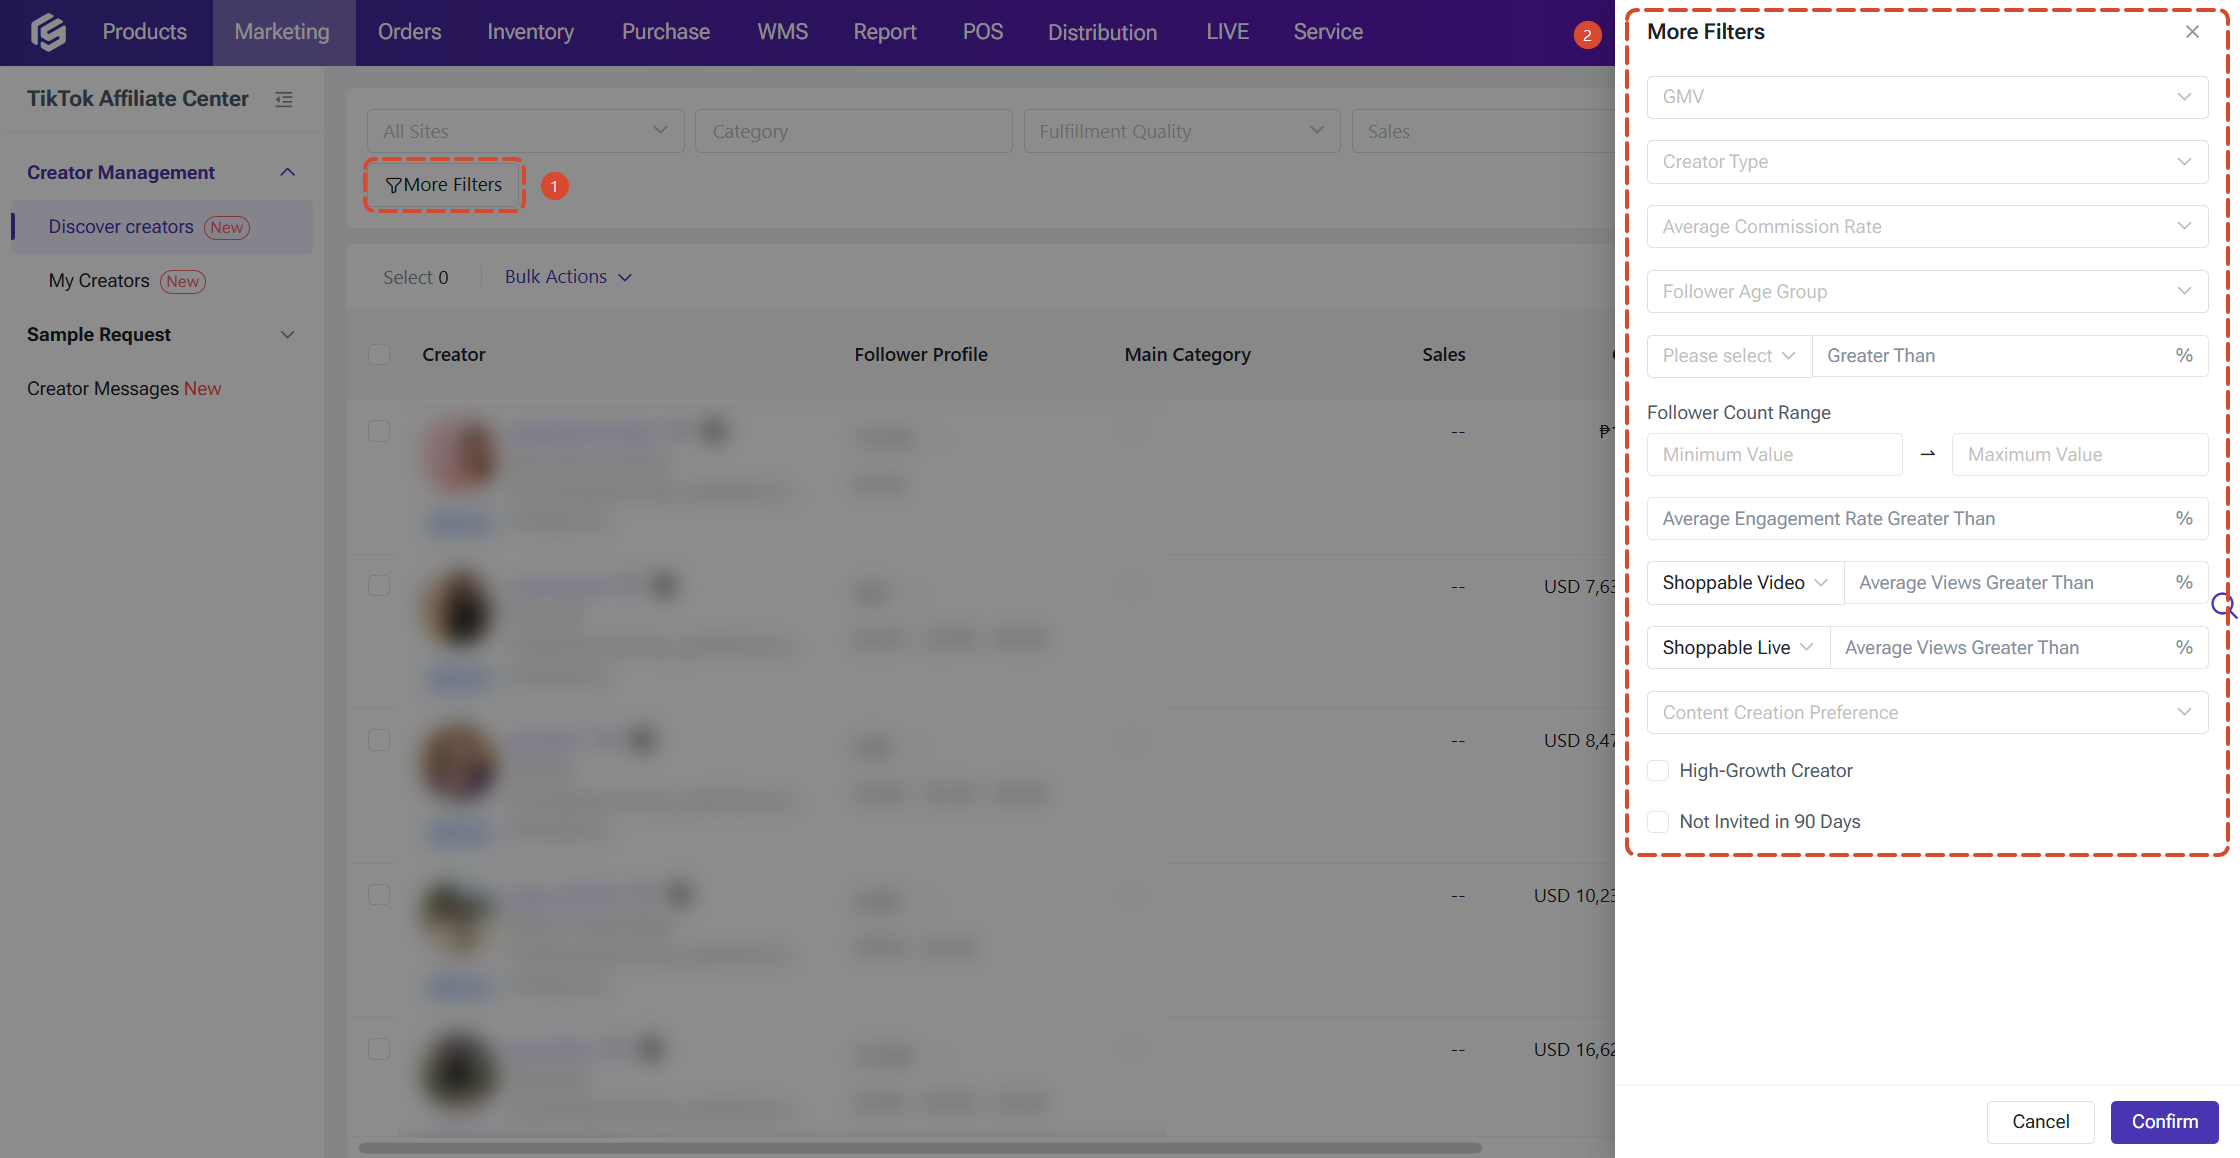
Here you can search for affiliate creators in the market your authorized store belongs to, and filter by business performance and follower profile to find the best fit for you. Data such as GMV, sales, ratings, fulfillment rate, and follower profile shown on the page comes directly from TikTok.

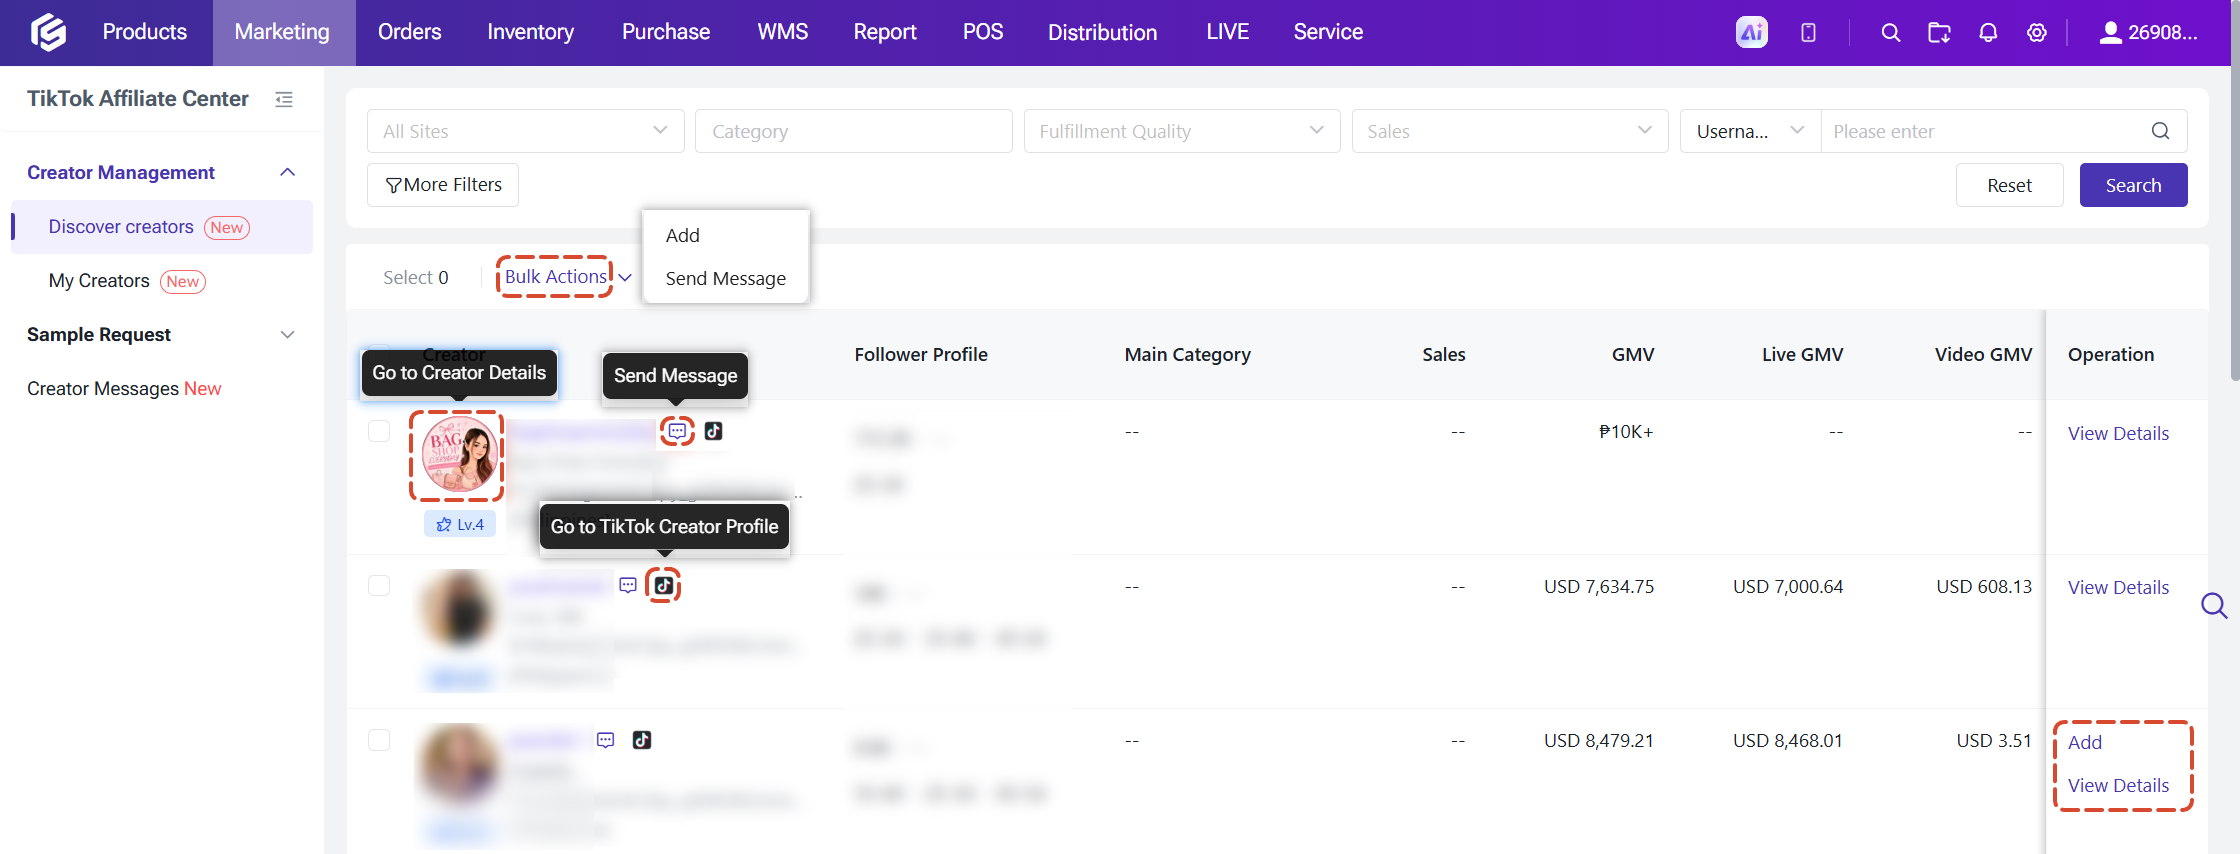
Work with Creators
- Add (single/bulk): Add creators to "My Creators" in one click.
- Send Message (single/bulk): Click the message icon and select an authorized store; you'll be taken to "Creator Messages" with the conversation opened.
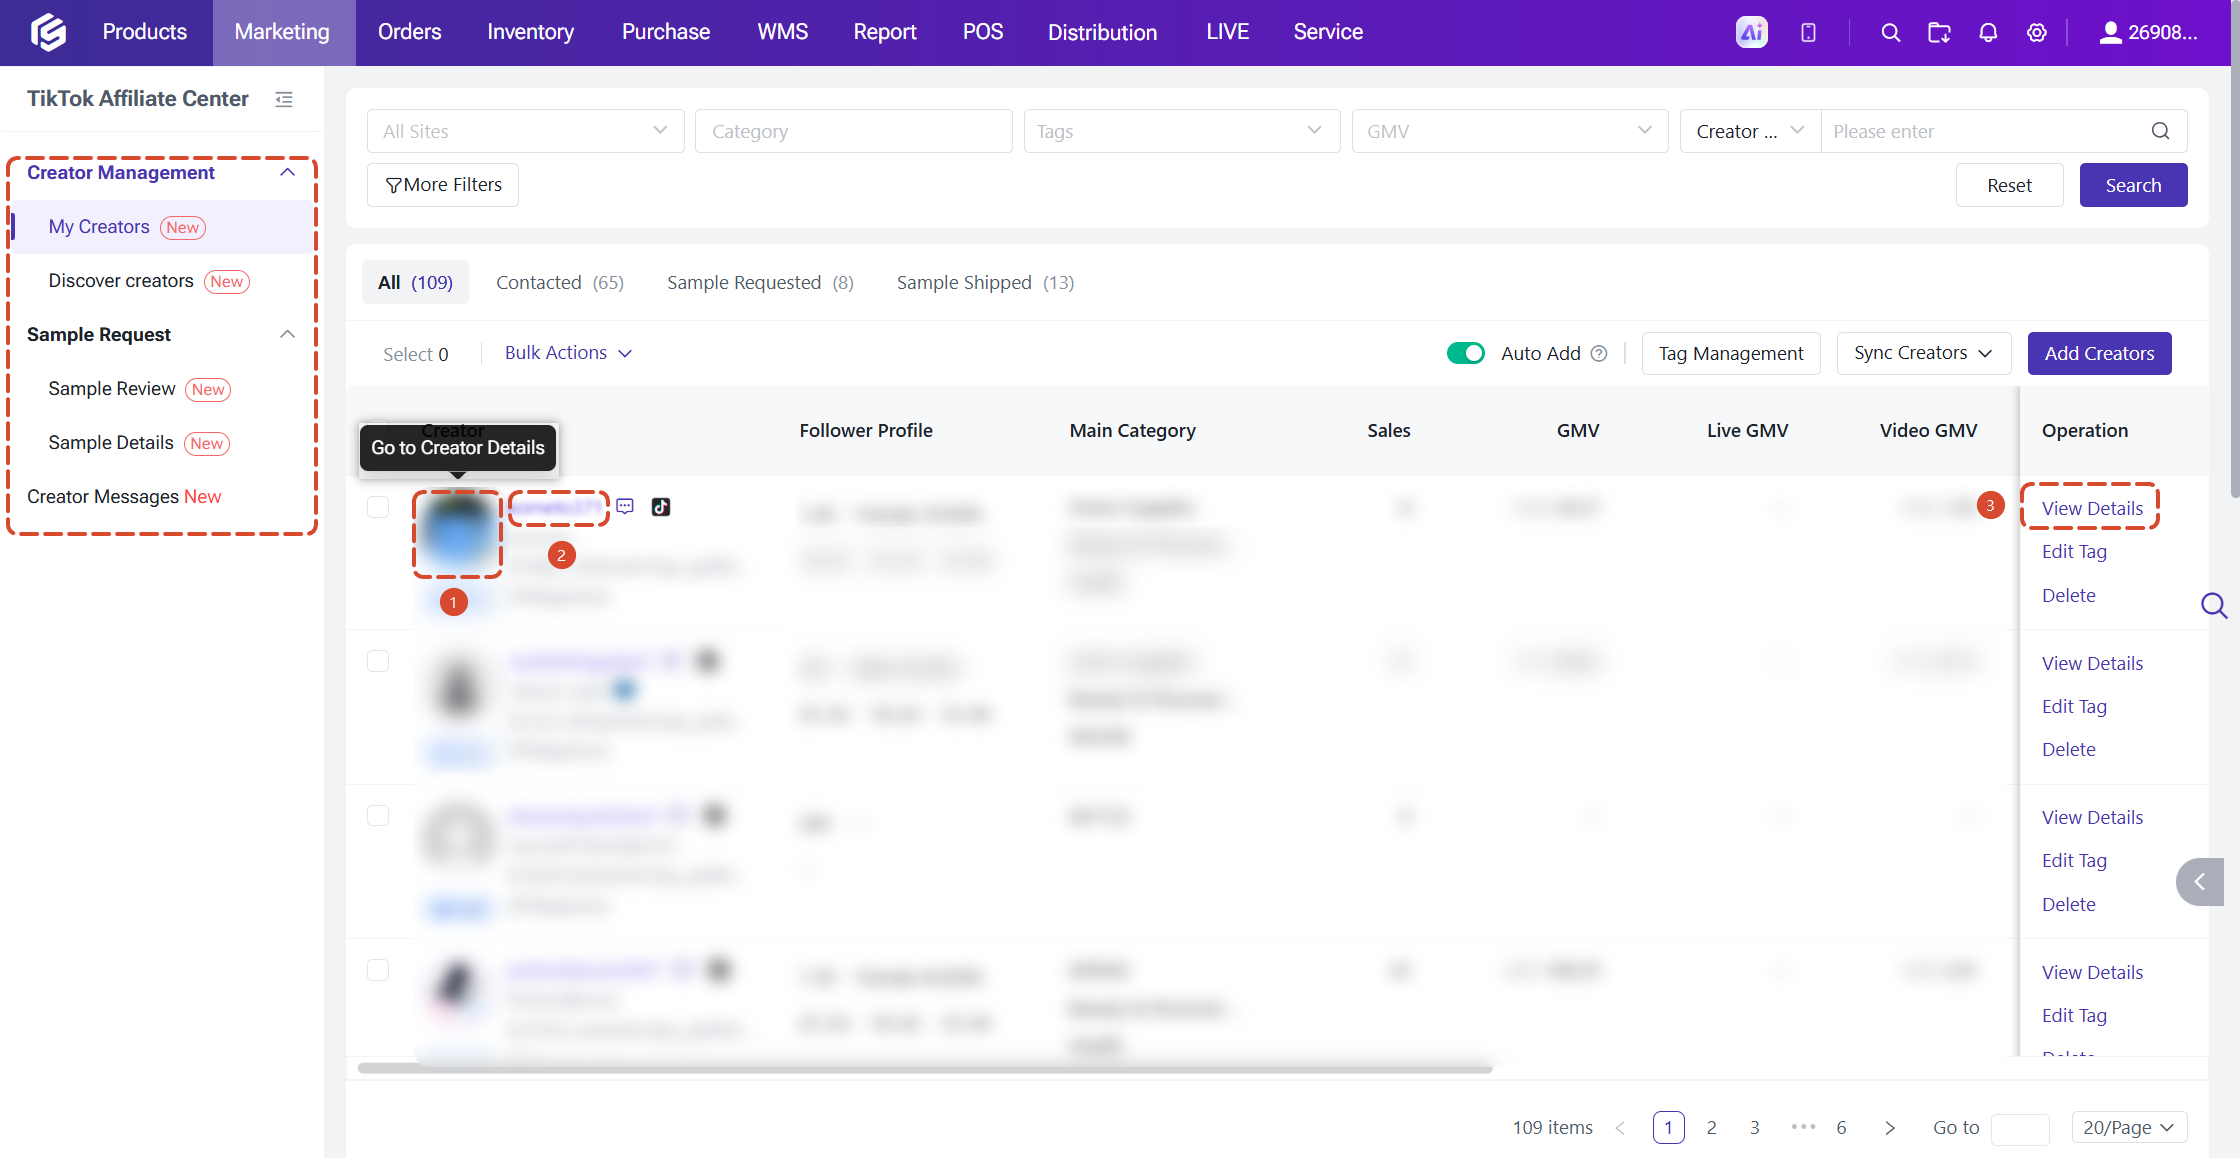
- View Details: Click [View Details], the creator's nickname, or avatar to view the full creator profile.
- Go to TikTok Creator profile: Opens the creator's TikTok profile in a new tab.
My Creators
Go to: TikTok Affiliate Center > Creator Management > My Creators
Collect the creators you've worked with or are interested in, tag them, and track their status, so every collaboration becomes a long-term asset.
Collaboration Status
The three statuses progress in order of collaboration stage: "Contacted→ Sample Requested → Sample Shipped." Each creator belongs to only one status. Your current filters are kept when you switch tabs.
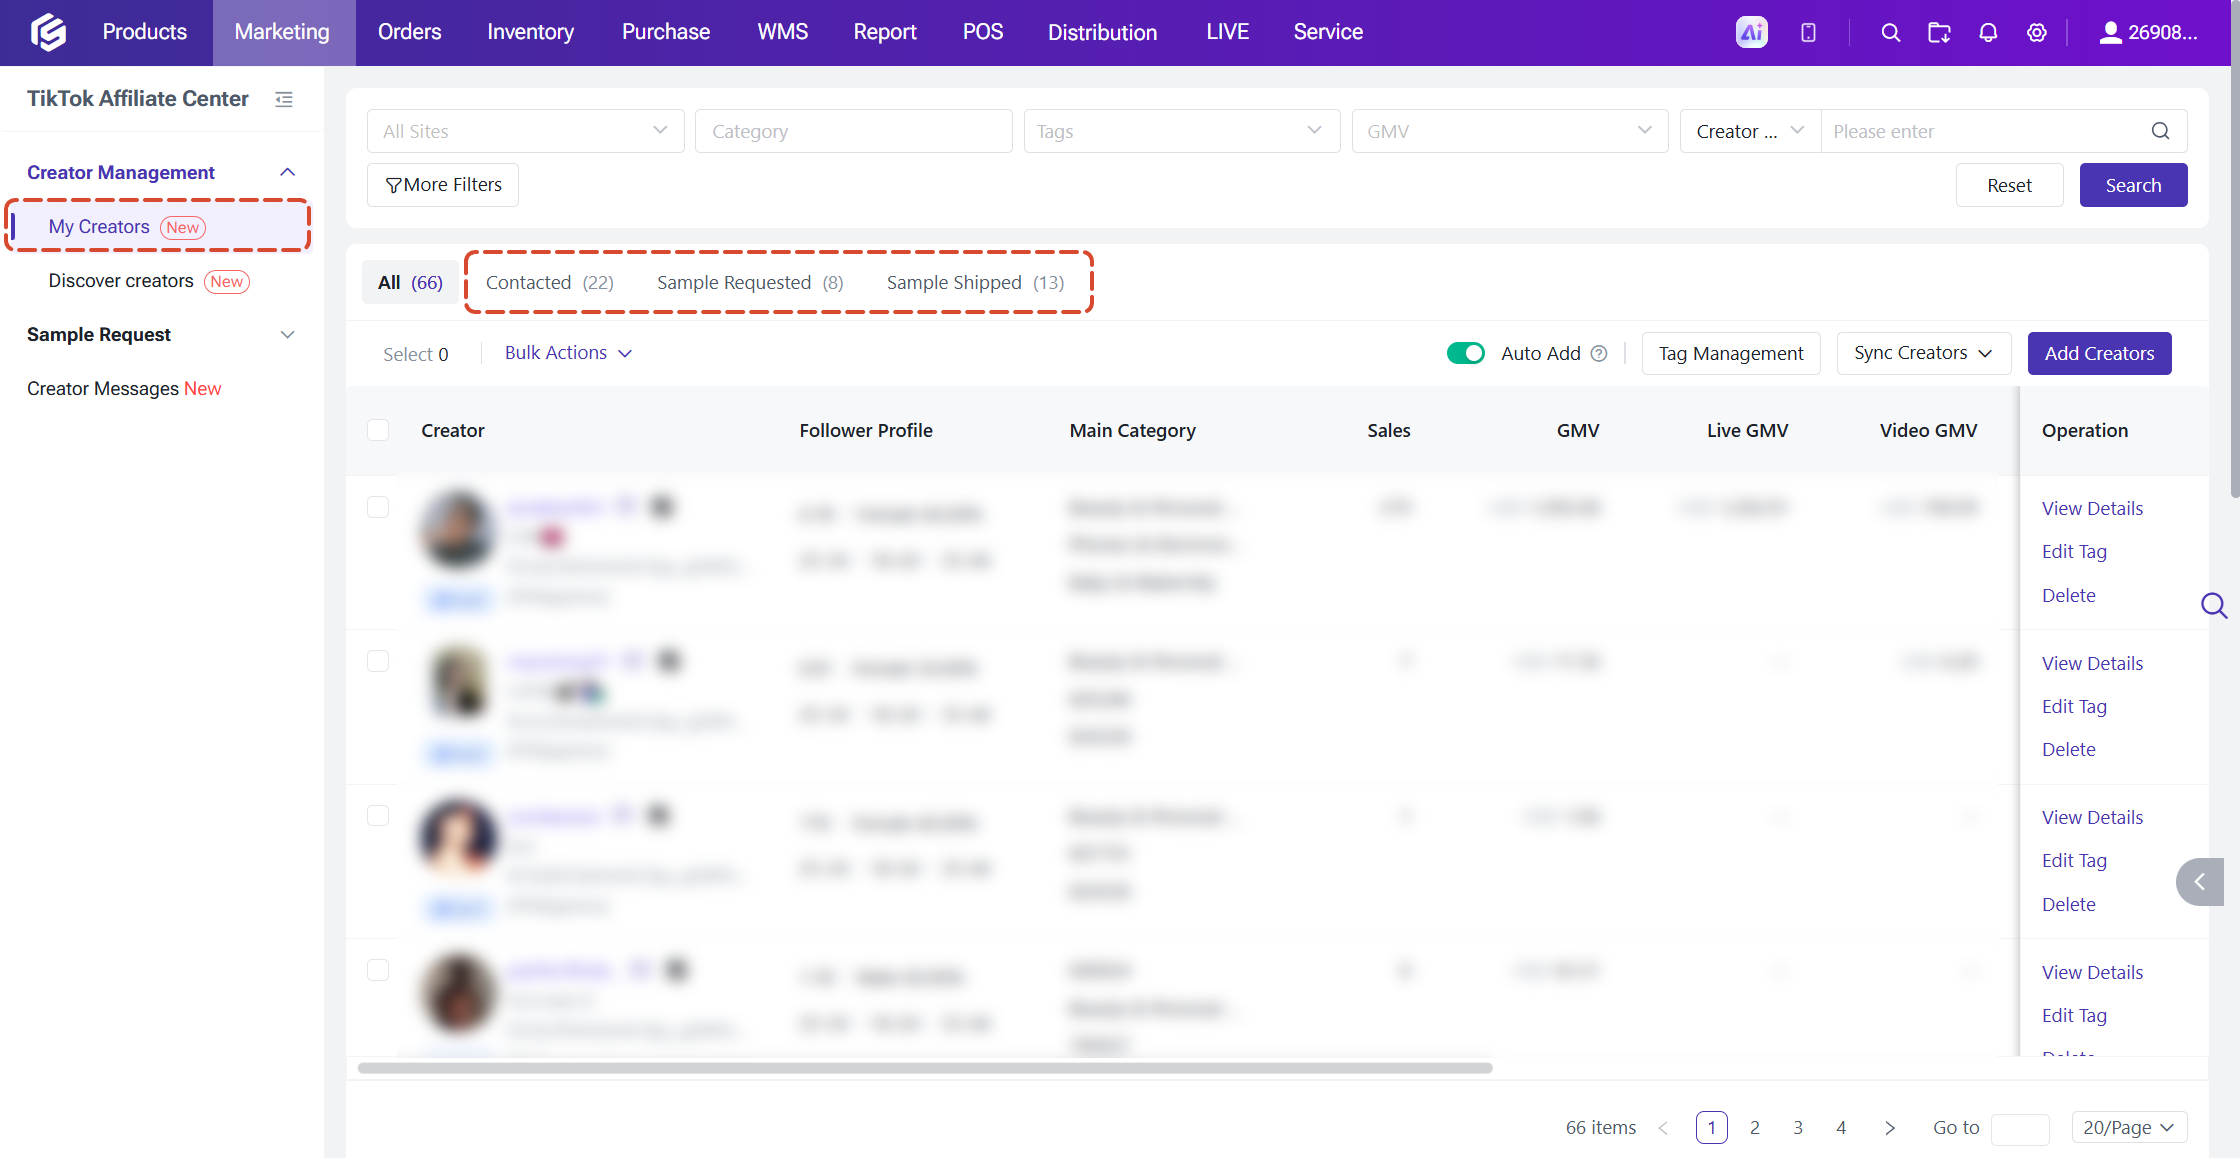
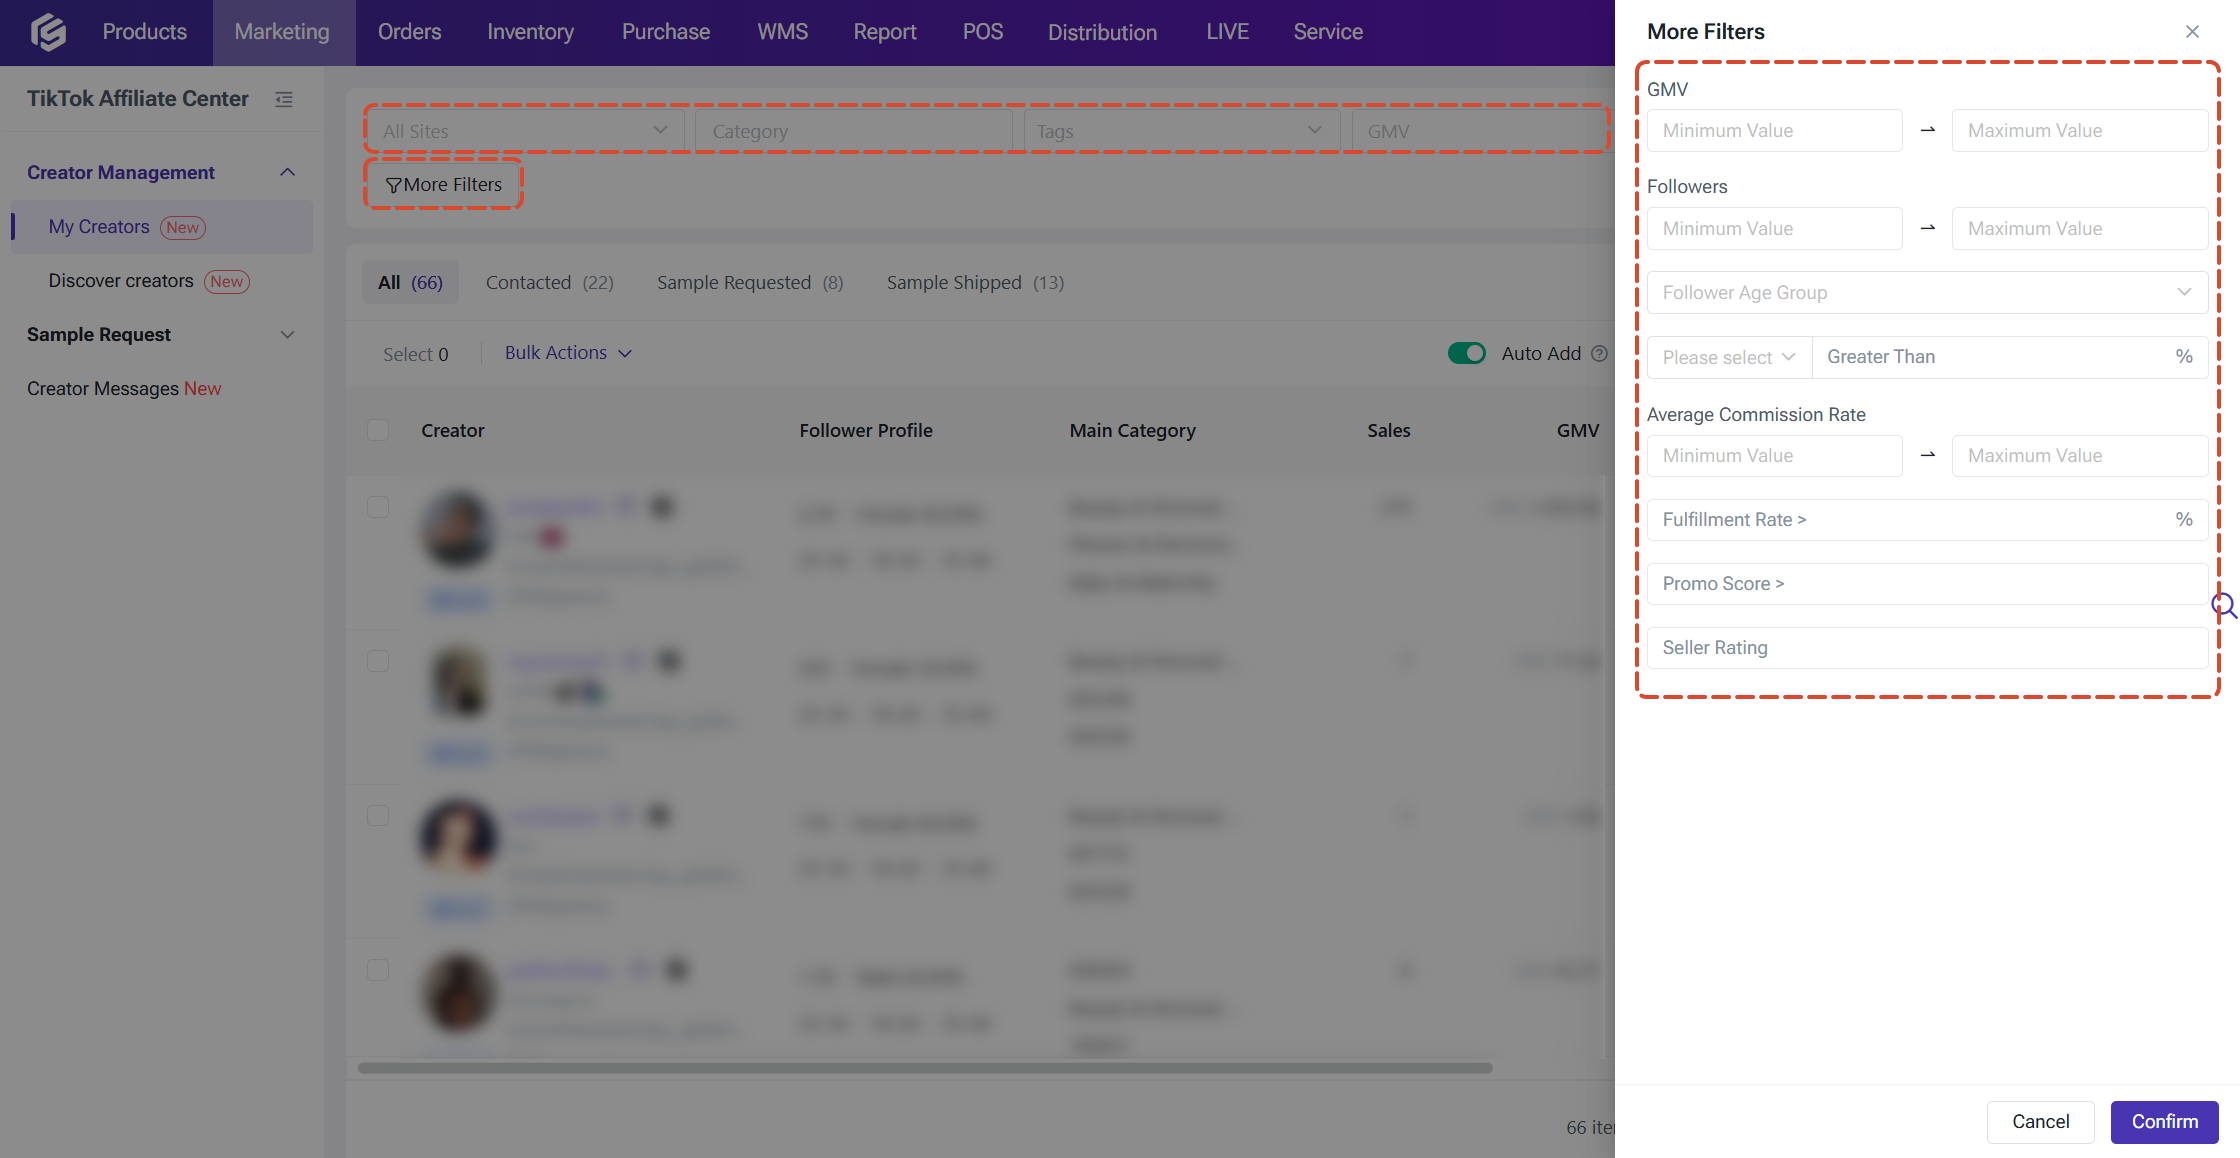
Basic filters: Site, category, creator tags (multi-select), GMV, username;
Advanced filters: GMV range, follower count range, follower age group, follower gender share, average commission rate range, fulfillment rate, promo score, seller rating.
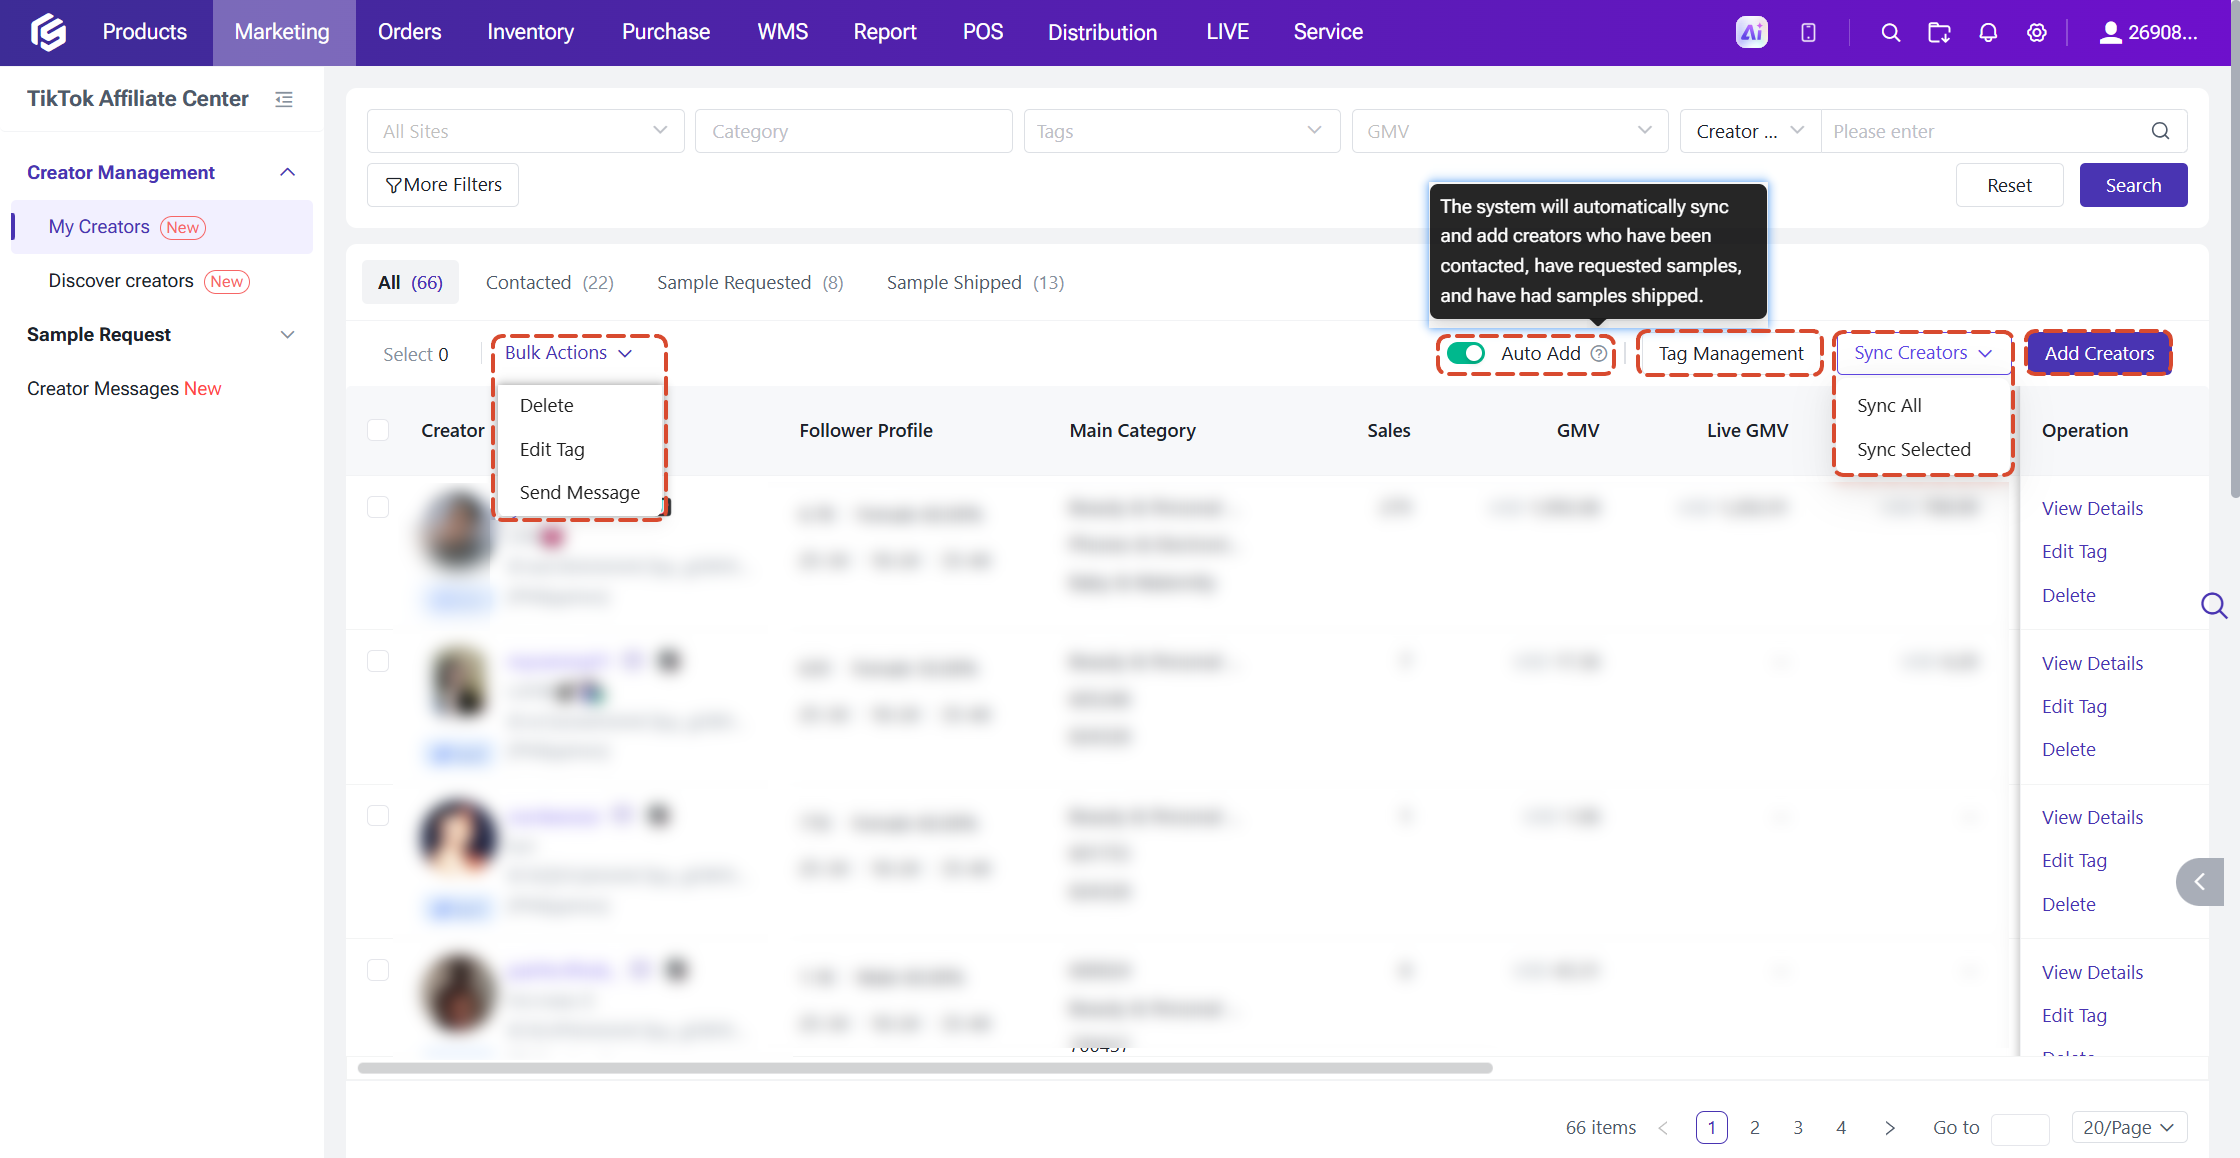
Top Bar Actions
- Auto Add: When enabled, the system automatically adds creators who have communicated with you, requested samples, or been shipped samples to "My Creators."
- Tag Management: Create and edit creator tags, and see how many creators are linked to each tag.
- Sync Creators: Choose "Sync all" or "Sync selected" to get the latest creator data.
- Add Creators: Jump quickly to the Discover Creators to pick creators.
- Bulk Actions: Delete, edit tag, send messages.
Creator Details
In Creator Management, Sample Request or Creator Messages, click a creator's nickname, avatar, or "Details" to open the Creator Details pop-up.
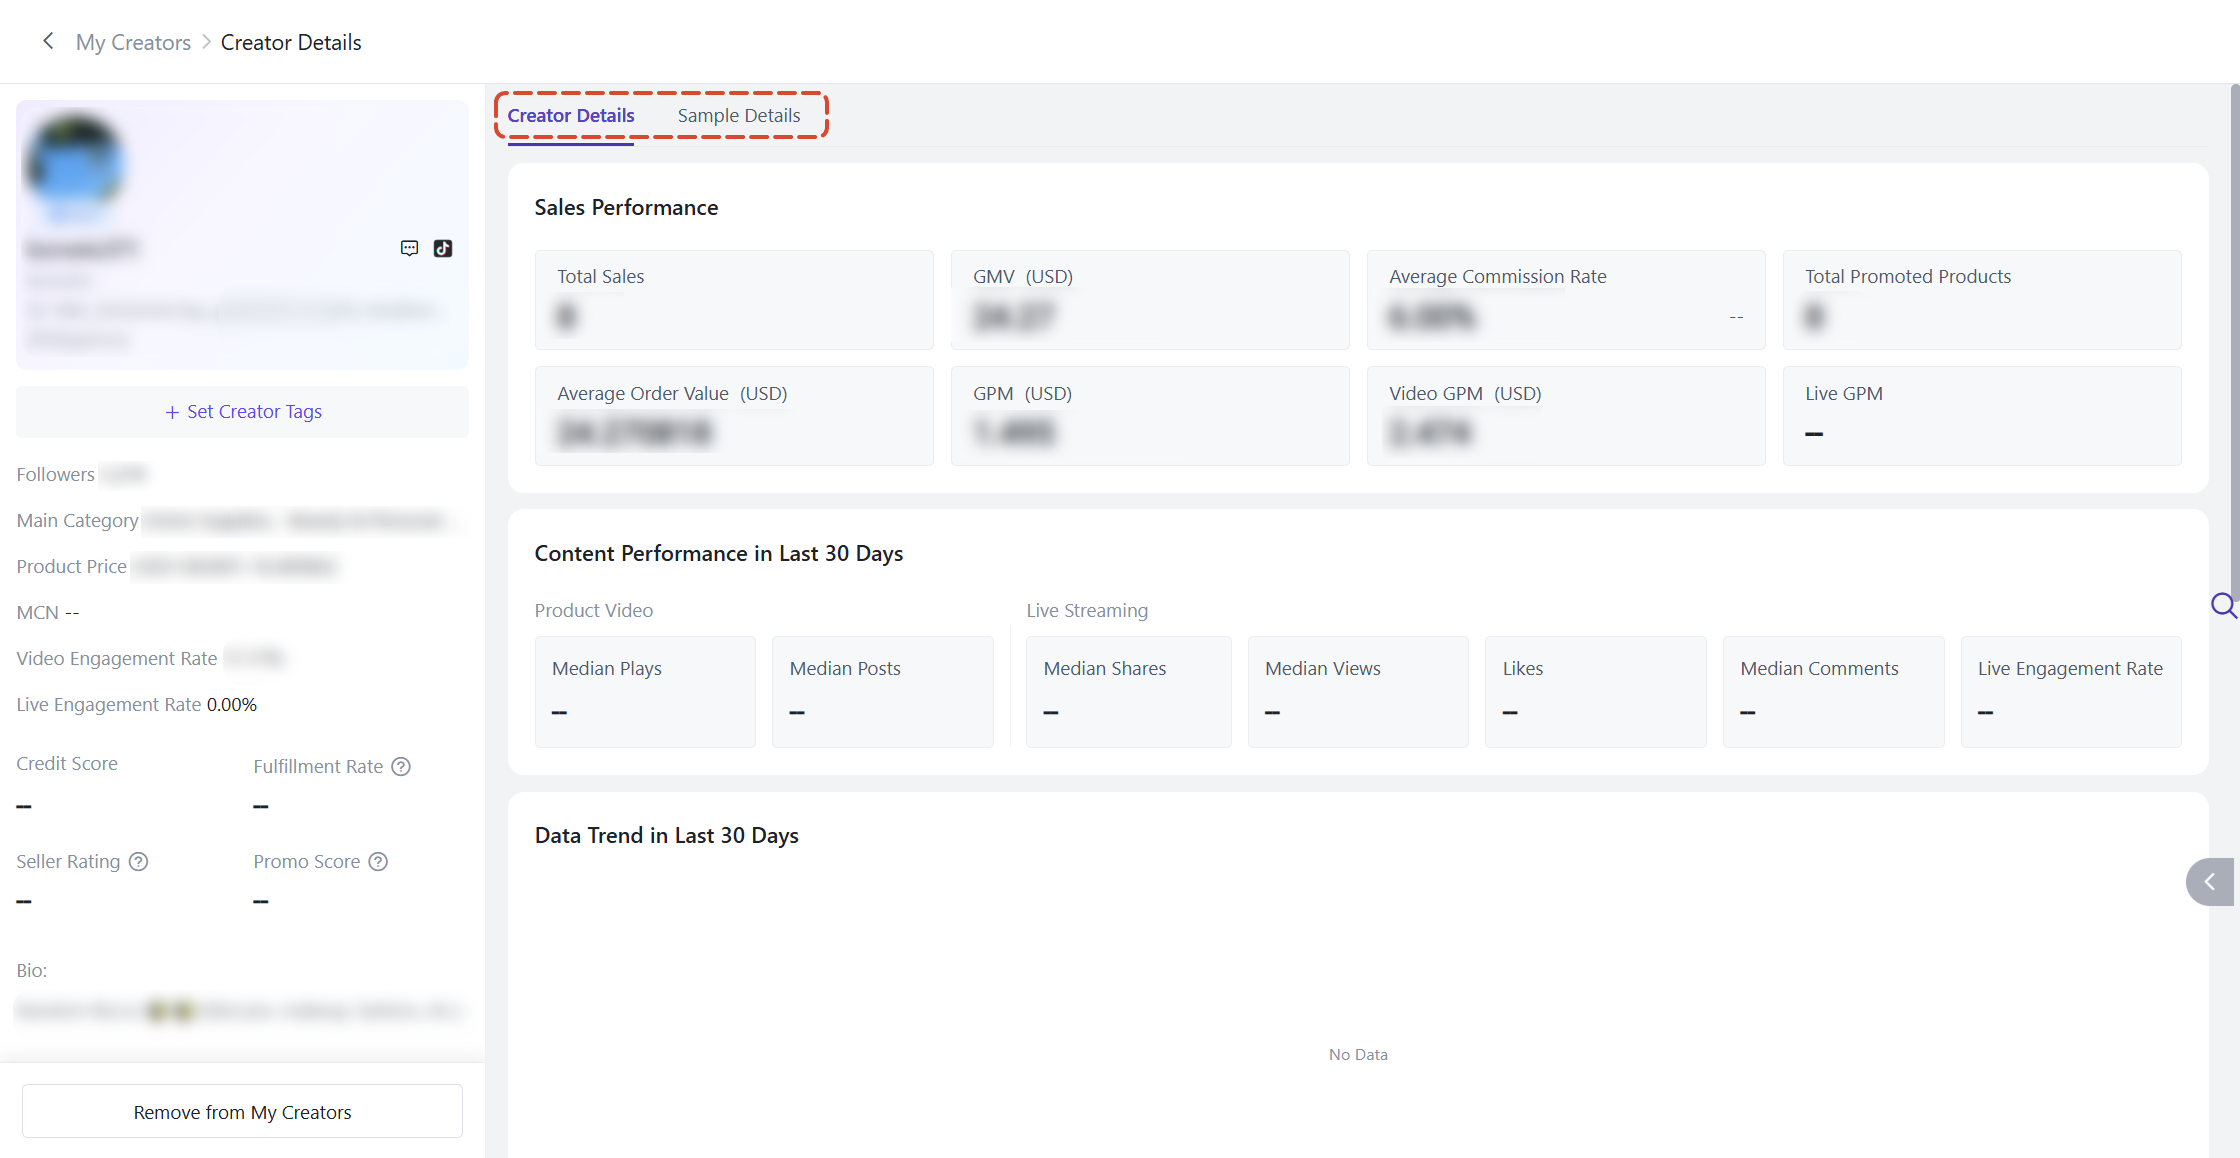
Creator Details
This page brings a creator's basic profile, ratings, fulfillment performance, and collaboration history together in one place, so you can judge whether a creator is worth working with without switching pages, and spot risks such as blocked status in advance.
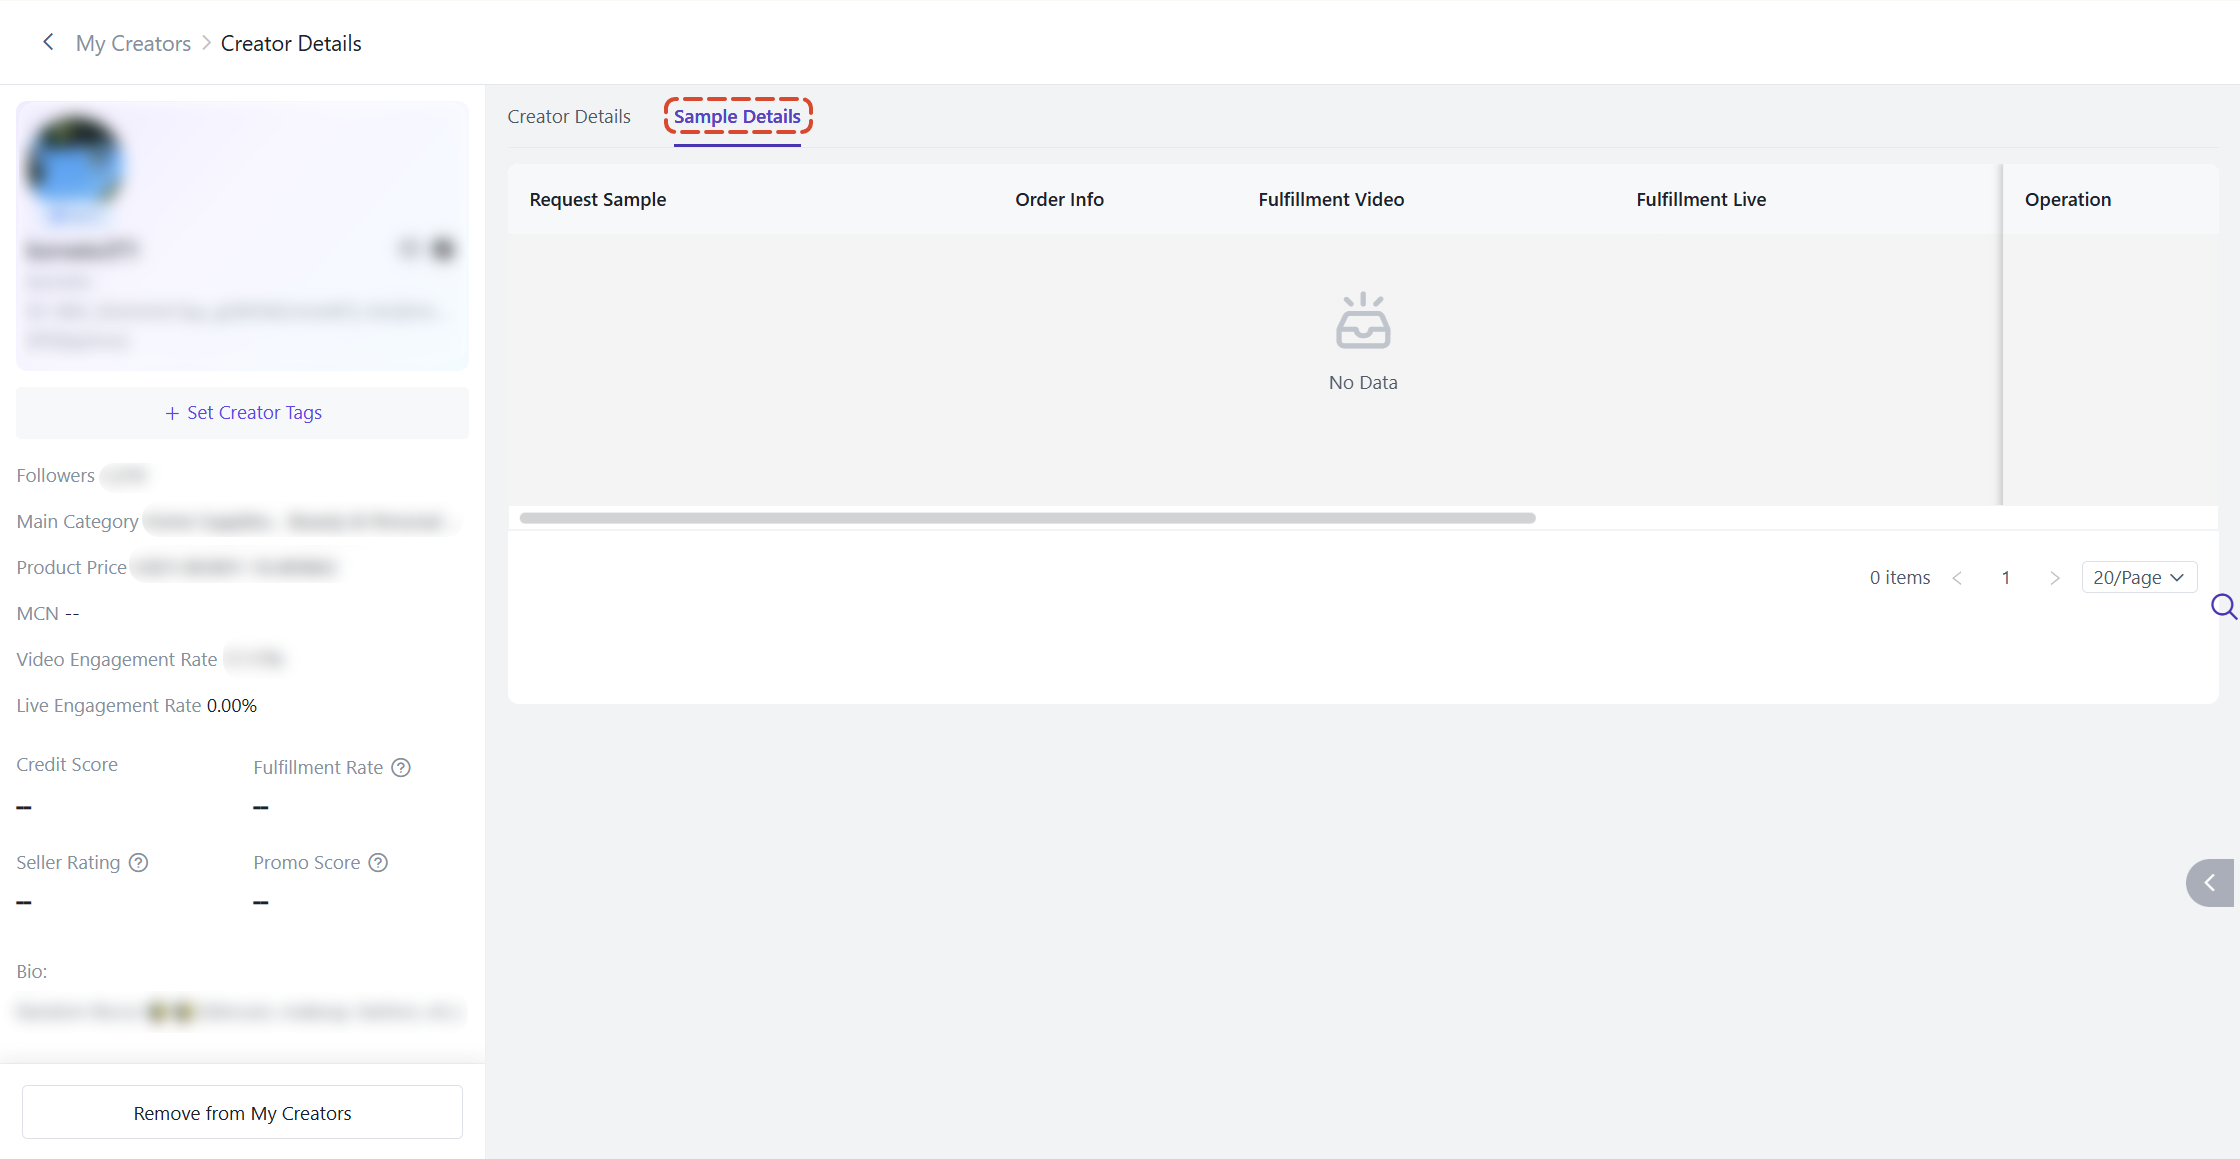
Sample Details
Here you can view all of this creator's sample records under the current store, including request sample, order info, fulfillment video / live, and more.
For pending requests, you can click [Agree] or [Reject] right here.
Collaboration
The Collaboration section brings together four features: Open Collaboration, Target Collaboration, Auto Invite Task, and Invite Template. With them, you can handle everything from listing products for collaboration to inviting creators in bulk, all without switching back and forth to TikTok Shop Seller Center.
Open Collaboration
When you add a product to Open Collaboration, every eligible creator can add it to their showcase and start promoting it on their own.-
Store Level
- Added Products: the number of products that are currently added in Open Collaboration and available for creators to promote. You can click the number to jump to the Products page, where these products are already filtered for you.
- Not Added Products: the number of products that meet the requirements but haven't added Open Collaboration yet. You can click the number to jump to the filtered list, too.
- Product Commission Range: the commission rate range for all Open Collaboration products in the store.
- Default Commission Rate for New Products: the default commission rate that the system applies to products it adds automatically.
- Auto-Add New Products: when you turn this on, the system will automatically add newly listed products in your store to Open Collaboration.
- Sync stores: you can choose Sync All Stores to update every store, or Sync Selected Stores to update only the stores you've checked.
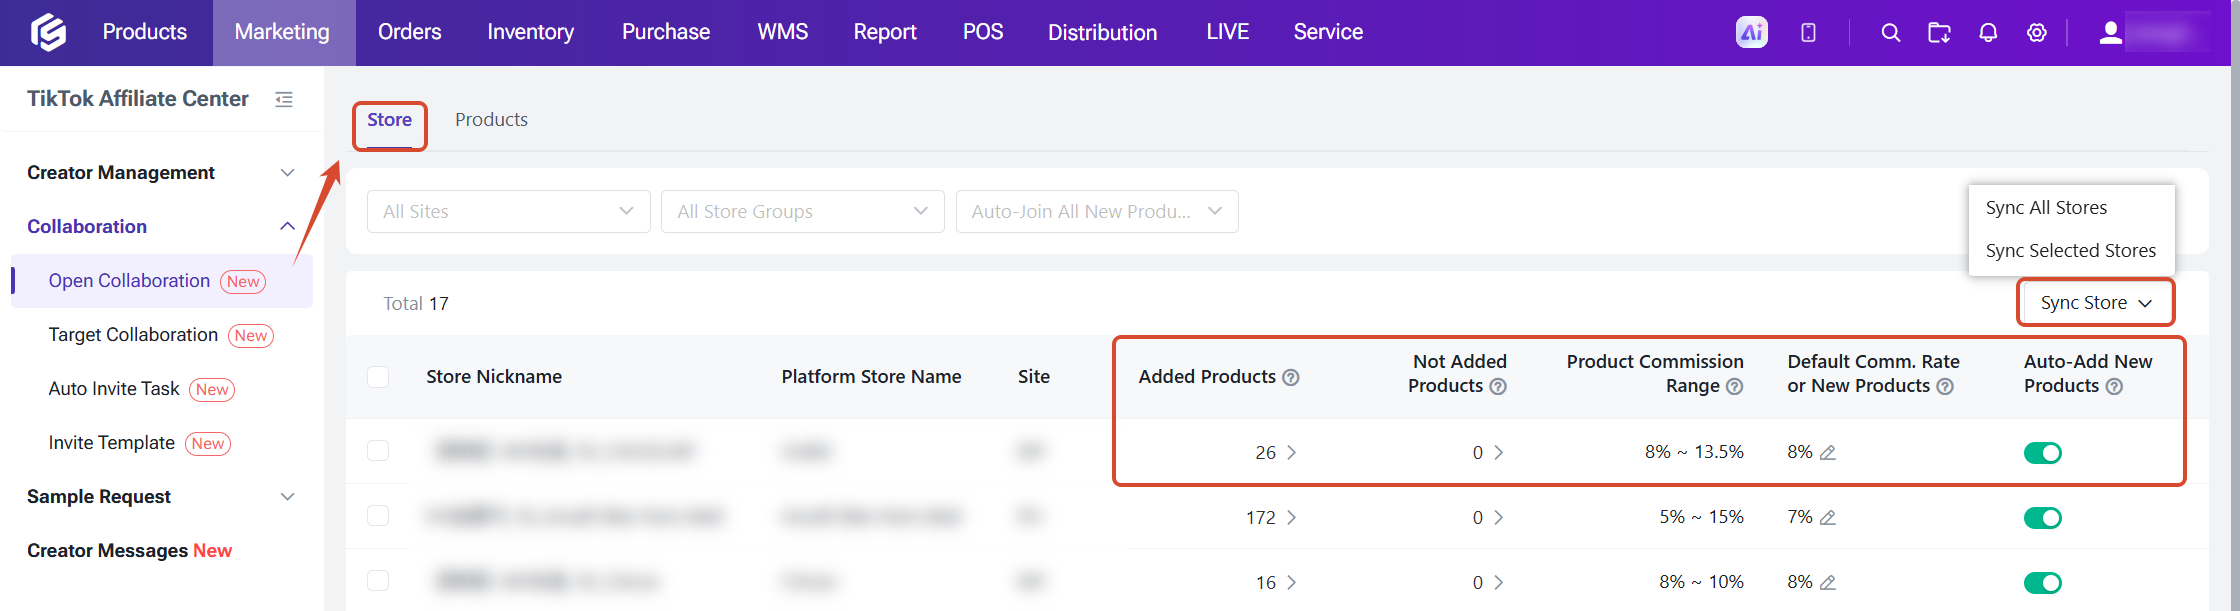
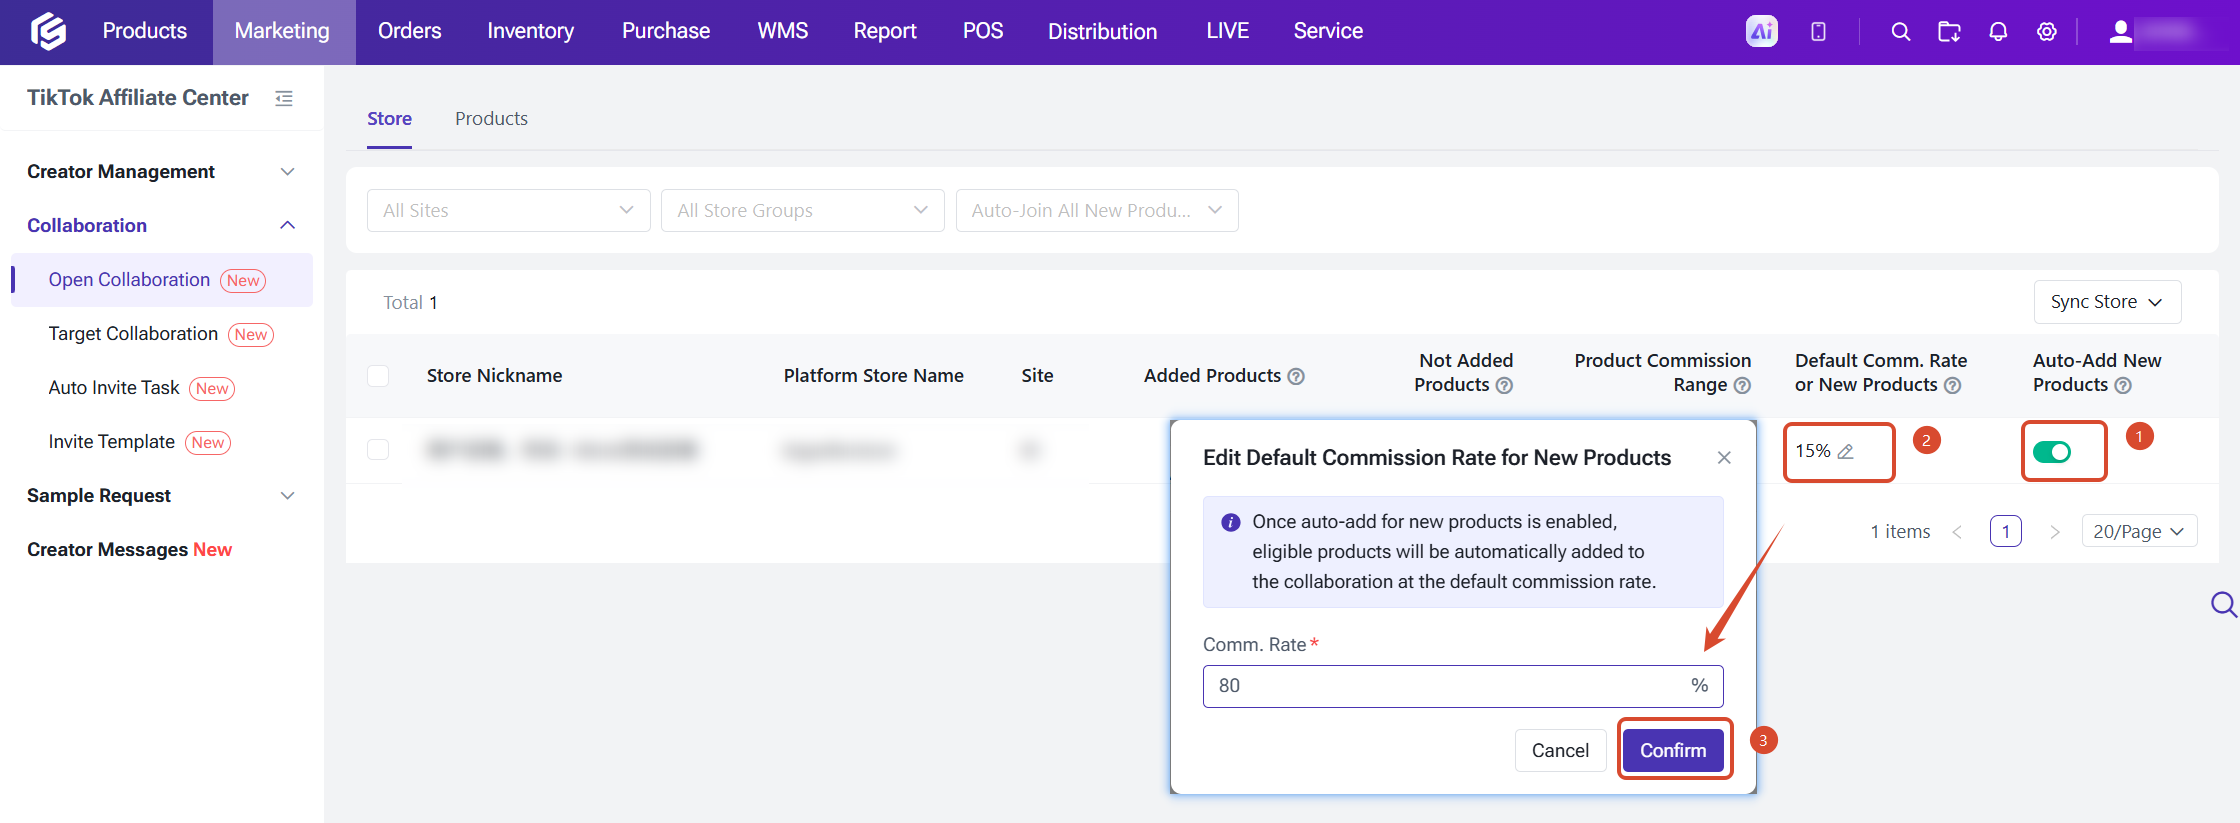
Set up Auto-Add New Products
- In the store row, turn on the Auto-Add New Products switch.
- Click the Edit icon and enter your default commission rate. The rate can be between 1% and 80%, with up to two decimal places, and it can't be left blank.
- Then click Confirm.
Notes:
- If you turn off auto-add, new products will no longer be added automatically, but products that have already added will stay in Open Collaboration.
- While auto-add is off, you'll still see your previous default commission rate on the page, but it won't take effect.
-
Product Level
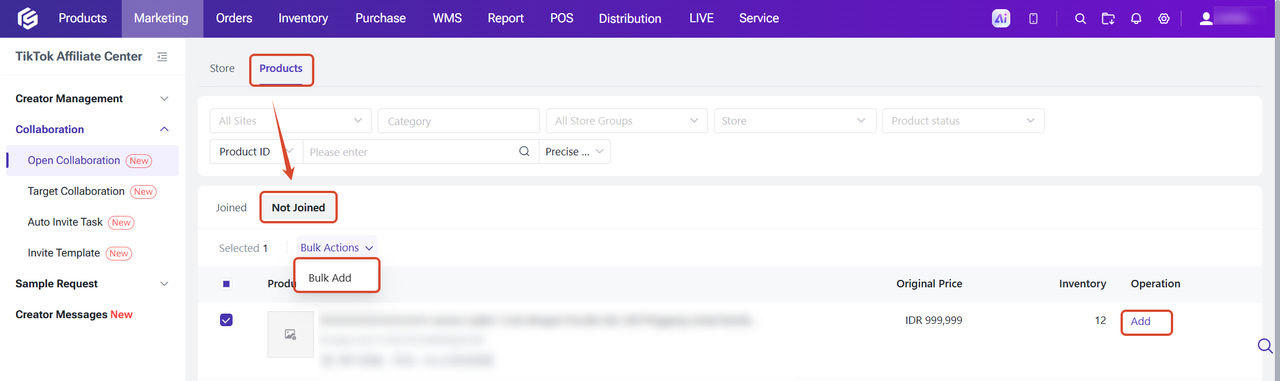
Add products to Open Collaboration
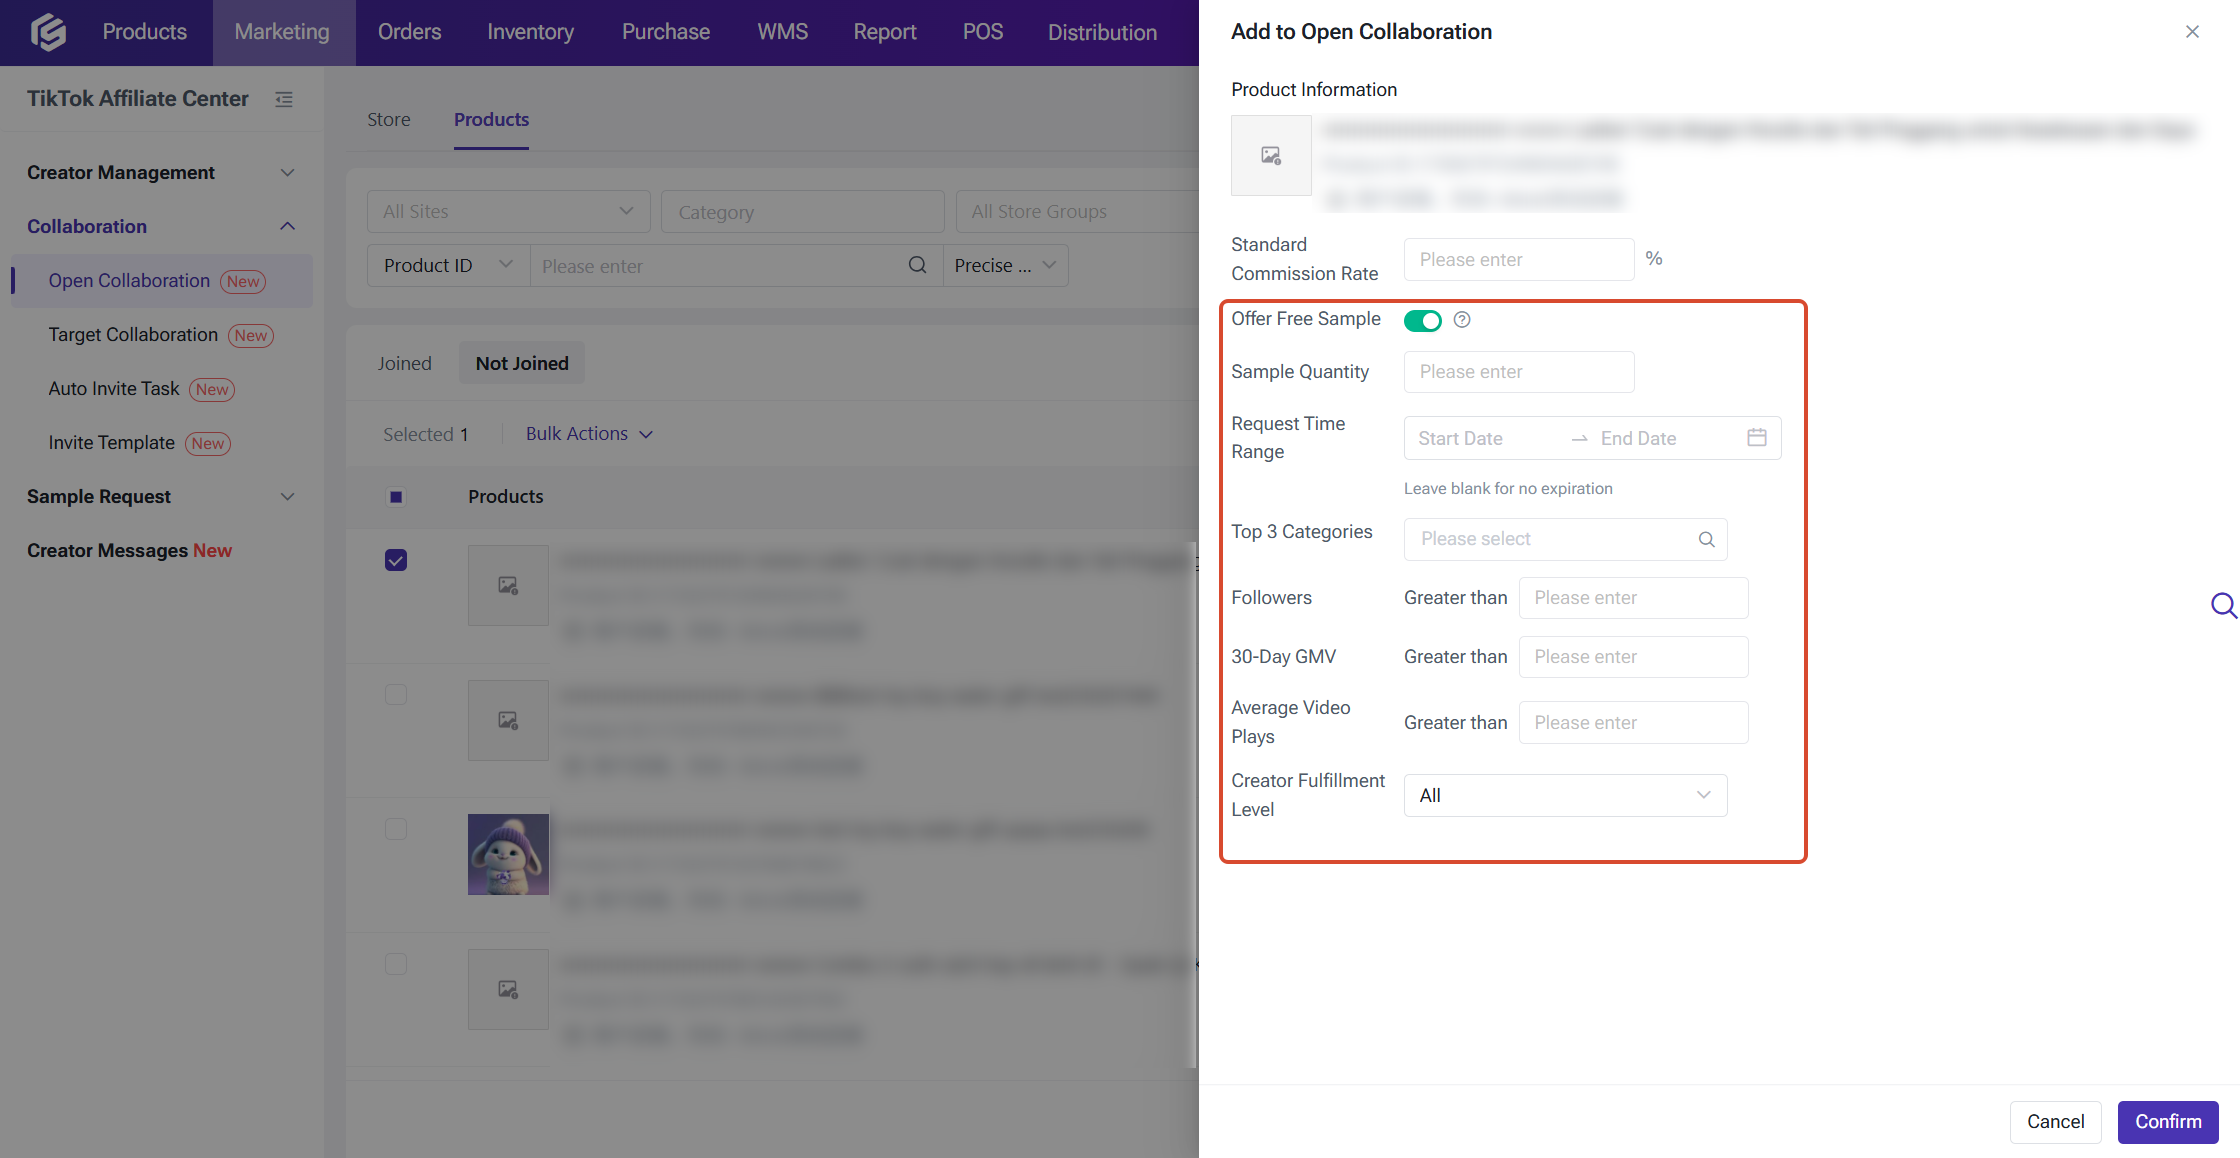
- Open the Not Joined tab, find the product you want, and click Add. If you'd like to add several products at once, check them first and then click Bulk Add.
- Enter the Standard Commission Rate.

- If you'd like to offer creators free samples, turn on Offer Free Sample and fill in the details:
- Sample Quantity (required): a whole number from 1 to 999999.
- Request Time Range (optional): leave it blank if you don't want an end date. You can only choose today or a later date.
- All other fields are optional.
- Click Confirm. When you add products in bulk, the system processes them one by one, and a progress window shows you how many succeeded and how many failed.
- Products that have been added successfully will appear under the Joined tab.
Manage Added products
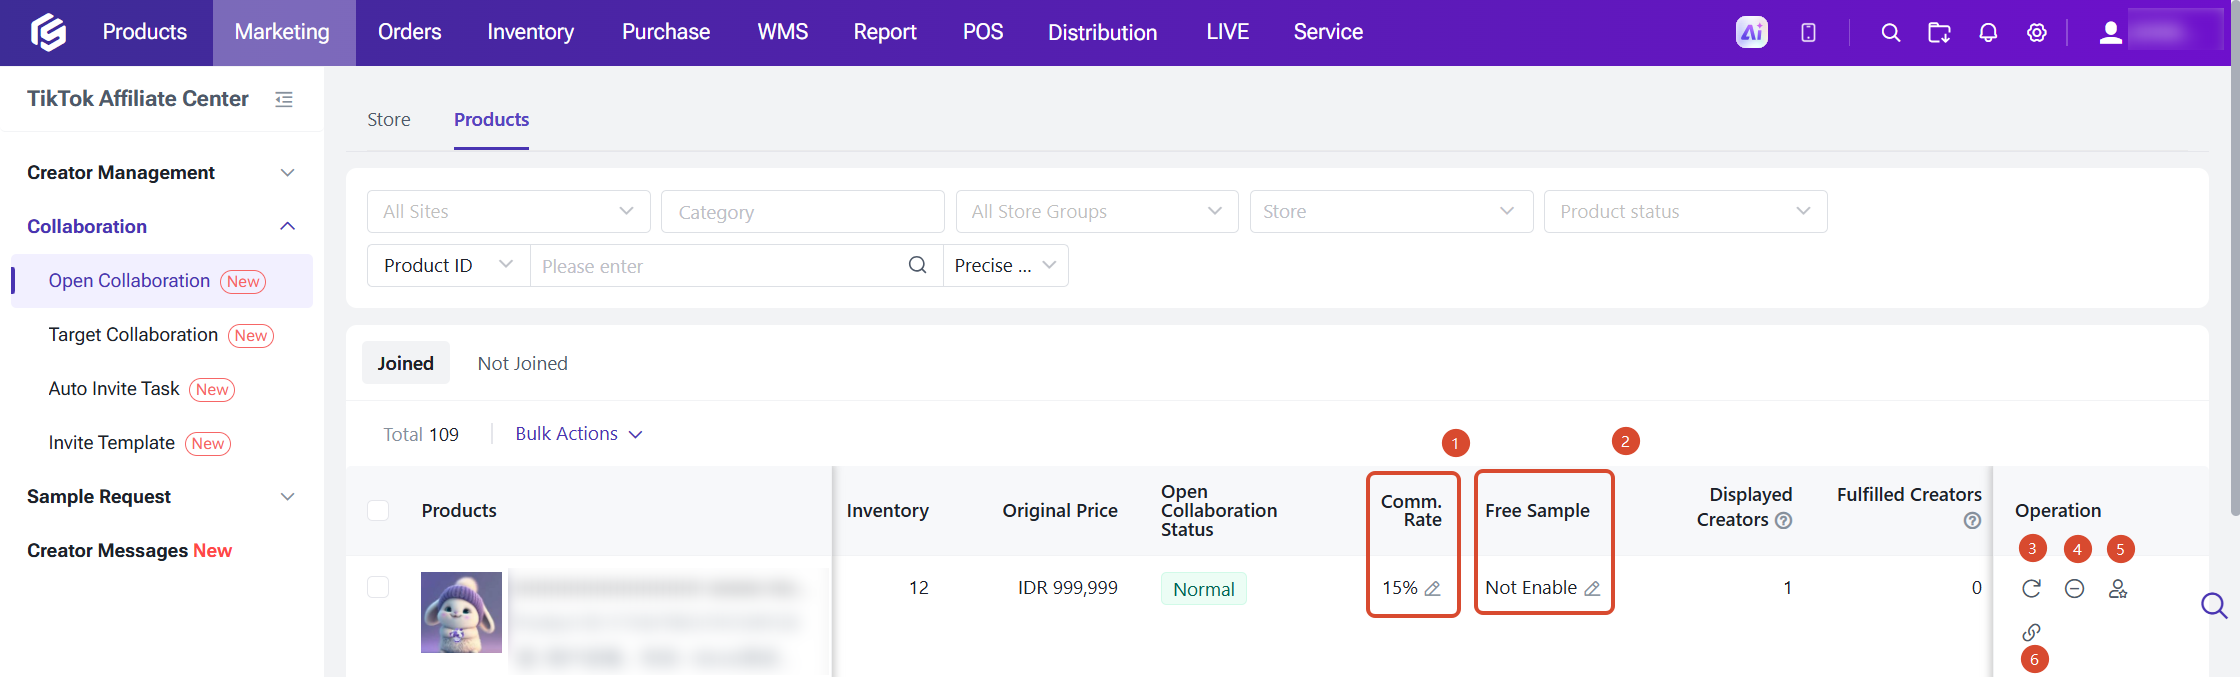
On the Joined tab, you can do the following:
- Edit Commission Rate: change the commission rate for one product. You can also check several products and use Bulk Edit Commission Rate.
- Edit Sample Rules: click the edit button in the Free Sample column to change the rules. You can also edit several products at once with Bulk Edit Sample Rules.
- Sync: manually update the Open Collaboration data for a product.
- Remove: take a product out of Open Collaboration.
- Creator Details: see which creators are collaborating on this product. You can also remove individual creators from here.
- Generate Invite Link: create an invite link and copy it automatically. Creators can use it to add your product to their showcase quickly.
Target Collaboration
Here, you can choose the creators you'd like to work with, set an exclusive commission rate for each product, and send a personal invite that includes your message and your free sample policy.-
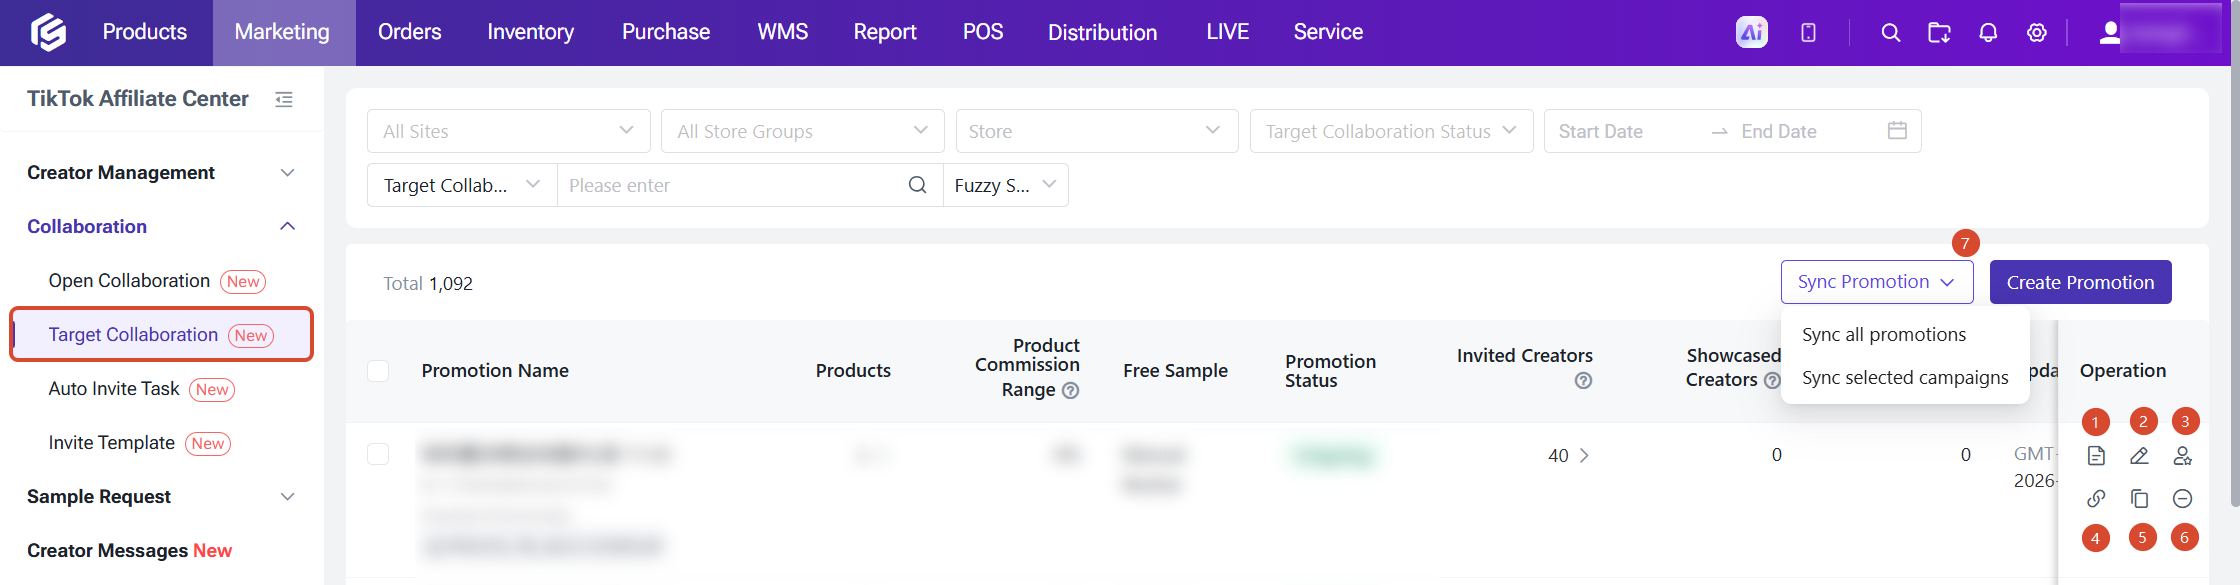
Target Collaboration List
- View Details: you can open the collaboration in read-only mode.
- Edit: you can change the name, expiry date, products, commission rates, contact details, and free sample rules. Creator information is shown for reference only, so you can't edit it here.
- Creator Details: you can check each creator's followers, promotion region, number of product showcases, number of content products, partnership status, and product commission status.
- Generate Invite Link: the system creates the invite link and copies it for you. Creators can accept your invite through this link.
- Copy: you can create a new collaboration based on an existing one. If the original collaboration has expired, you'll need to choose a new expiry date.
- Remove: you can remove collaborations that are in progress. Once you confirm, the collaboration can no longer be promoted.
- Sync Promotion and Create Promotion: these buttons sit at the top of the list.
-
Create a Target Collaboration
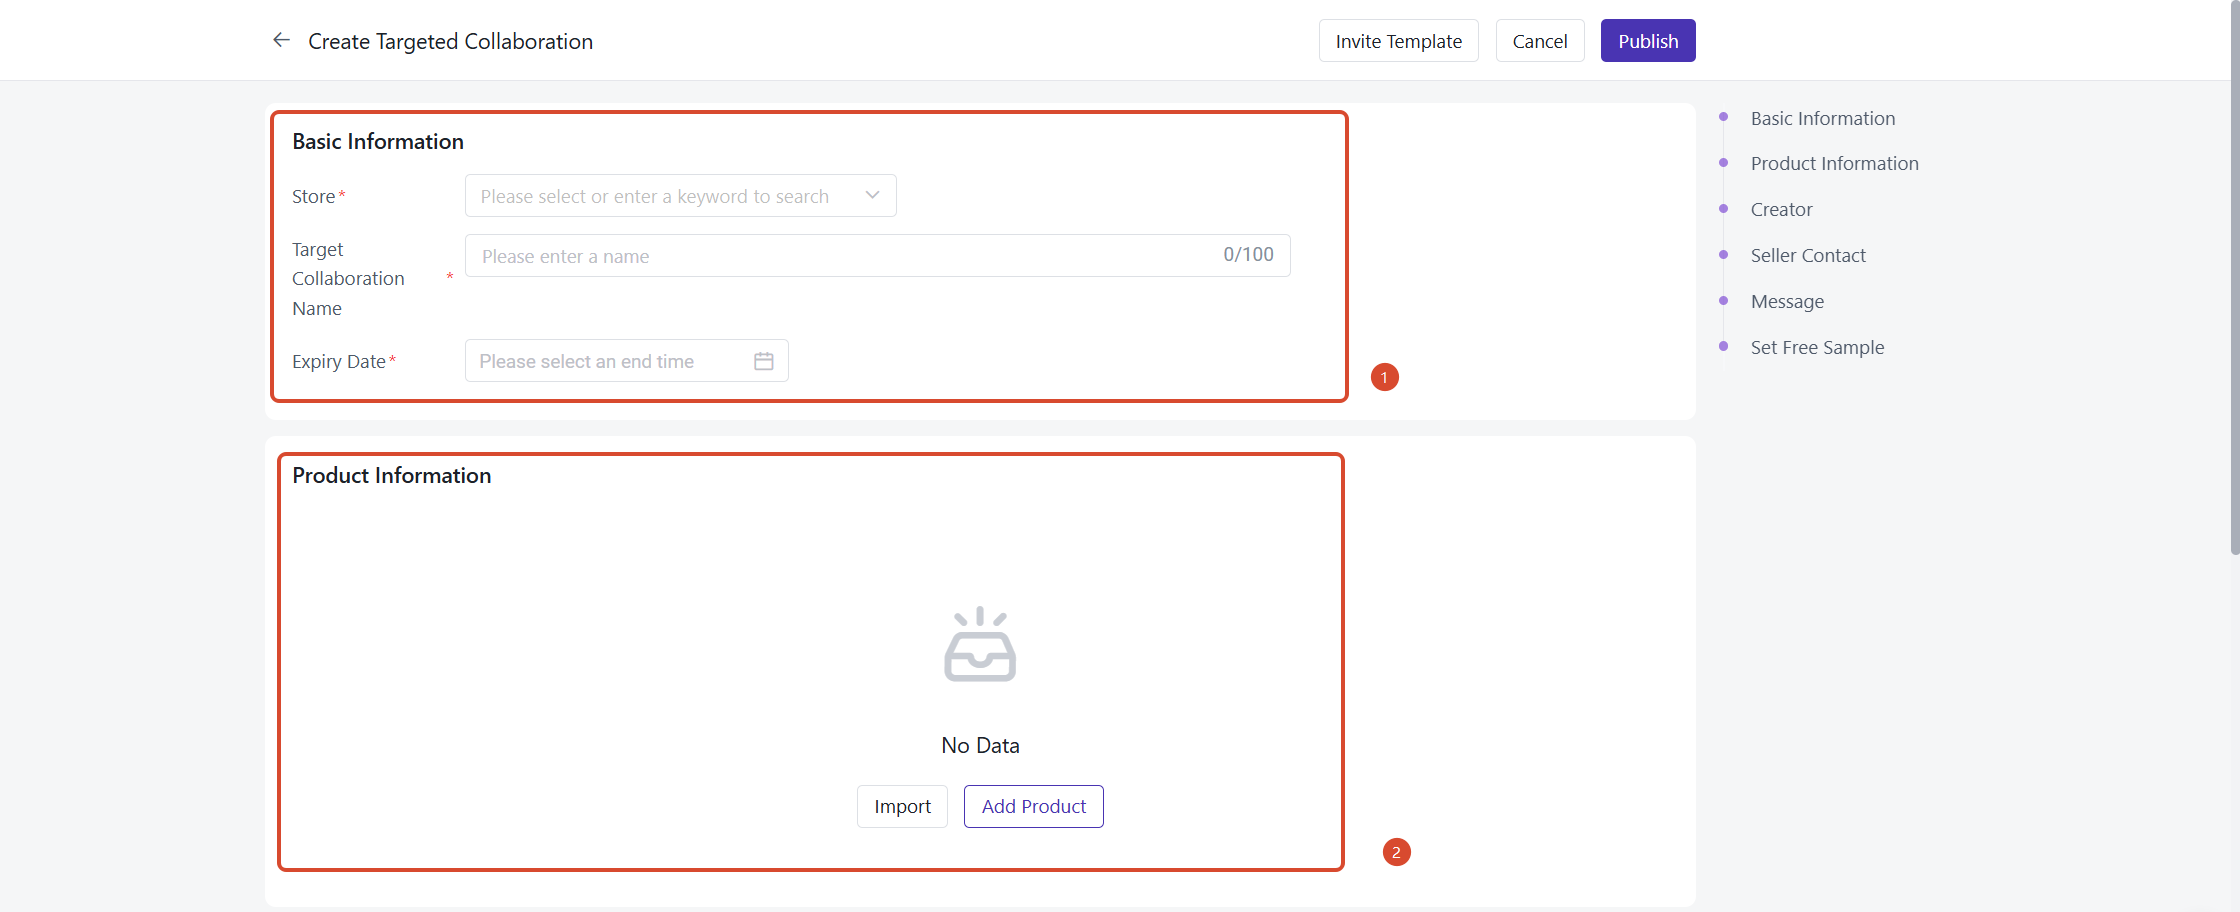
Click Create Promotion, and then fill in the following sections:
① Basic Info (required)
Choose your Store, enter a Target Collaboration Name, and set a Validity End Time. The end time needs to be later than the current time. When you're editing, it can't be earlier than the original end time.
② Products
- You can add up to 100 products, either by selecting them manually or by importing them.
- You'll set a Target Commission Rate for each product (required).
- You can also set an Ad Commission Rate (optional). It applies only to orders that come from ads.
- You can edit the target commission rate and ad commission rate in bulk, and you can delete products in bulk, too.
- When commission changes take effect: if you raise a commission rate, it takes effect immediately. If you lower it and a creator has already added the product to their showcase, the change takes effect at 00:00 the next day. Otherwise, it takes effect immediately. The same rules apply when you delete a product.
③ Creators
You can add up to 50 creators. You can pick them from My Creators or Platform Search, or import them in bulk with the template.
④ Seller Contact
Your email is required. Phone, WhatsApp, Telegram, and Line are optional, and they make it easier for creators to reach you.
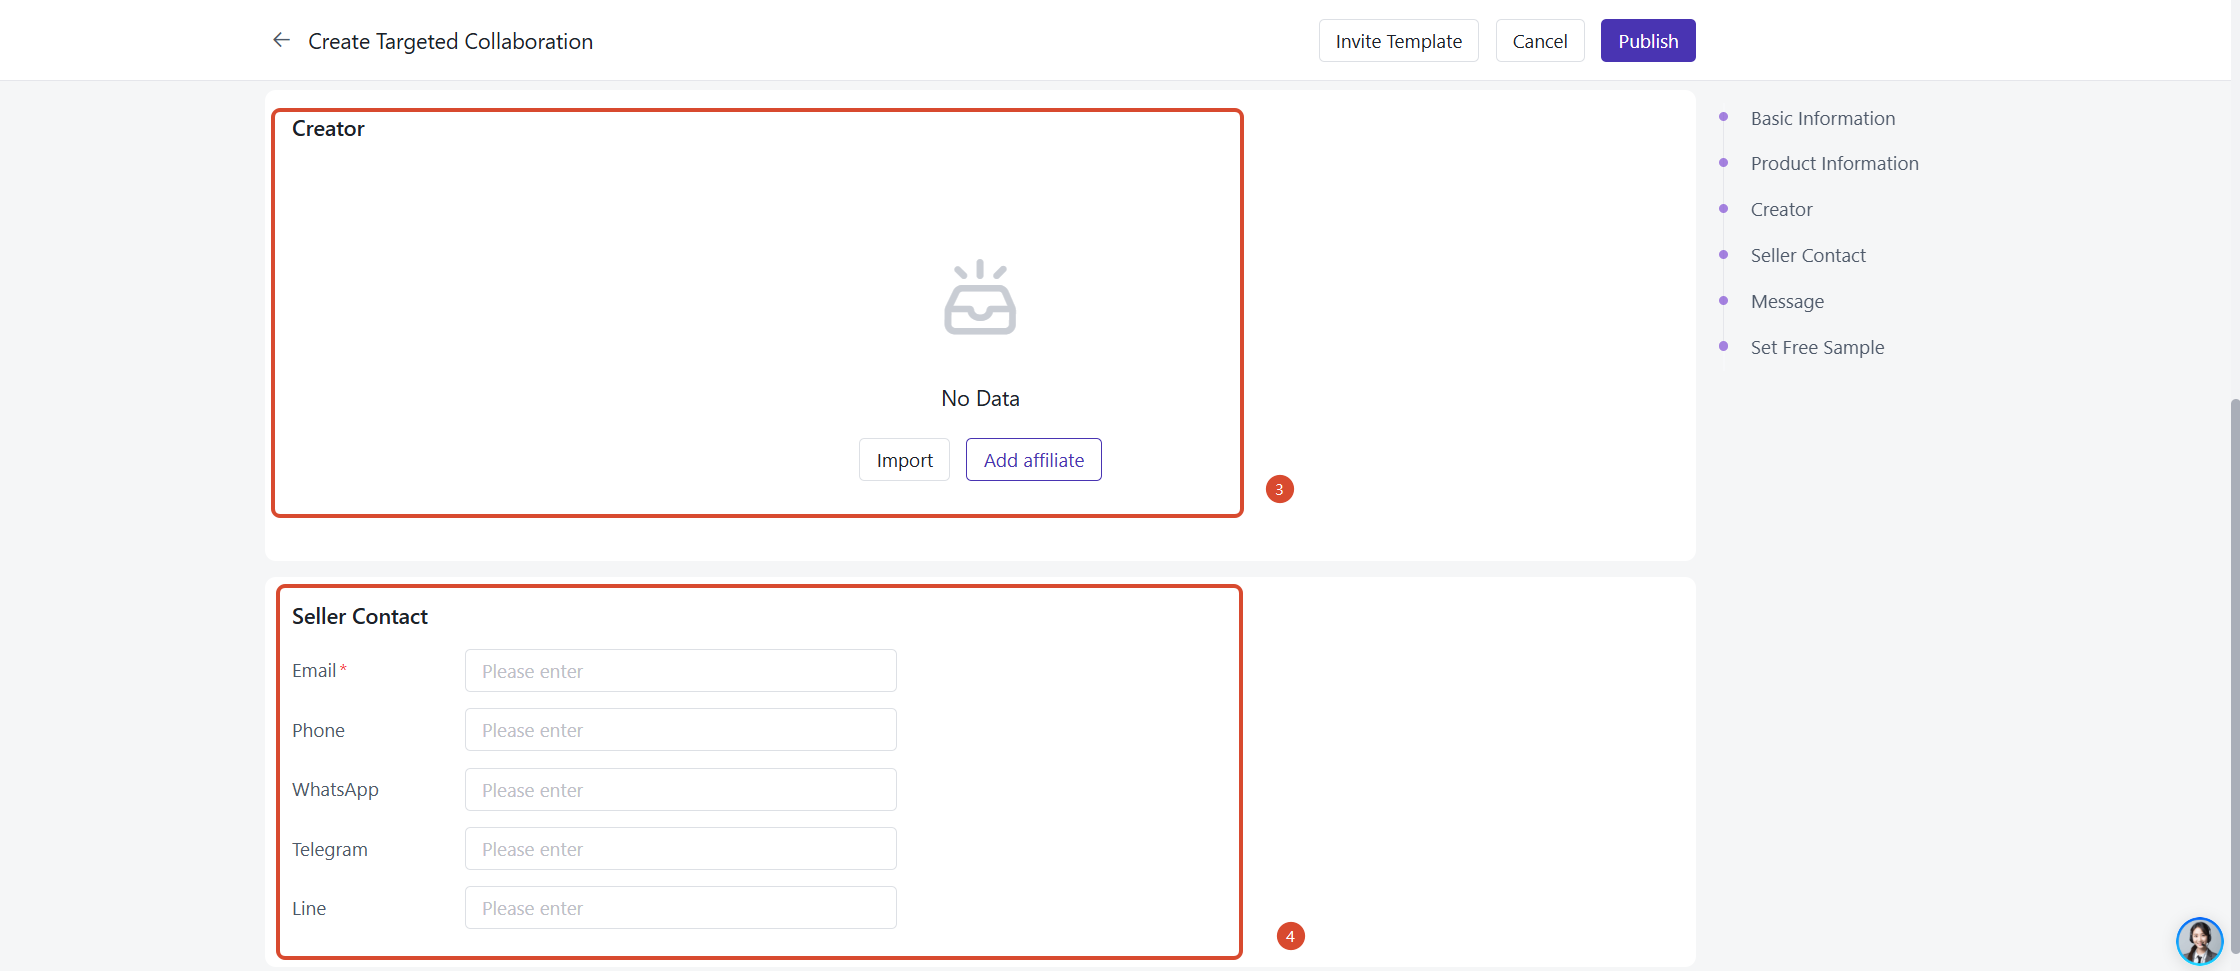
⑤ Invite Message (optional)
This is the private message that creators will receive from you. It's optional and can be up to 500 characters long.
⑥ Free Sample Rules (optional)
After you turn on Offer Free Sample, you can choose how you'd like to review requests:
- Manual Review: you review each sample before it's shipped.
- Auto Approval: sample requests from creators are approved automatically.
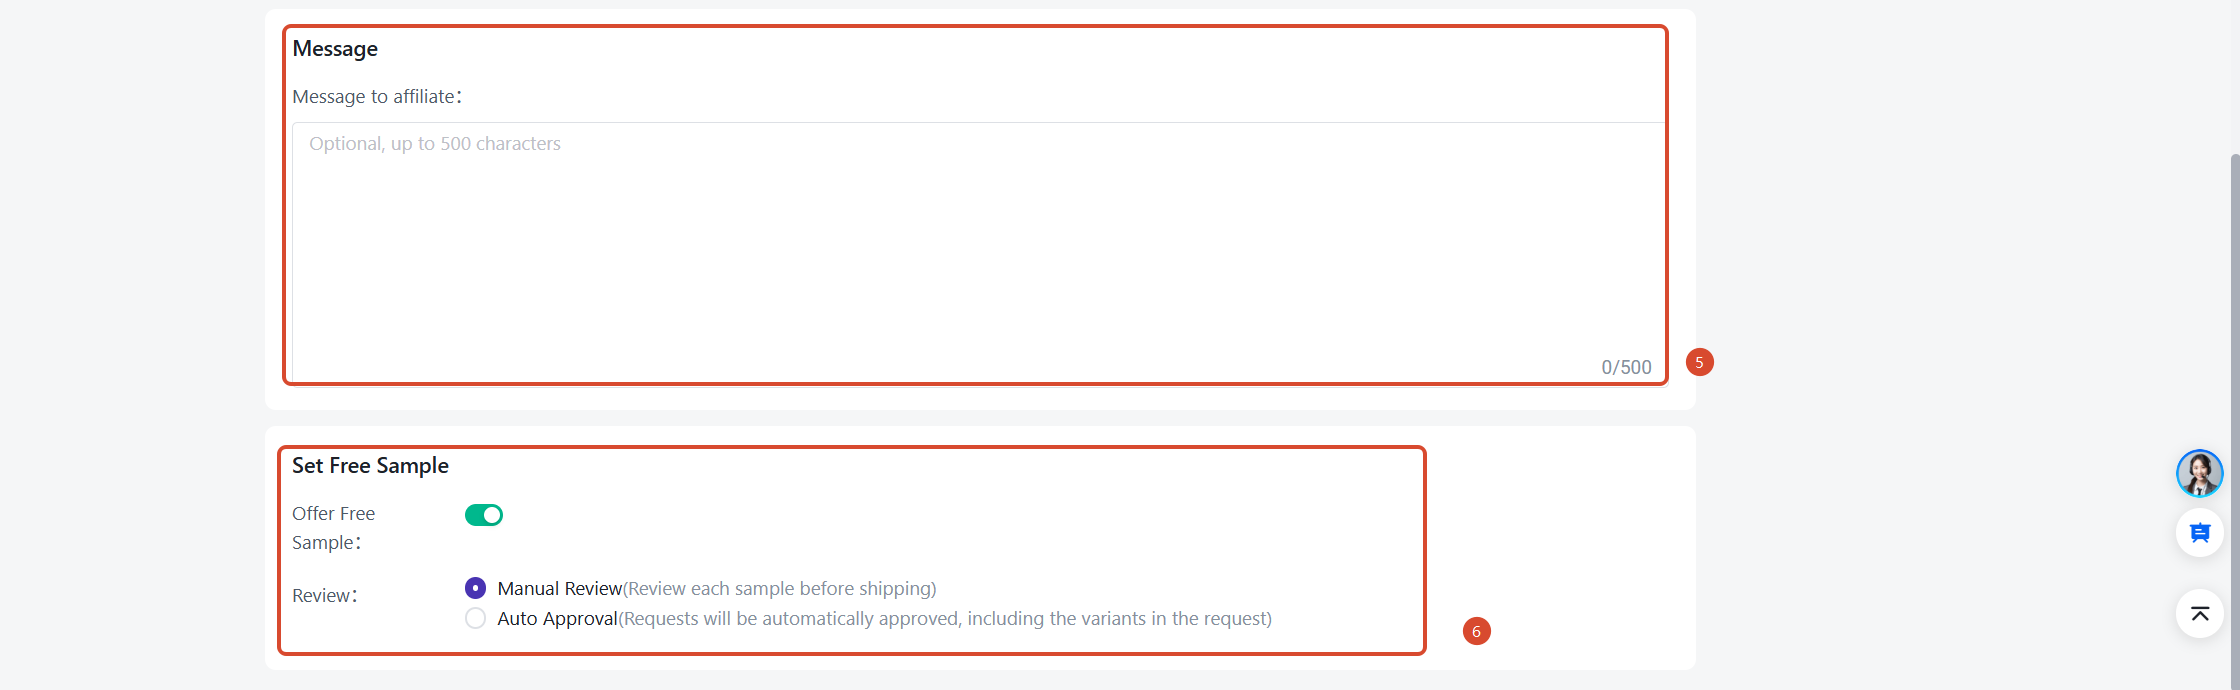
⑦ Use an Invite Template (optional)
Click Invite Template and choose one you've saved. If you don't have a suitable template yet, you can also choose Create Invite Template.
⑧ Publish
When you've filled everything in, click Publish.
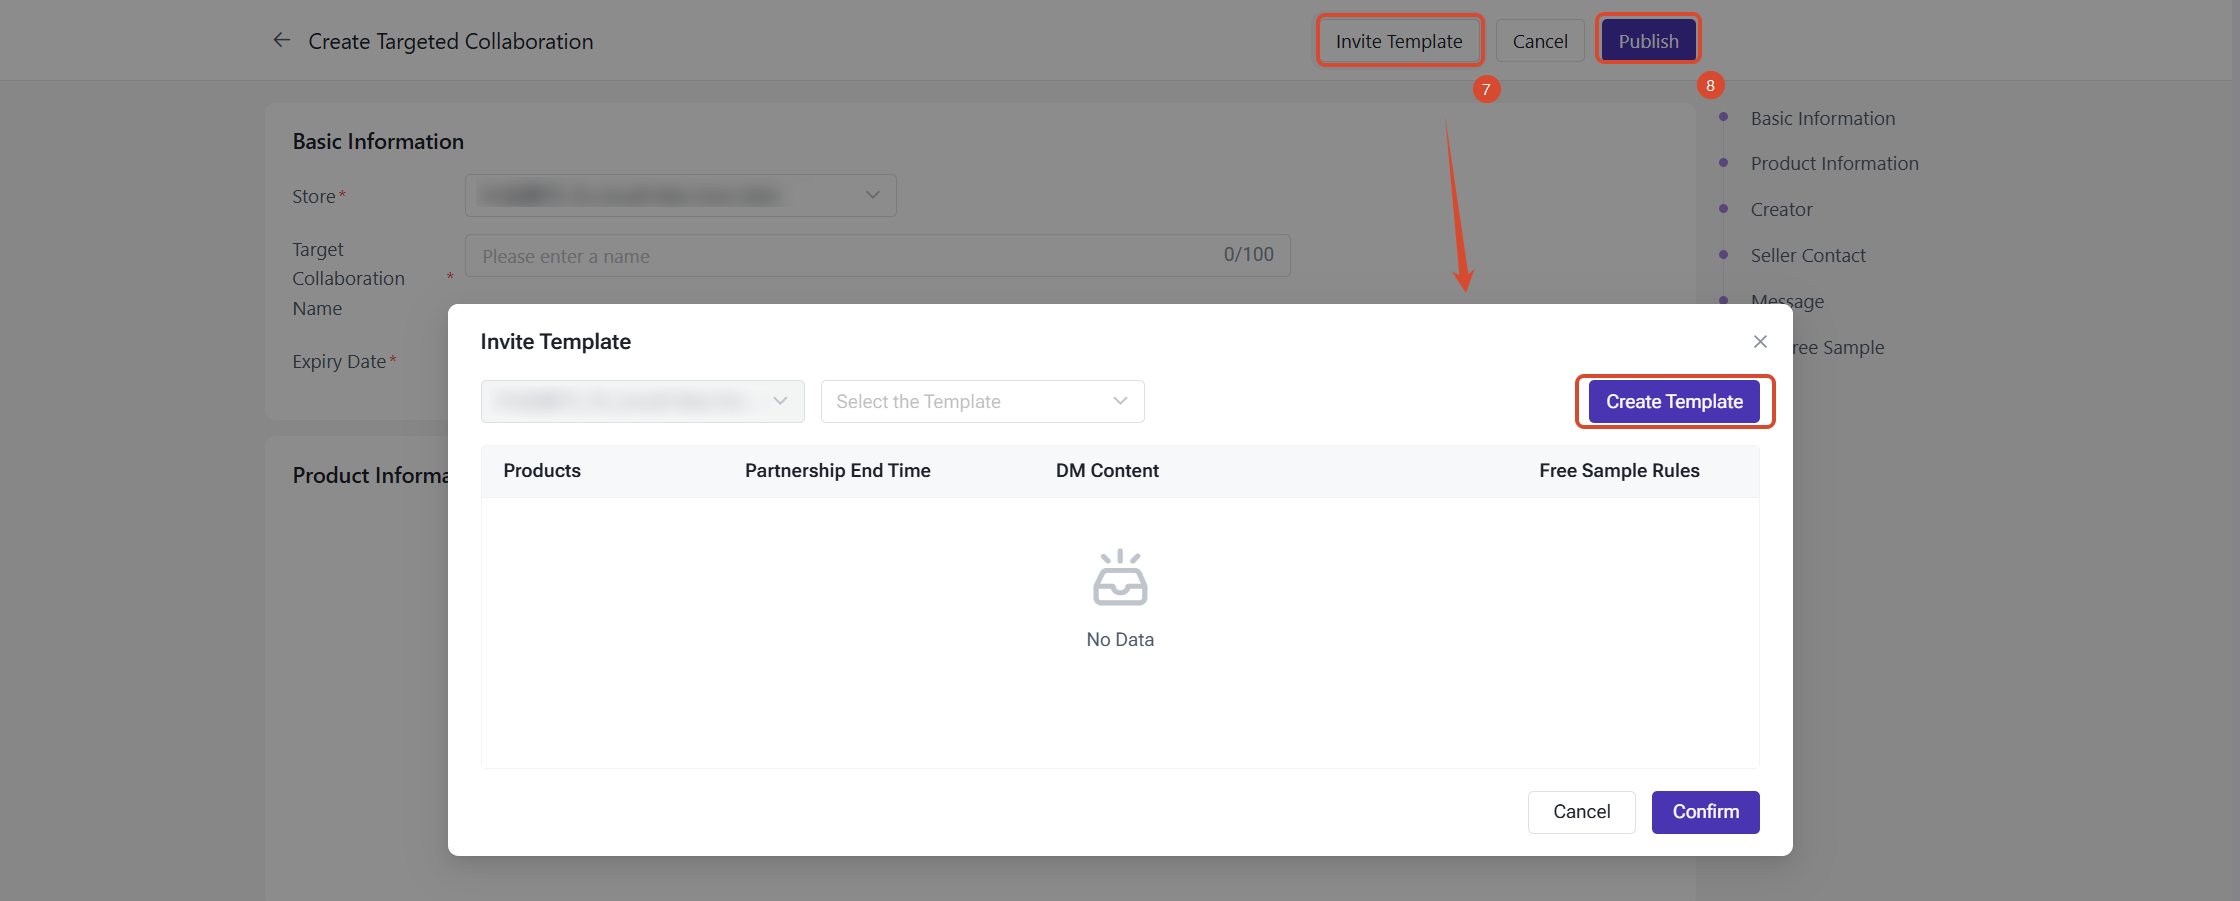
Auto Invite Task
Set your goal and conditions here, and the system will find creators and send invites for you.-
Task List
- Details (all statuses): you can view the task settings, results, and failure records in read-only mode.
- Pause (Ongoing): once you pause a task, the system stops sending further invites.
- Resume (Paused): the task carries on with creators who haven't been invited yet, and it won't send a second invite to anyone who already received one.
- End (Ongoing, Pending, Paused): an ended task can't continue, so the system asks you to confirm first.
- Copy (all statuses): the system brings in the invitation content and target creator settings from the original task. You'll need to enter a new task name and execution time.
- Delete (Ended, Terminated): this removes only the task record, and the Target Collaborations that were already created stay as they are.
-
Create an Auto Invite Task
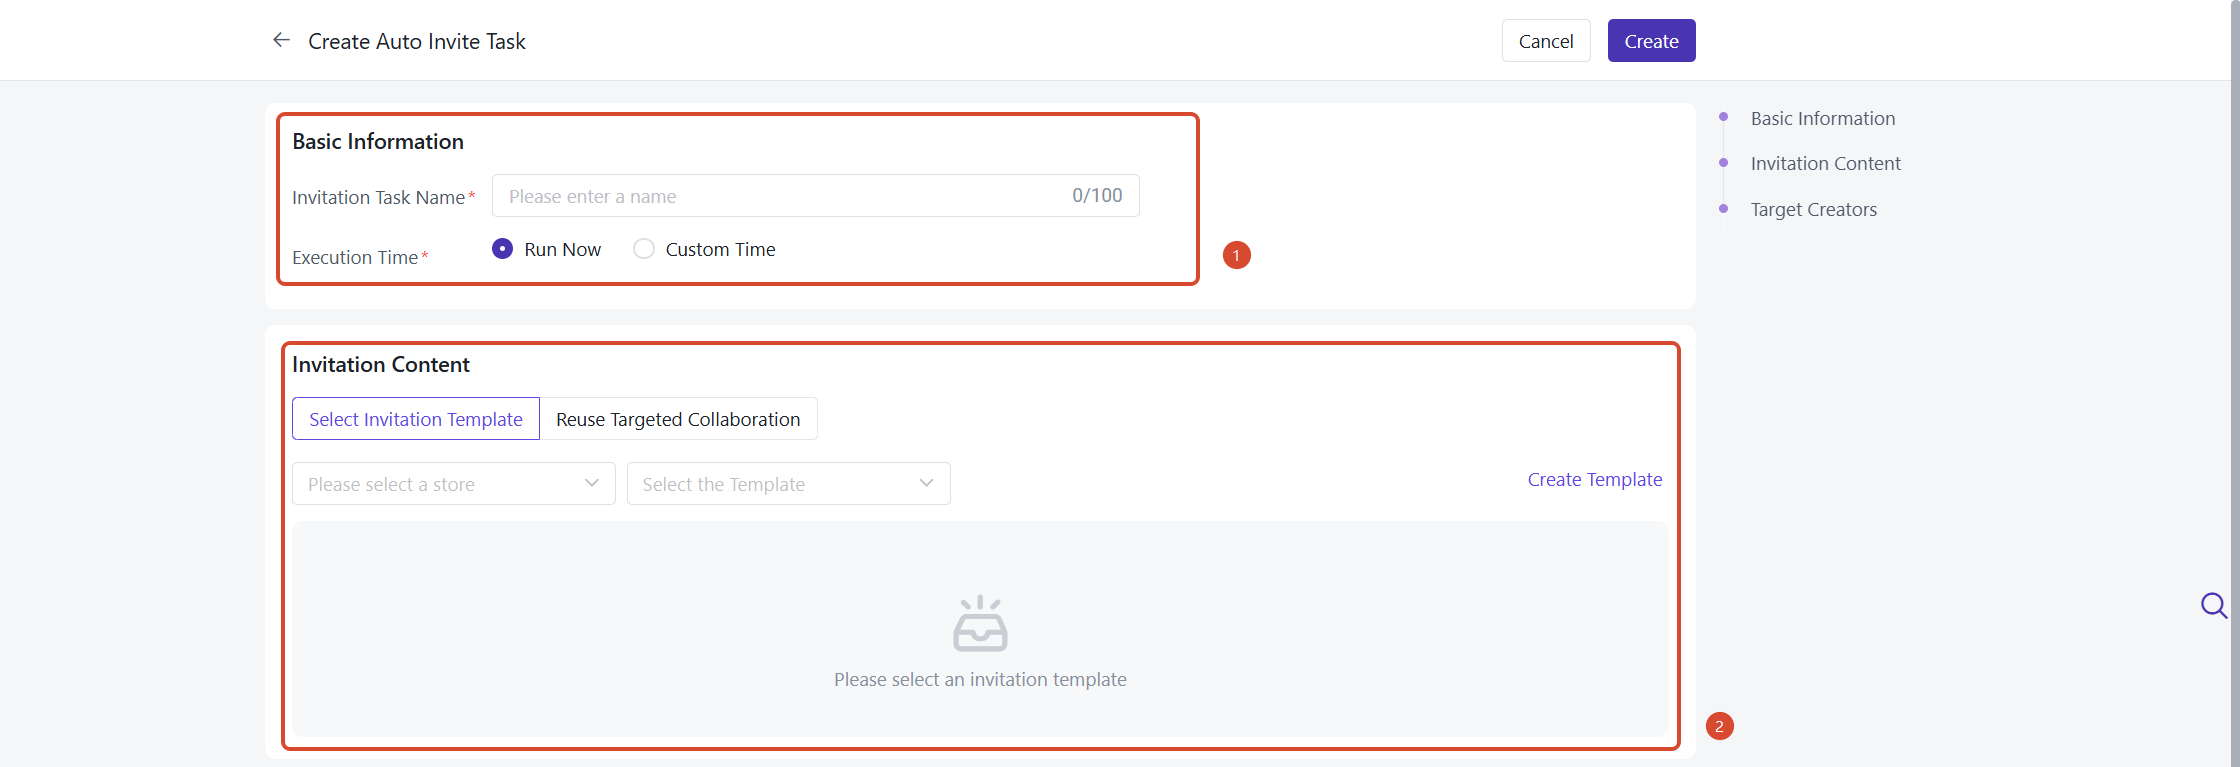
① Basic Info
- Invitation Task Name (required, up to 100 characters)
- Execution Time (required): you can choose Run Now or set a Custom Time.
- Select Invitation Template: choose a template for your task. If you'd like to change a template, you can do that on the Invite Template page.
- Reuse Targeted Collaboration: choose a store and an existing Target Collaboration to reuse.
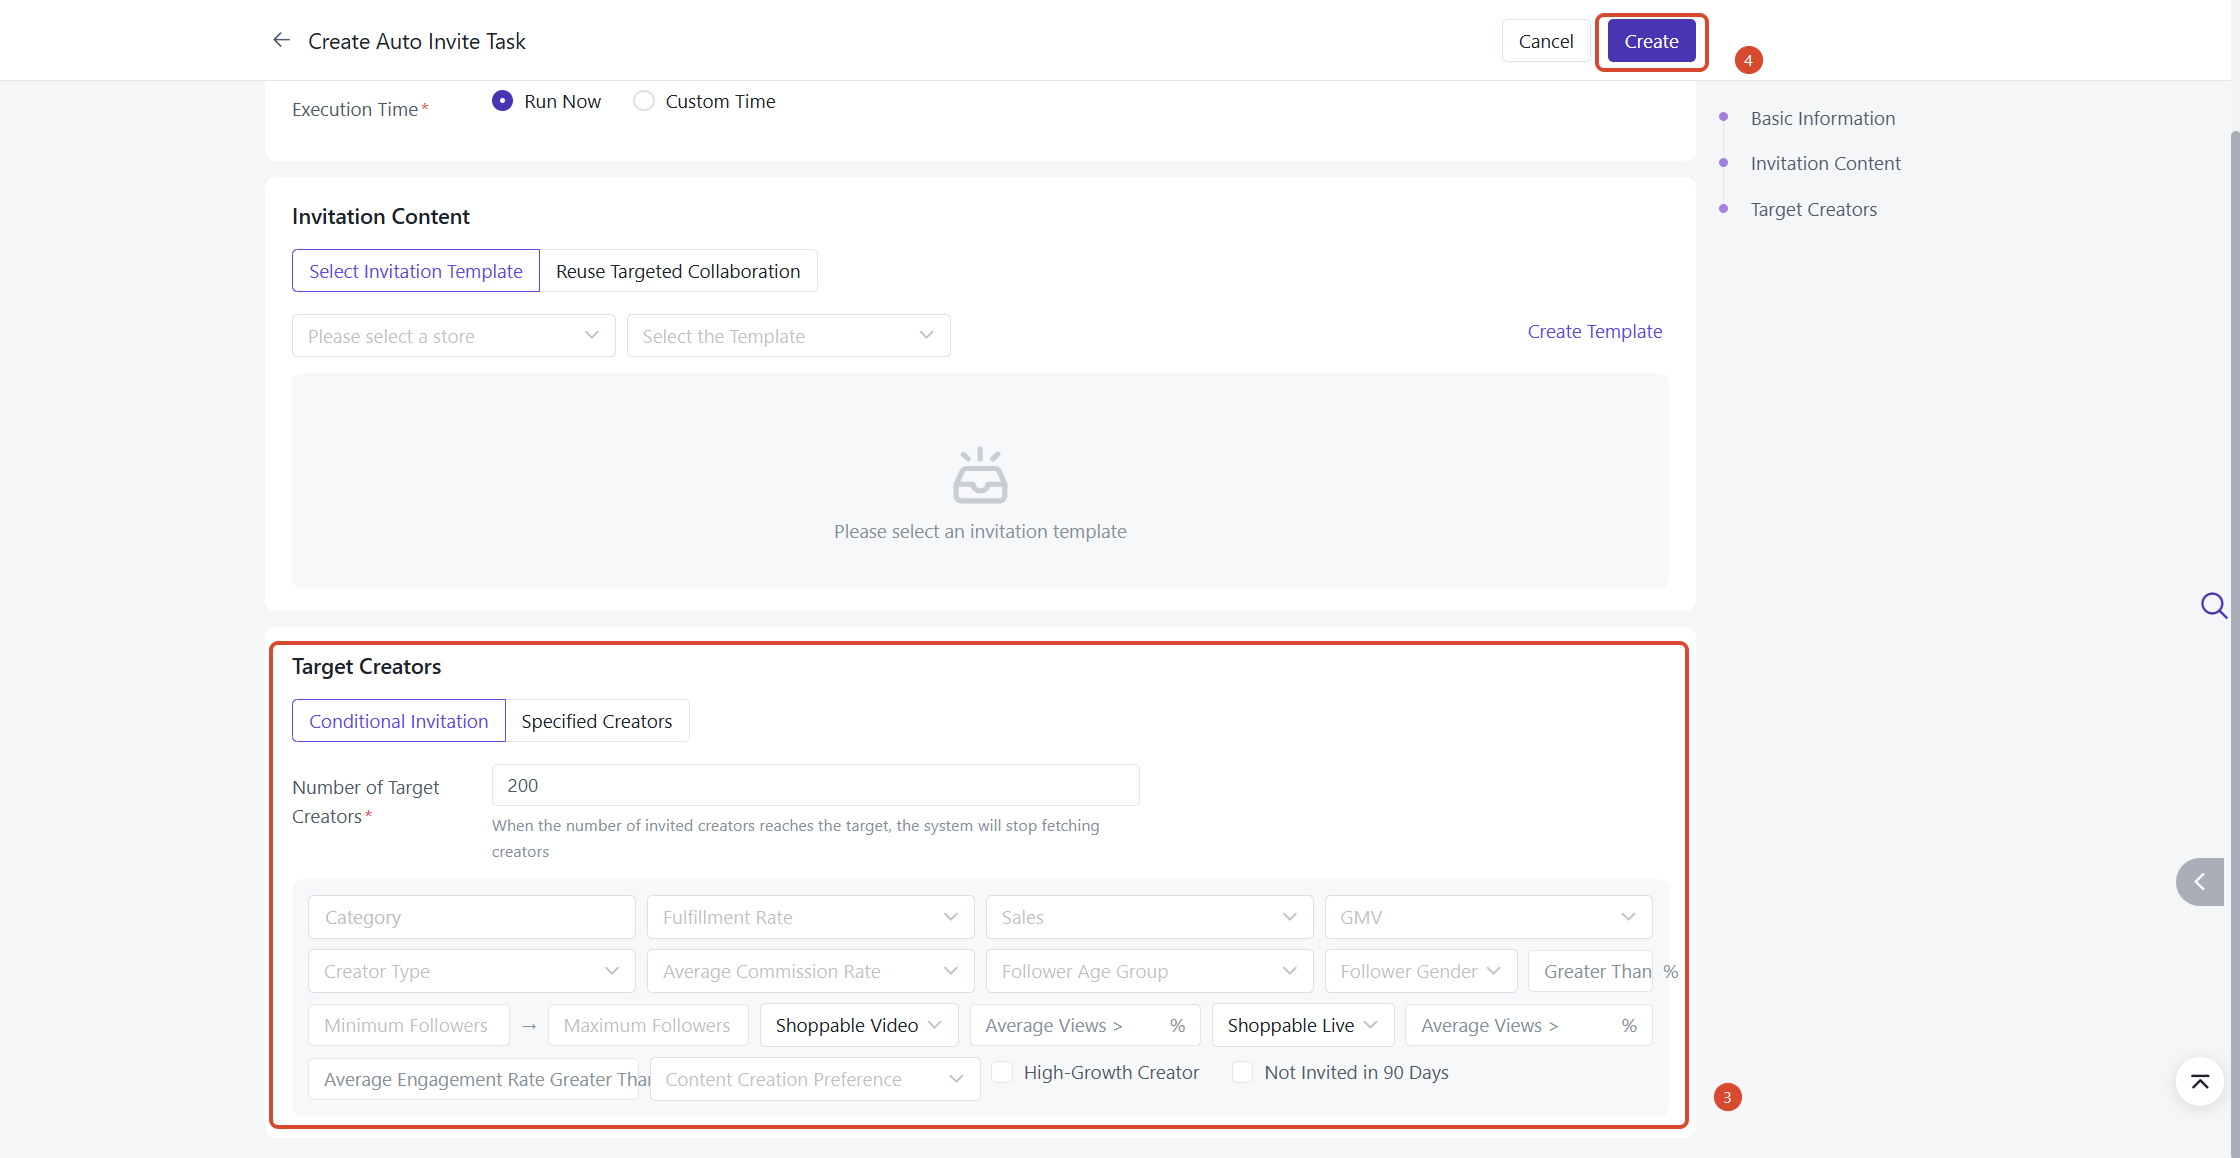
③ Target Creators
- Conditional Invitation: enter the Number of Target Creators and set your filters. The system will find creators who match them.
- Specified Creators: enter the creator IDs you'd like to invite, separated by line breaks or spaces. The system removes extra spaces at the beginning and end, as well as duplicate IDs.
When you've filled everything in, click Create.
-
How Your Task Runs
- When the execution time arrives, the task status changes to In Progress.
- If you're using a template, the system creates a Target Collaboration and sends the invites. If you're reusing a Target Collaboration, the system adds creators to it.
- One Target Collaboration can include up to 50 creators. If a task has more, the system splits them into several Target Collaborations and names them "task name + a number starting from 1".
- These creators won't be invited again: creators who were already invited successfully, creators your store has already invited, creators who are blocked, creators who can't be invited, and creators the API reports as invalid.
- If an invite fails for one creator, the other creators aren't affected, and you'll find the reason in the task details.
- Once the number of invites reaches your target, the task status changes to Ended automatically.
- If you pause or end a task, the system stops processing creators who haven't been invited yet. Invites that were already sent won't be withdrawn.
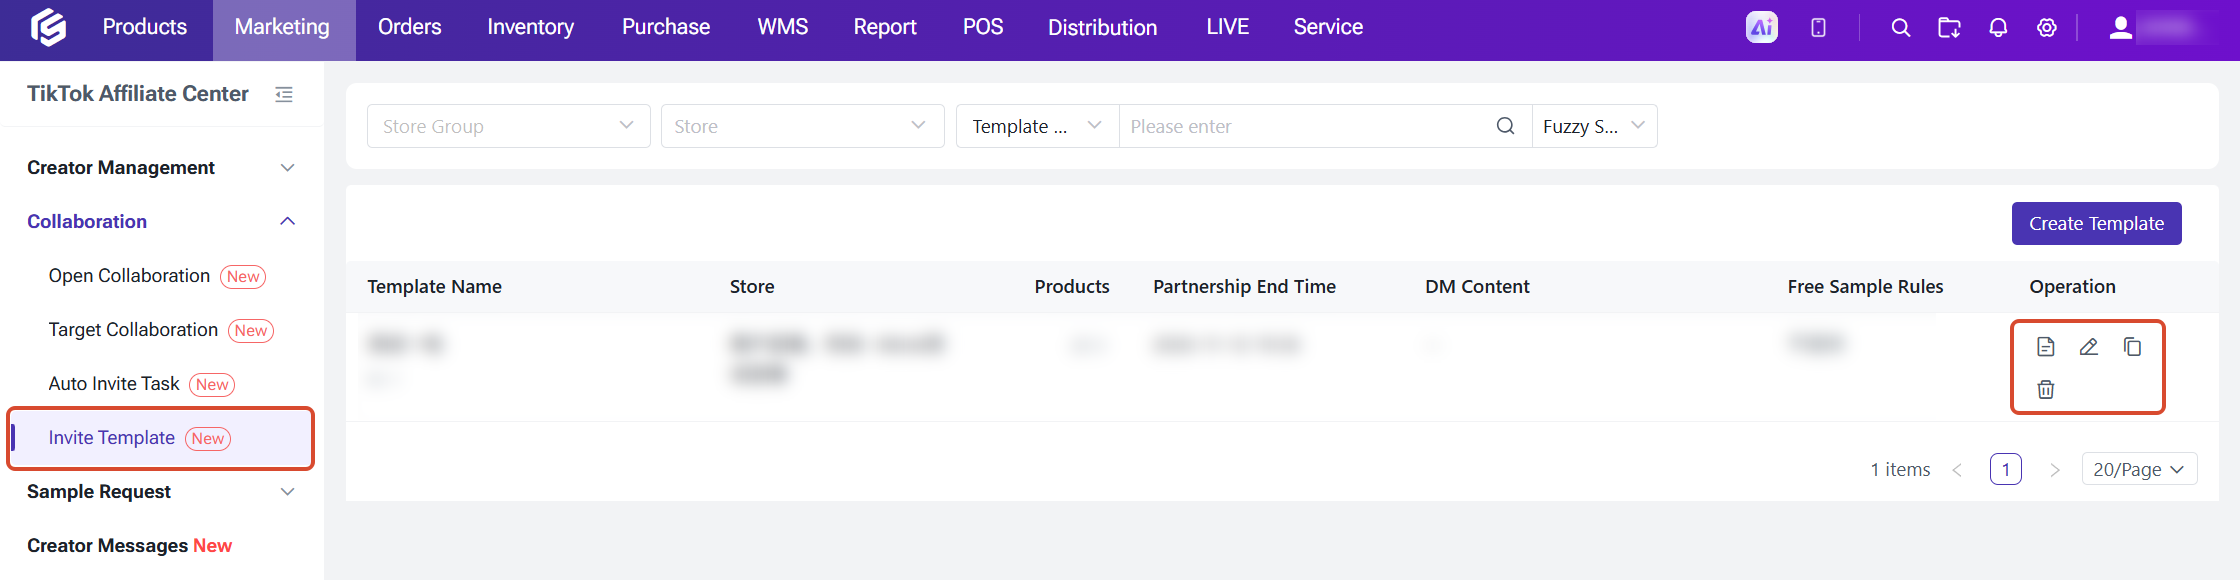
Invite Template
You can save the invite settings you use often as a template, and then pick it with one click whenever you create a Target Collaboration or an Auto Invite Task.Actions: Details, Edit, Copy, and Delete. When you copy a template, you'll need to enter a new template name.
-
Create a Template
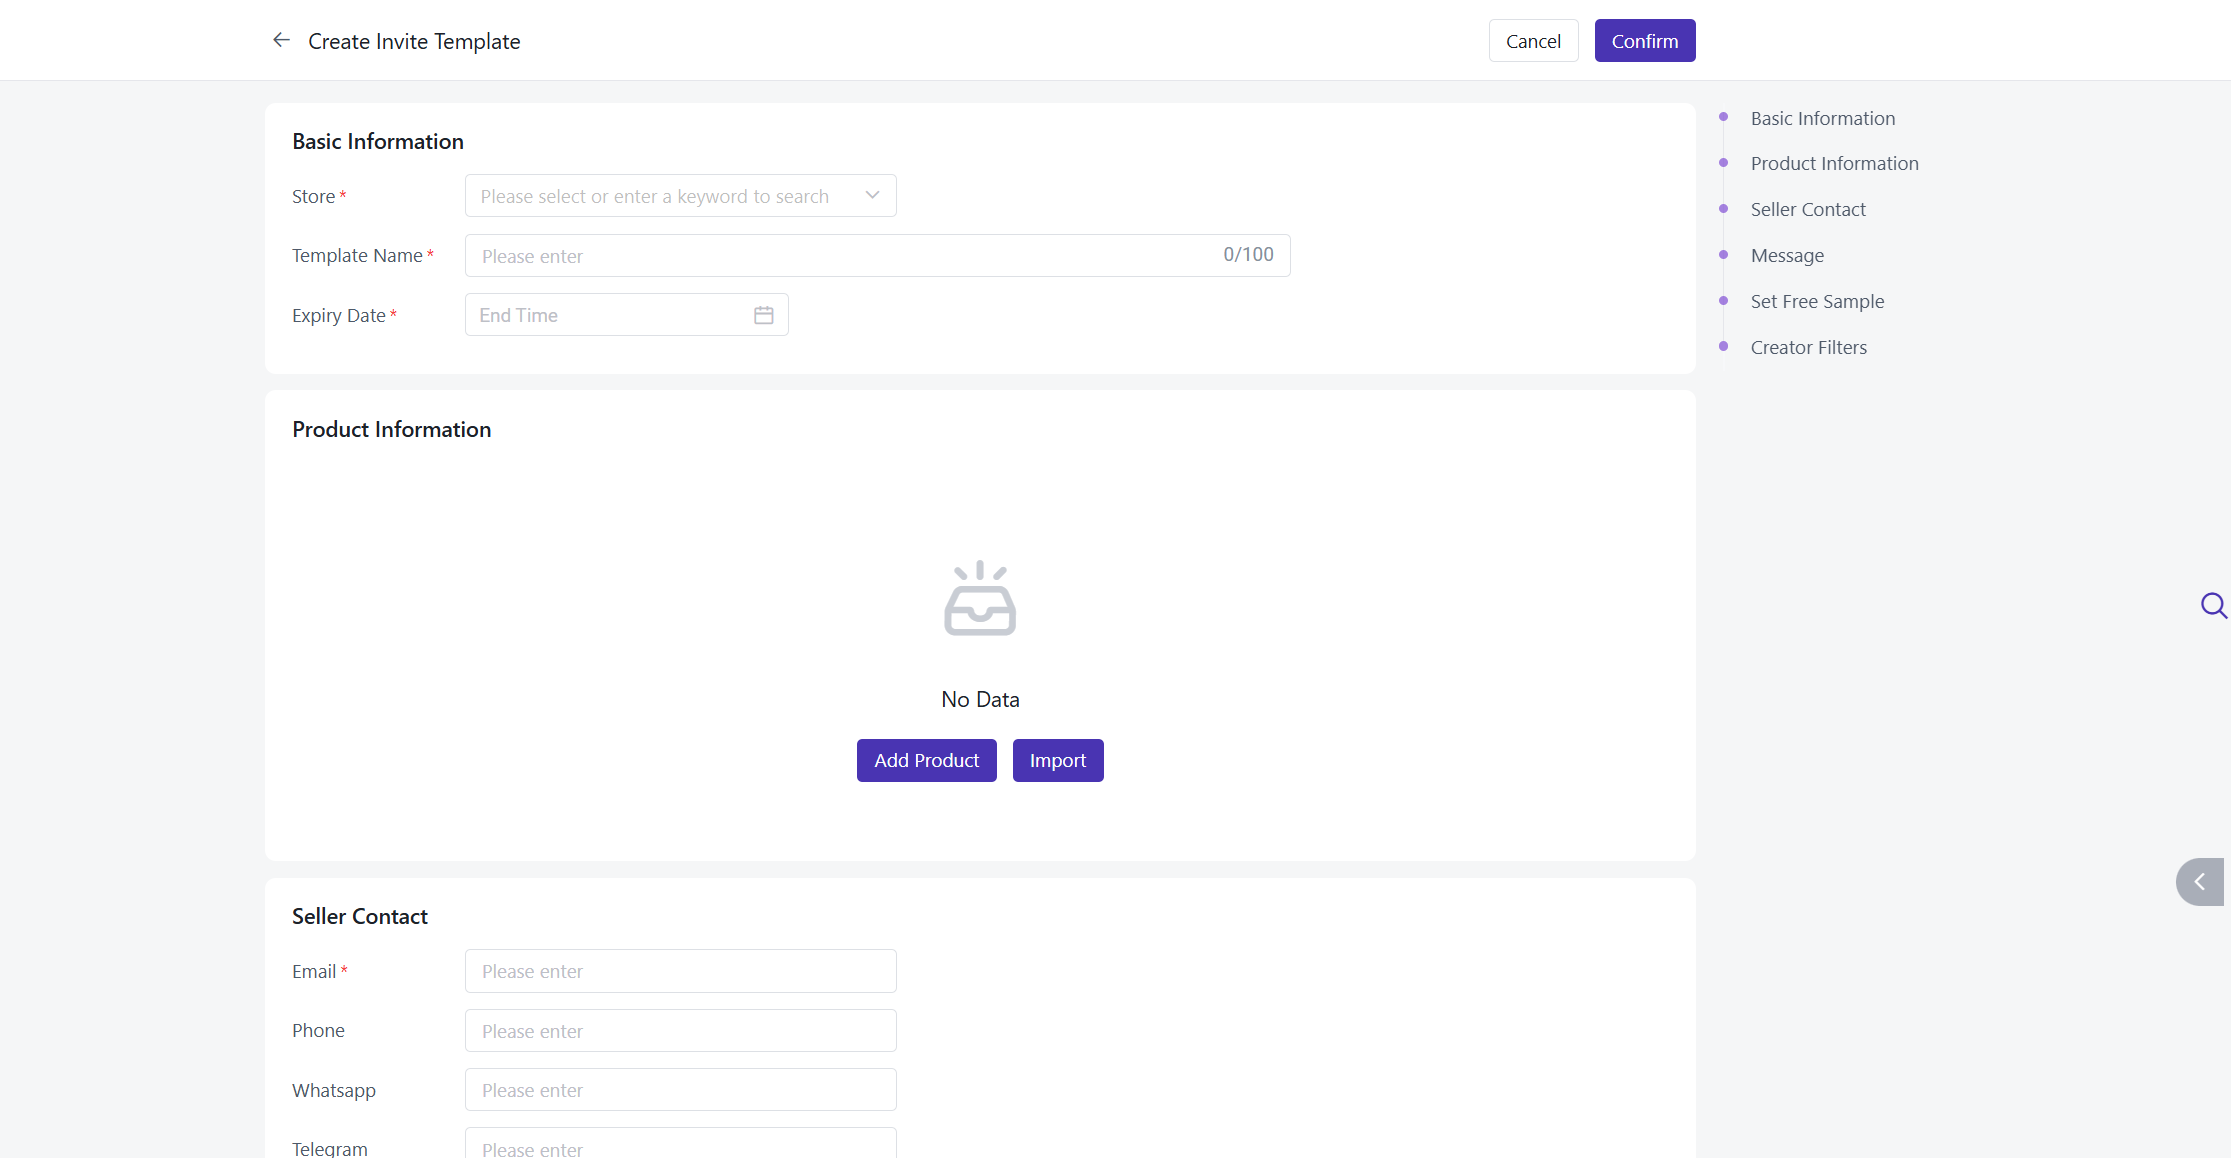
Creator Filters apply only to Auto Invite Tasks:
- The store follows the one you chose in Basic Info, so you can't change it separately.
- If your template doesn't include any creator filters, your Auto Invite Task will use the target creator conditions you set on the task page.

-
How Templates Relate to Auto Invite Tasks
- If you edit the template later, it won't affect tasks you've already created.
- If you delete the template, it won't affect the invite settings in tasks you've already created, either.
Sample Request
Sample Review
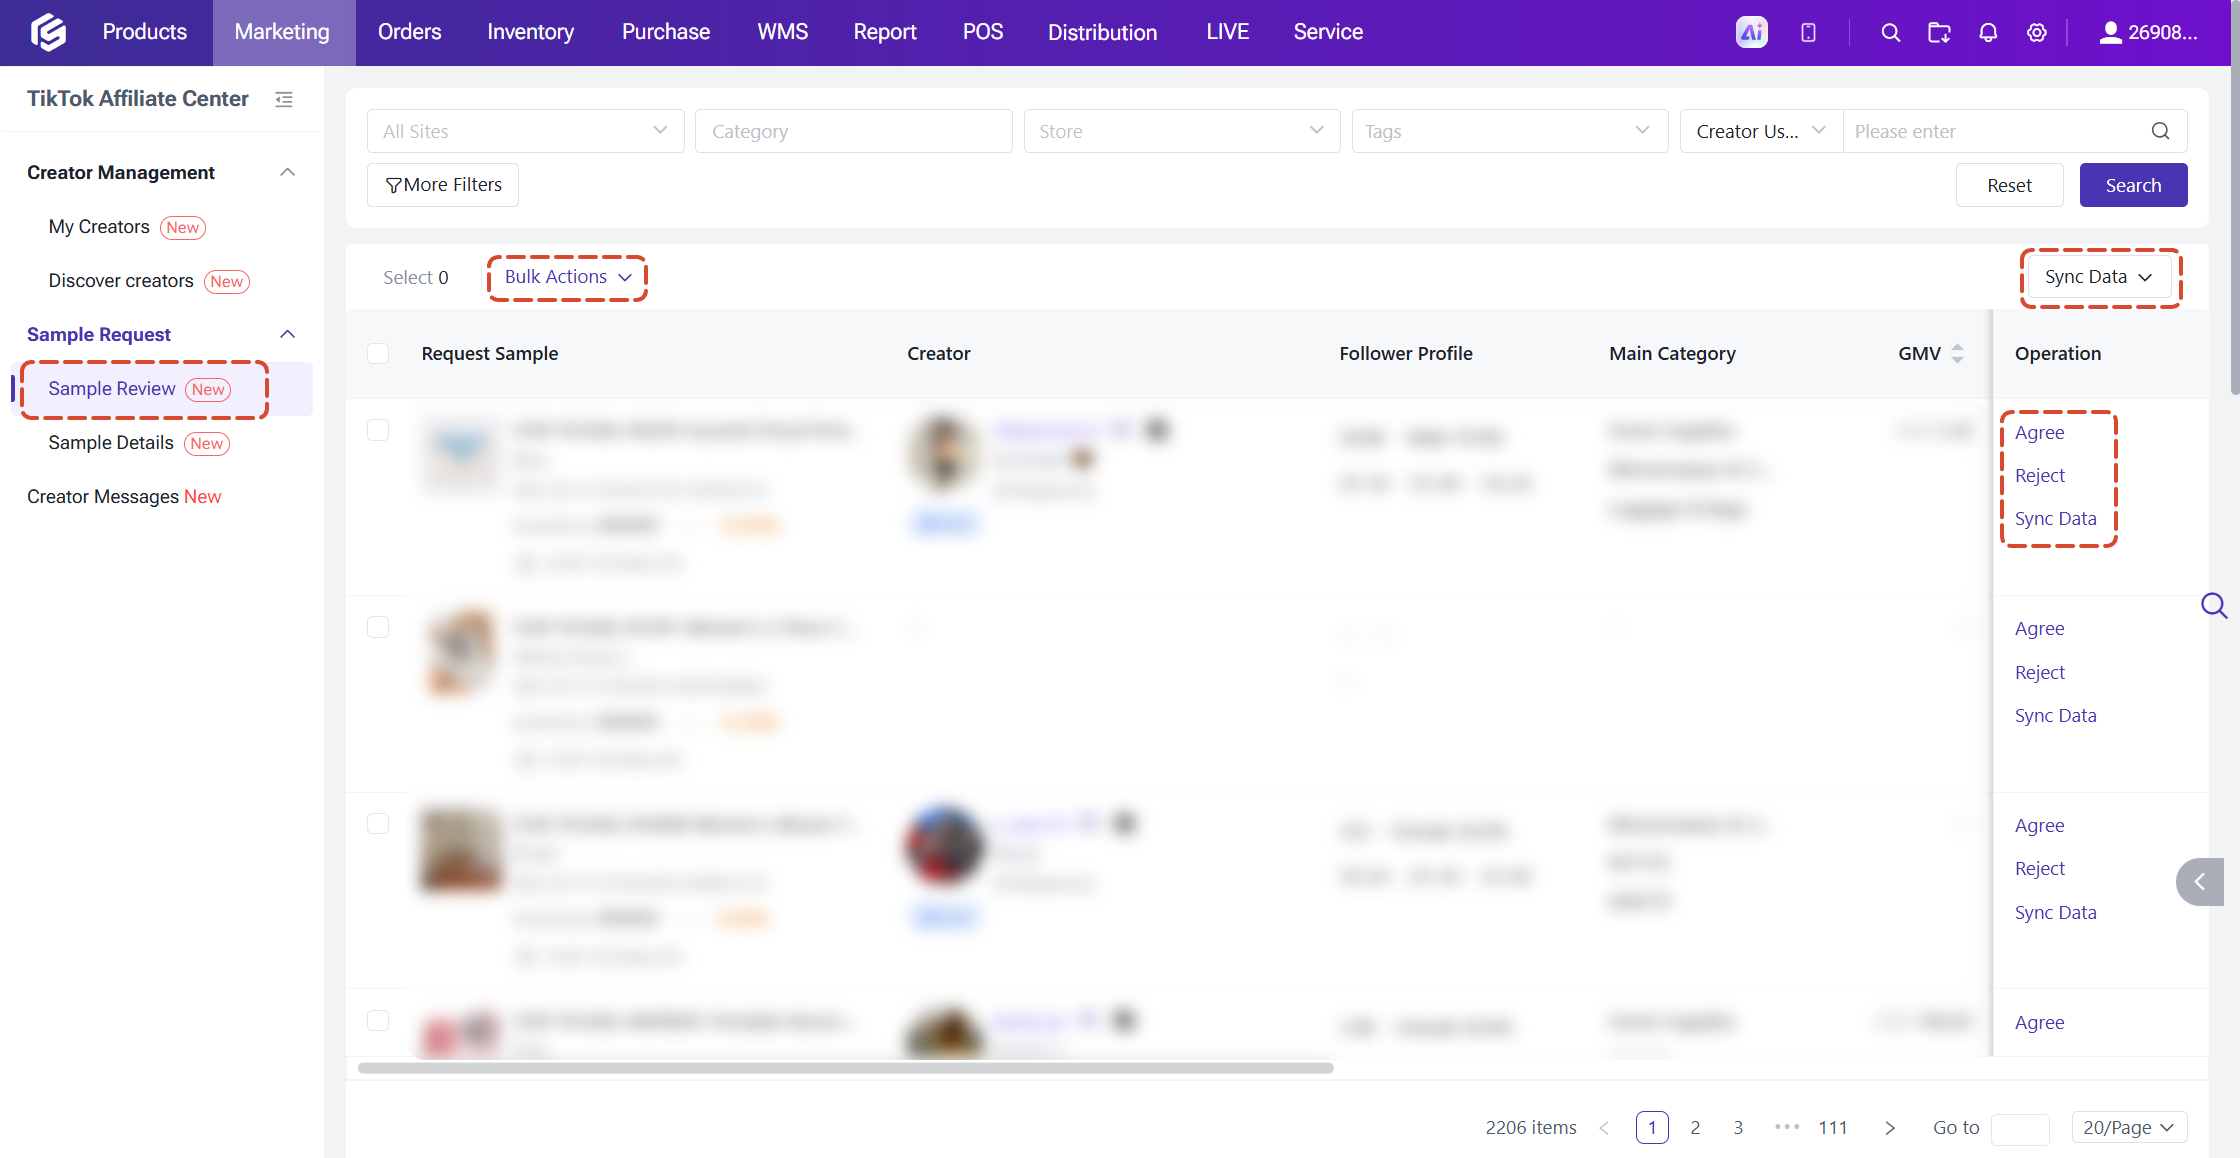
This page lists sample requests submitted by creators that are awaiting your review. Once a request is reviewed (agreed or rejected), it is removed from this page.
● Single Review: Click [Agree] or [Reject]; a reason must be selected when rejecting
● Bulk Review: Select multiple requests, click [Bulk actions], and choose bulk agree or bulk reject;
● Sync Data: The system automatically syncs pending requests every 2 hours; you can also click [Sync data] and choose to sync all or only the selected requests.
Sample Details
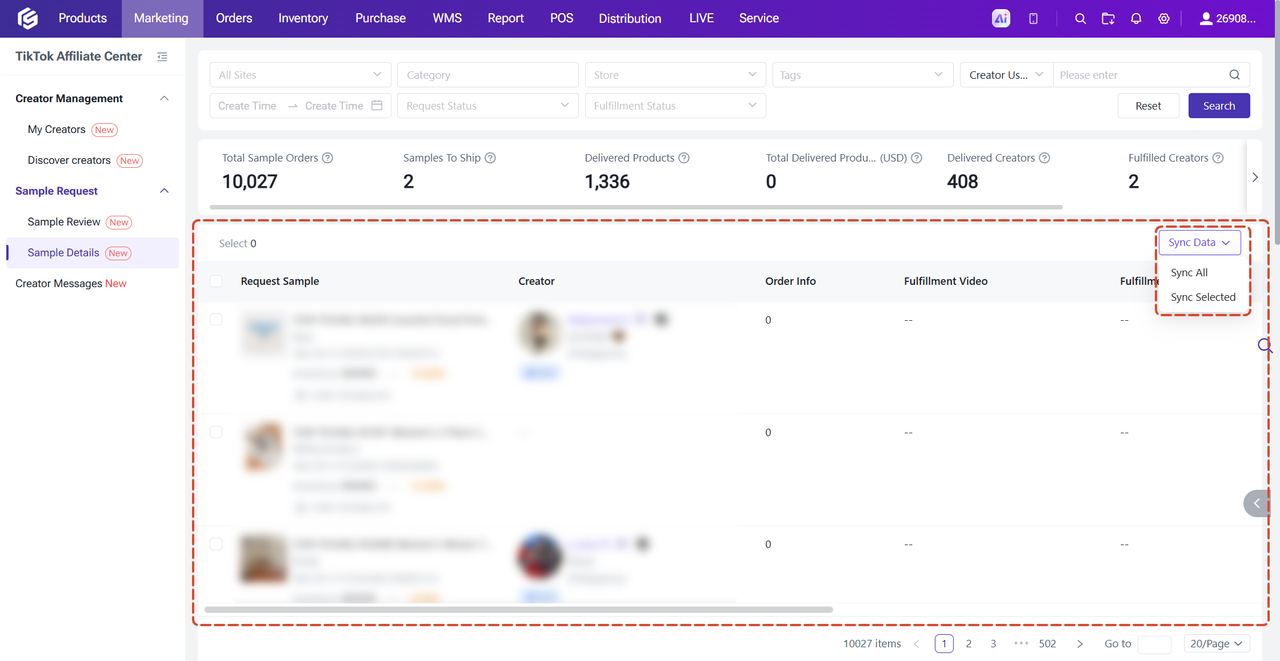
How did the samples perform after shipping? See it all in one place.
- Filters: site, category, store, tags, creator username, create time, request status, fulfillment status.

- Summary metrics (update in real time with your filters): total sample orders, samples to ship, delivered products, total delivered product value (converted to USD), delivered creators, fulfilled creators who, and number of orders generated by fulfillment content.

- List content: request sample, creator, order info, fulfillment video, fulfillment live (showing content ID, cumulative views / likes / comments / orders, and fulfillment time; click to open the original content on TikTok), request ID, request status, fulfillment status, shipping deadline, reviewer, and review time.
- Data sync: The system syncs automatically every day, and you can also manually sync all or selected records.
Creator Messages
Here you can view and manage conversations with affiliate creators. Send text, images, and product cards, and check each creator’s basic information and performance data.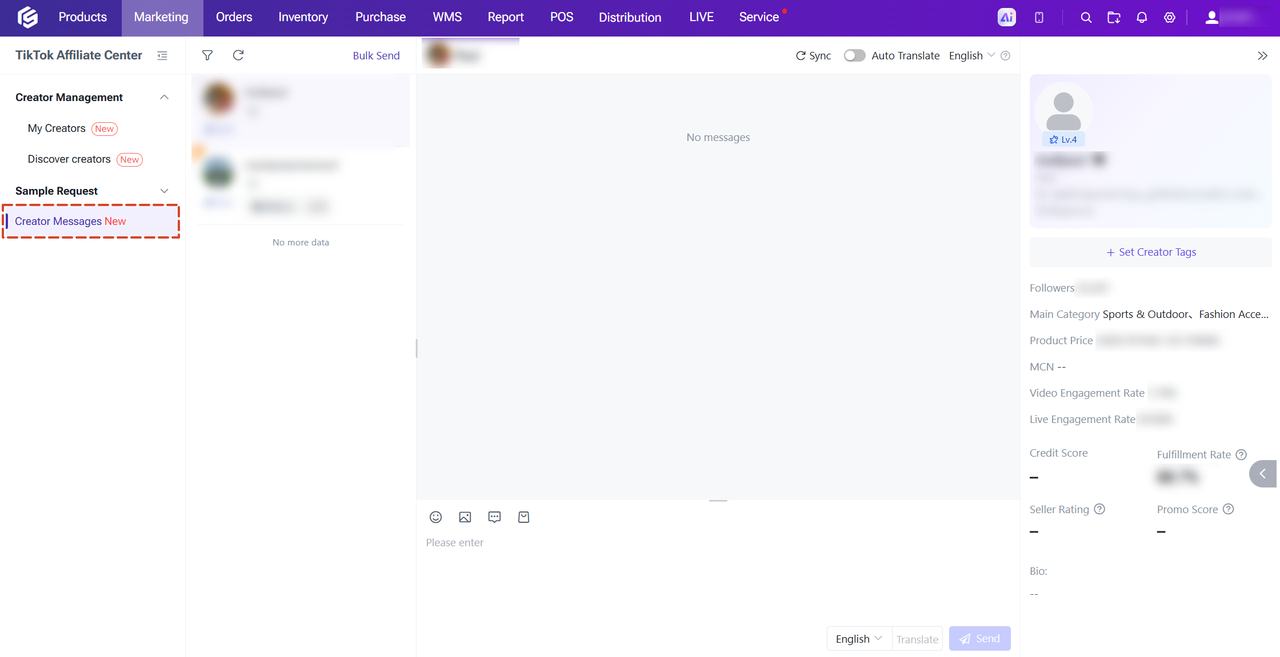
FAQ
Q1: How often is creator data updated? Data in "My Creators" is updated automatically every day in the early morning; you can also click "Sync Creators" at any time to update it manually. Data in Discover Creators is a live search result.
Q2: Which creators does "Auto Add" add?
When enabled, the system automatically adds creators who have communicated with you, requested samples, or received samples to "My Creators."