How to Set Up and Use Paycools Payment in BigSeller?
Copy link & title
Update Time: 11 Sep 2026 03:15
BigSeller has integrated PayCools Online Payment to help you manage the complete flow of "place an order — collect payment — record the payment — reconcile — refund" for offline orders within one system.
With PayCools Online Payment, you can:
With PayCools Online Payment, you can:
- Accept local payment methods: QR codes, e-wallets, online banking, bank transfers and card payments;
- Use one checkout across scenarios: the same capability serves in-store checkout, messenger orders, live-stream orders and distributor account top-ups;
- Refund to the original payment method: refunds are returned to the buyer's original payment account, keeping fund handling compliant.
Payment channels are associated with sites and currencies. The channels you enable must match the site where the store operates and the currency of the order; buyers can only see the channels you have enabled for that site in the checkout.
PayCools Online Payment currently supports the following sites and channels:
PayCools Online Payment currently supports the following sites and channels:
- Indonesia (IDR): QR (QRIS), e-wallets (DANA, OVO, ShopeePay, LinkAja), bank transfers (BCA, BNI, BRI, Mandiri, CIMB, Permata, Danamon and other banks), card payments (including credit card installments), buy now, pay later (Akulaku);
- Philippines (PHP): QR (QRPH, GCash), e-wallets (GCash, PayMaya, GrabPay, Coins, Alipay), online banking (BPI, UBP), card payments;
- Malaysia (MYR): QR (DuitNow), e-wallets (TNG, Boost, GrabPay, MCash), online banking (FPX, CIMB, Public Bank, Hong Leong, RHB, OCBC, HSBC, AmBank and other banks), card payments;
- Thailand (THB): QR (Thailand, WeChat), e-wallets (Rabbit LINE Pay, TrueMoney) and WeChat Pay, online banking (BBL, KTB, SCB, BAY, KBANK, TTB and other banks), card payments.
Quick Start
Complete the following three steps to start collecting payment with PayCools:
1. Open a PayCools merchant account (If you don't have a paycools account and would like to have one, you may contact WhatsApp: +6282312371808)
2. Authorize in BigSeller and enable the channels
3. Start collecting payment
1. Open a PayCools merchant account (If you don't have a paycools account and would like to have one, you may contact WhatsApp: +6282312371808)
2. Authorize in BigSeller and enable the channels
3. Start collecting payment
How to Enable and Manage PayCools Payment
Step 1: Add an Authorization
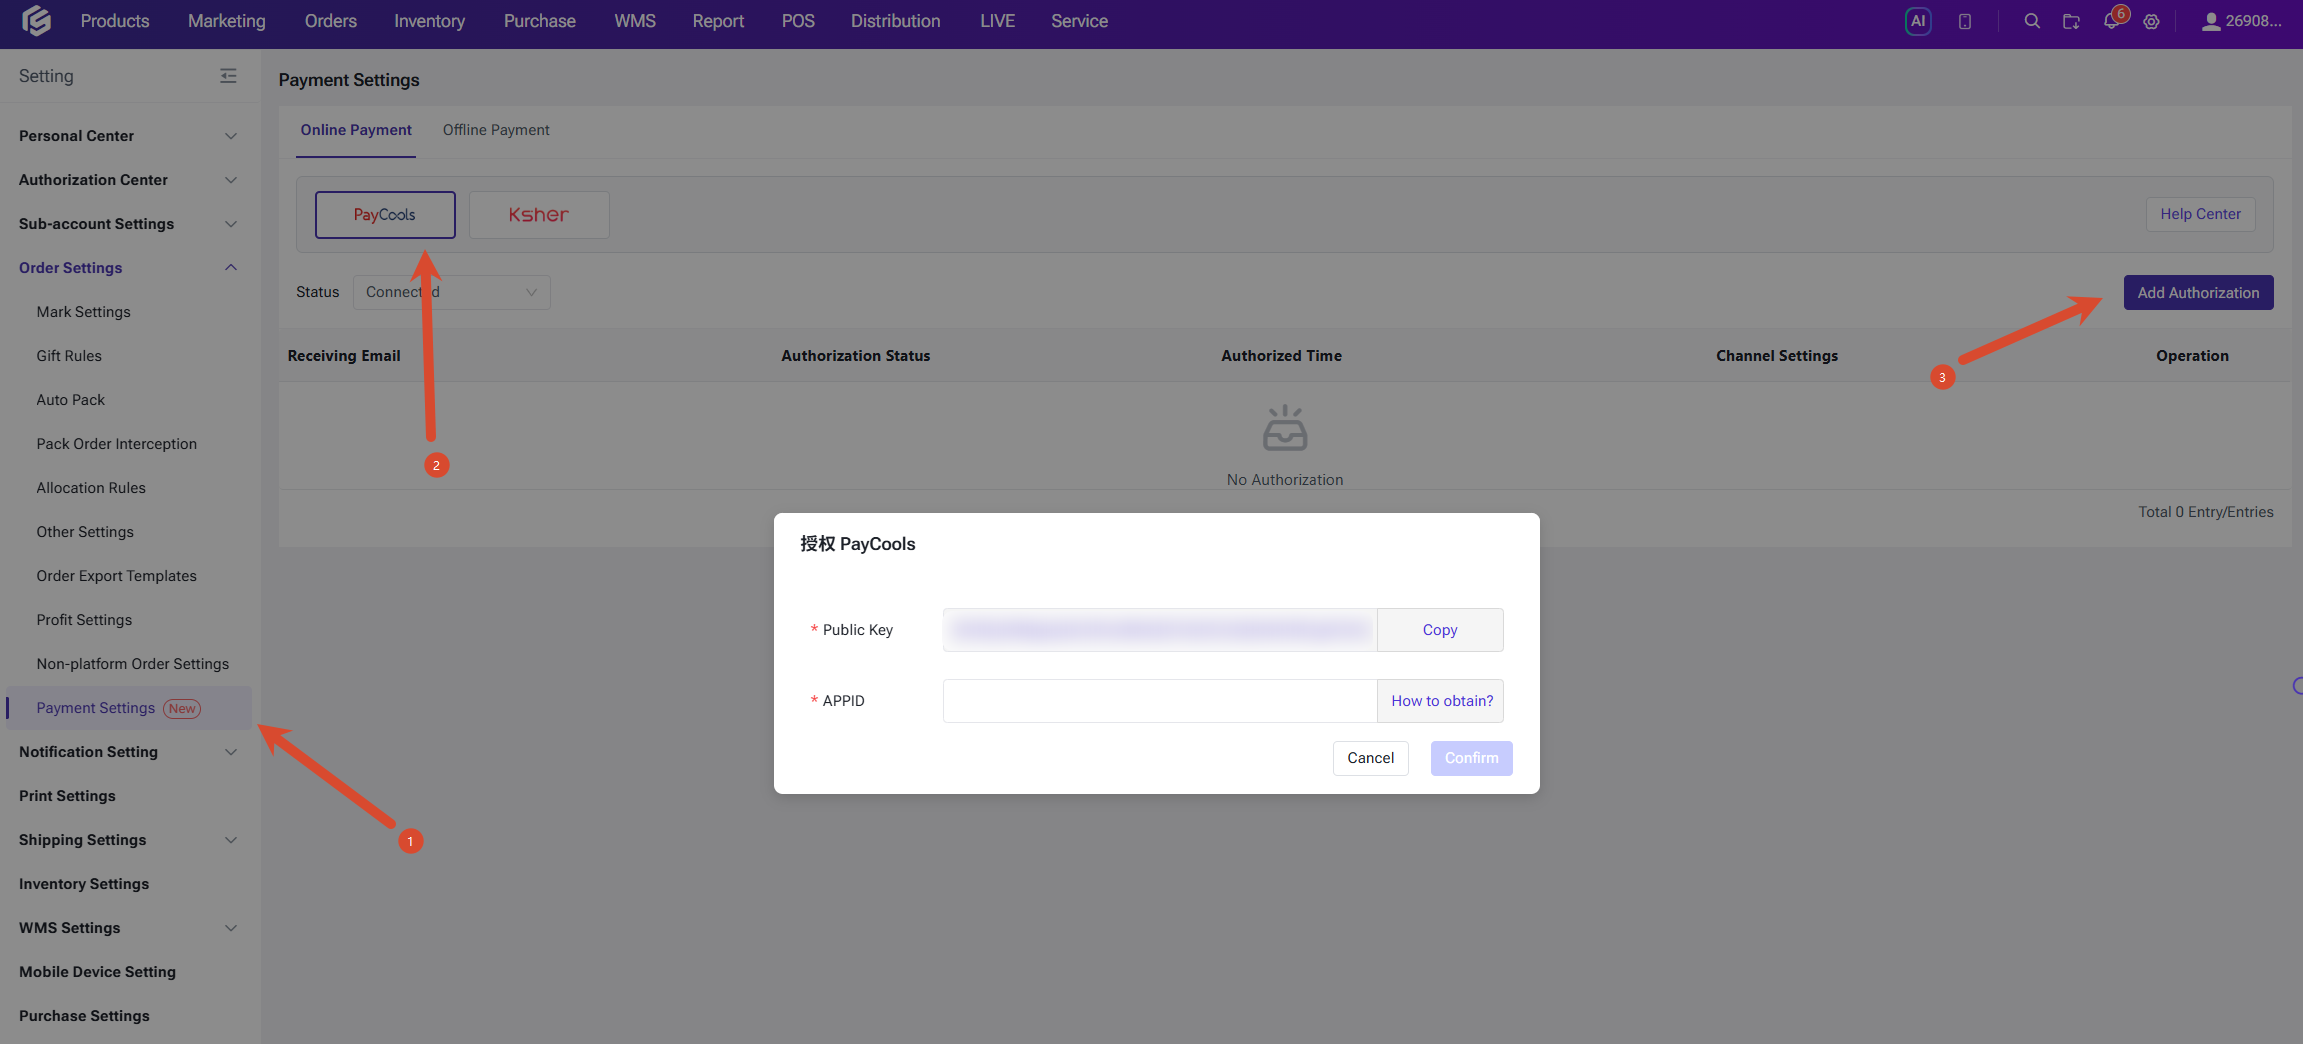
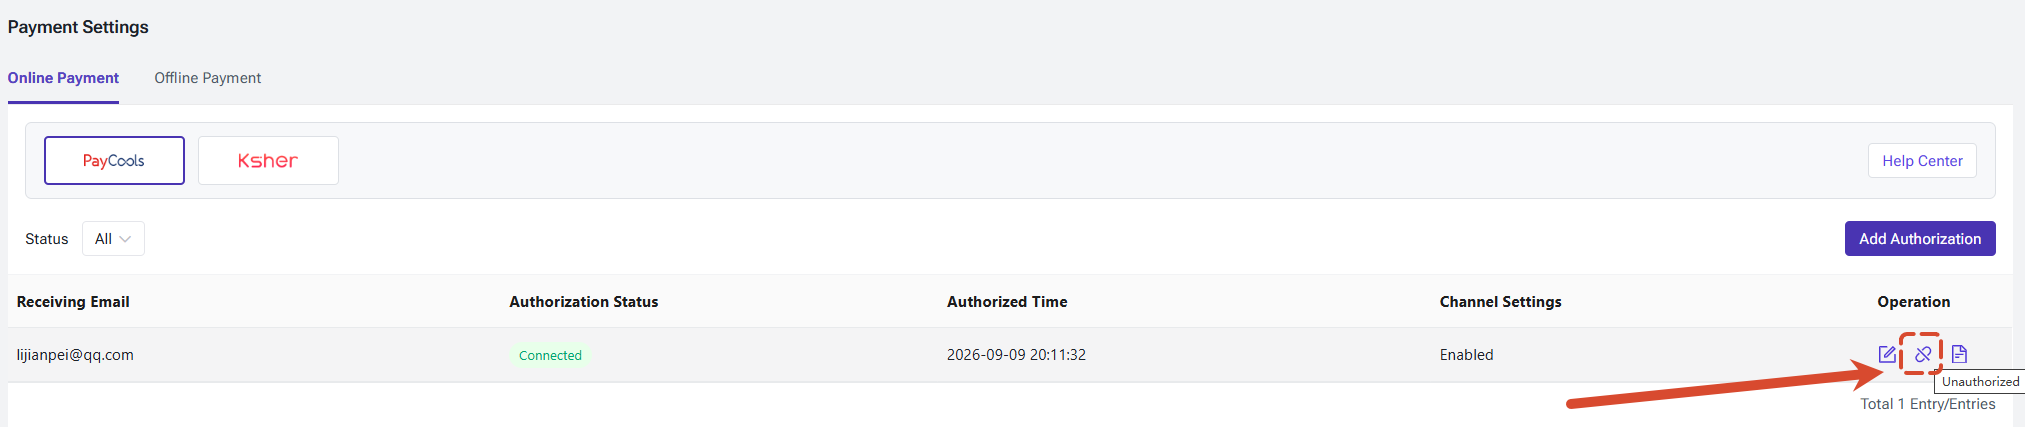
- Go to Settings > Order Setting > Payment Settings, click Add Authorization
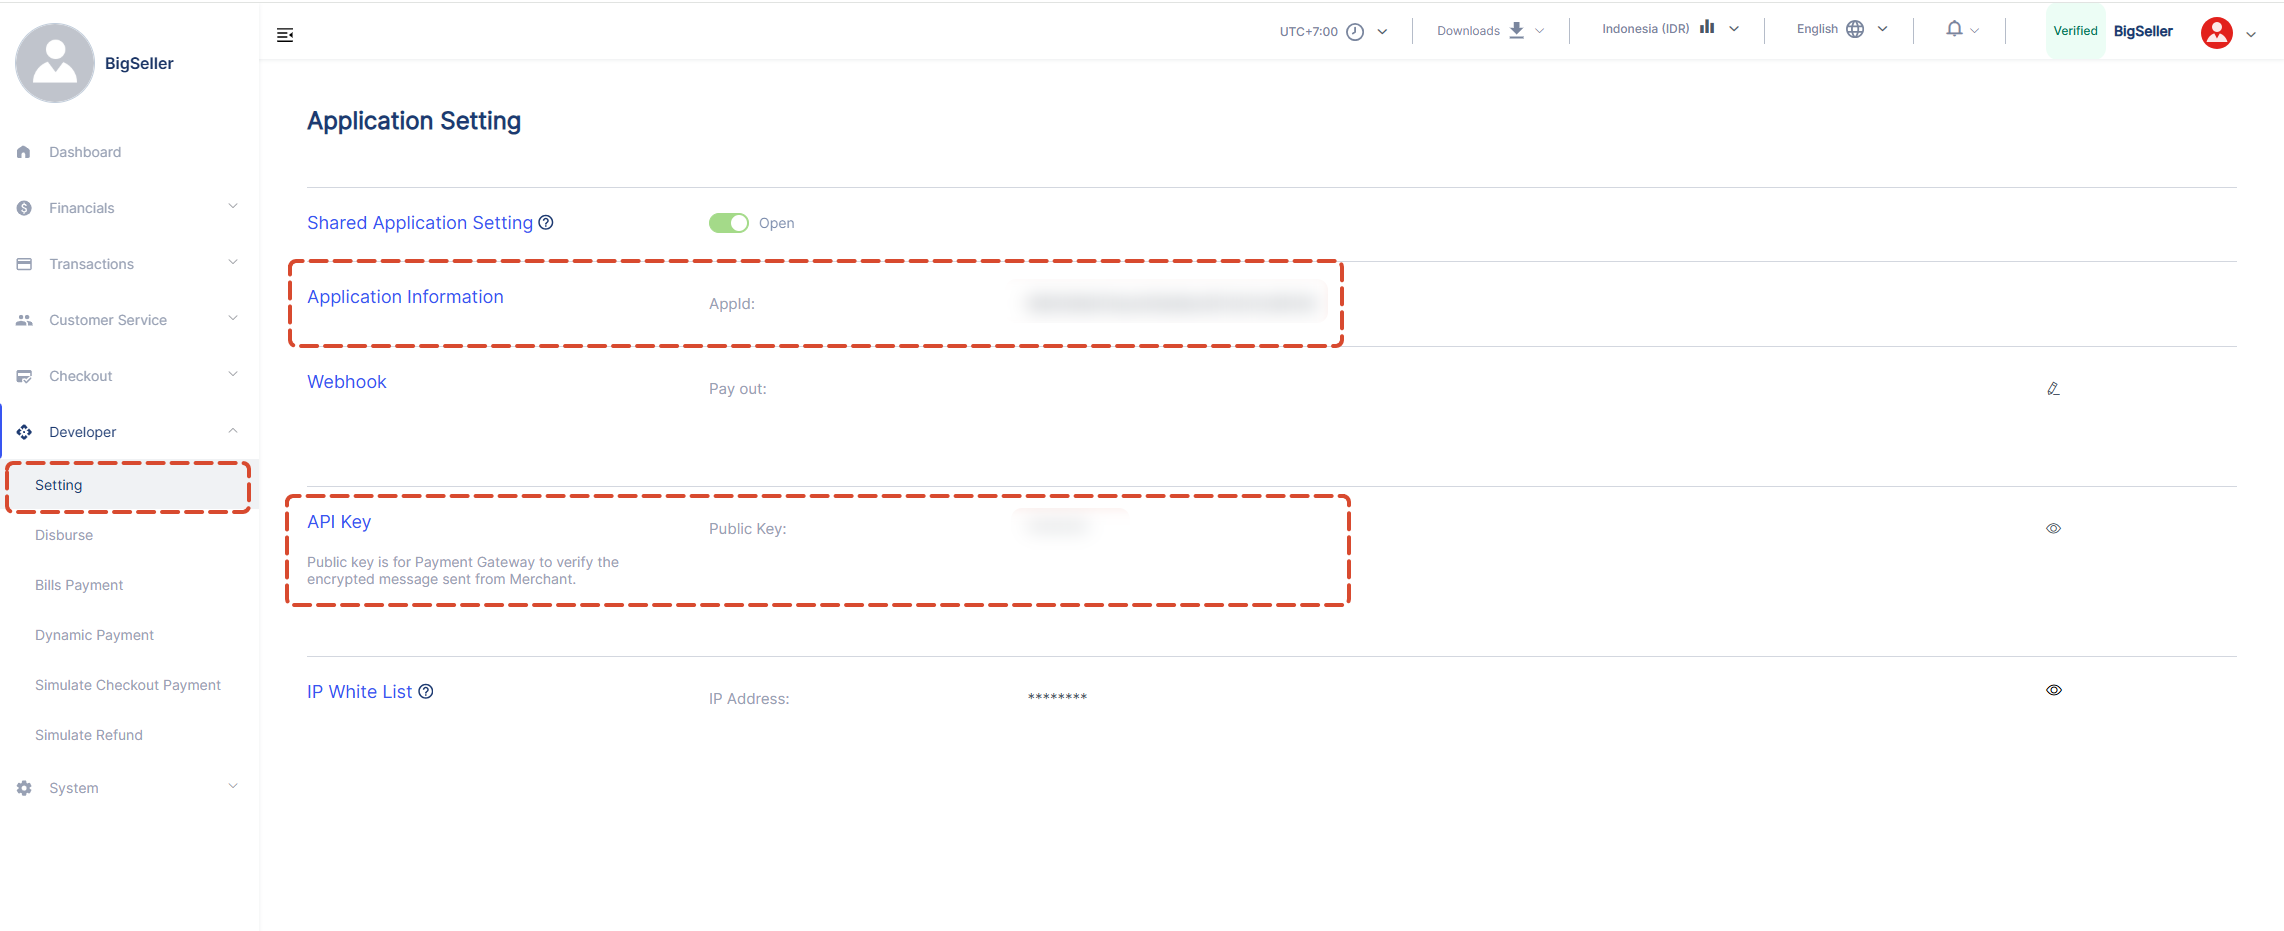
- Enter the APPID. The APPID is the application identifier assigned to the merchant by the payment platform.
- Copy the public key and configure it in your PayCools merchant console.
- Click Confirm. The system verifies the APPID and the public key configuration. Once verified, your authorization record with the authorization time will be shown in the authorization list.
Step 2: Bind Applicable Stores
After the authorization succeeds, you need to bind the applicable stores for it. Once bound, the corresponding stores can collect payment through PayCools:
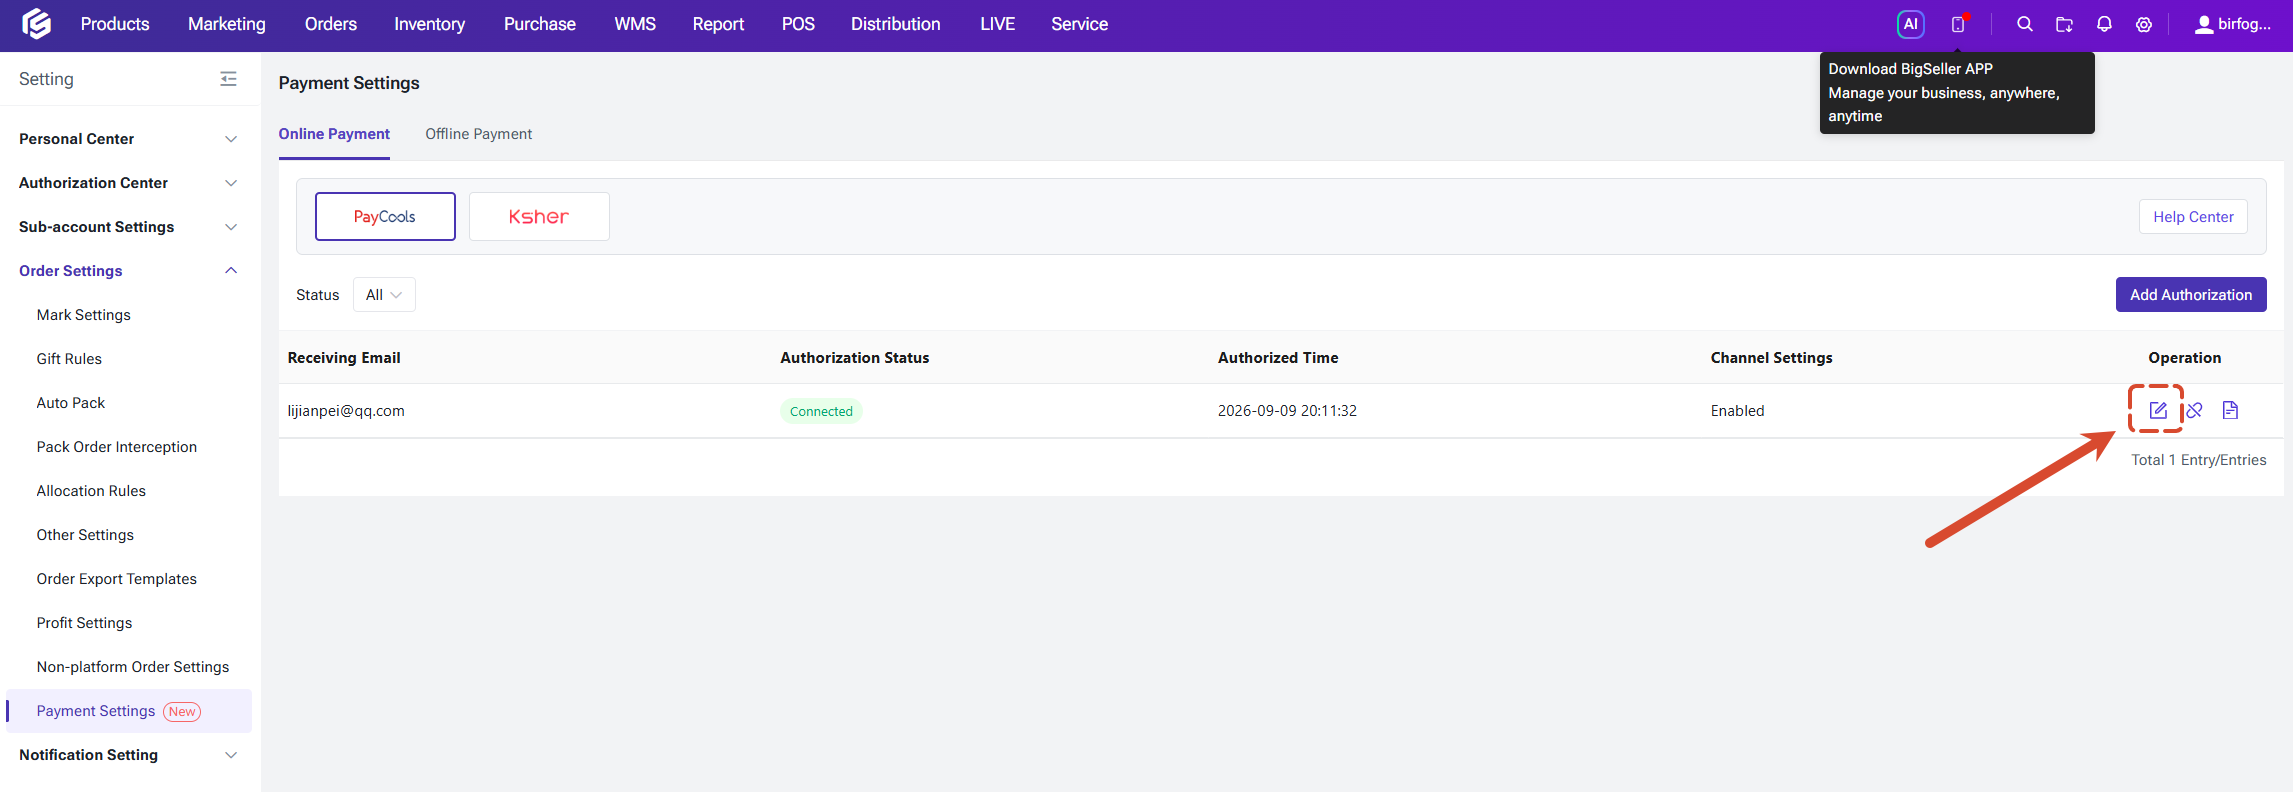
- Click Edit for the corresponding service in the authorization list;
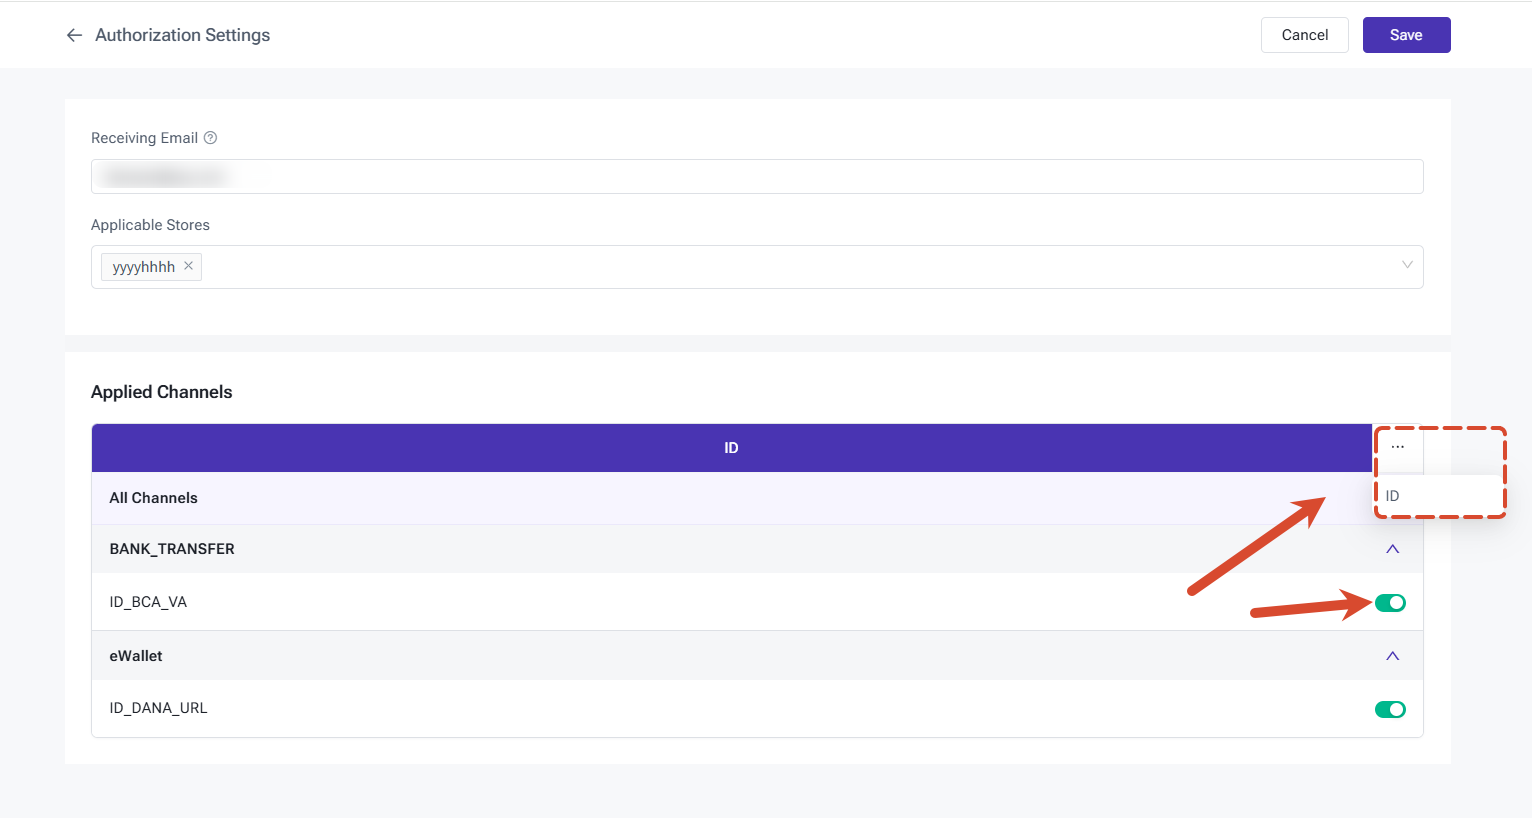
- In the applicable stores section of the edit page, select the stores that should be enabled for payment and click Confirm to save. Orders from these stores can then use PayCools to collect payment.
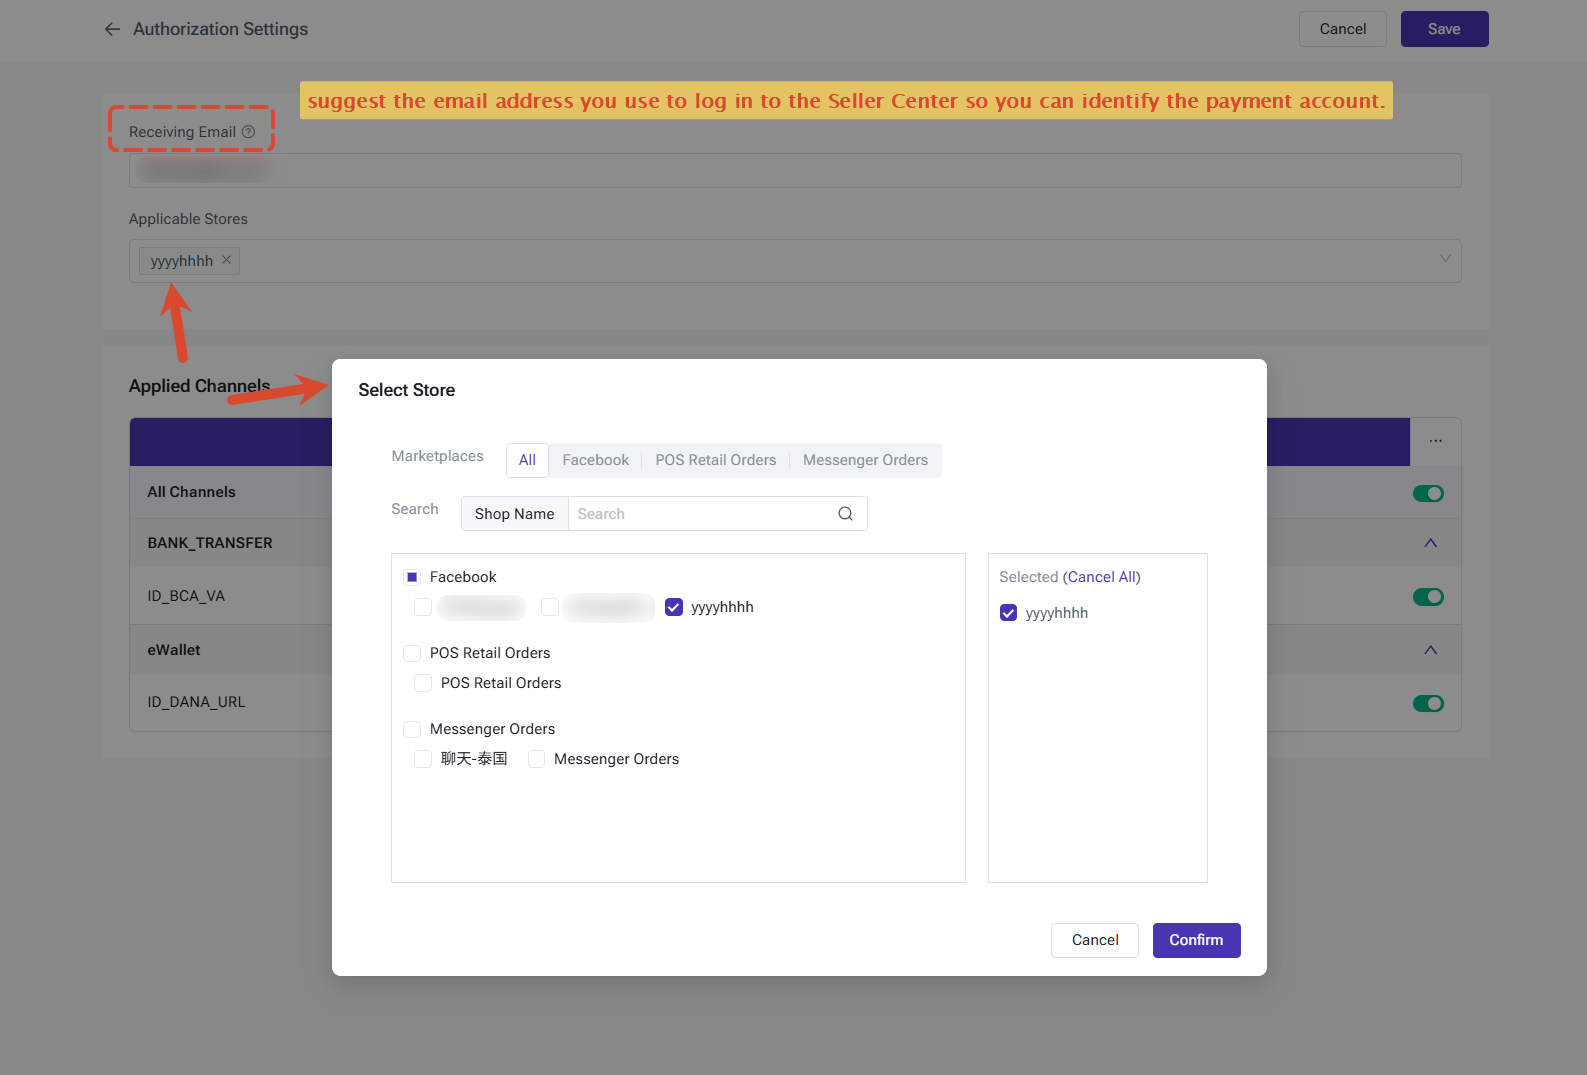
Step 3: Configure Payment Channels
This controls which payment methods buyers can see and use in the checkout. As payment channels are associated with sites and currencies, select the channels according to the site where the store operates:
You may select the payment channels to enable by site.
If you no longer need to use this payment service, you can cancel the authorization in the authorization list
Where to Use Online Payment
After completing the authorization and channel configuration, you can initiate PayCools online payment in the following business scenarios. When payment is initiated, the system automatically generates a checkout (payment QR code or payment link), and once the buyer pays successfully, the order payment status updates automatically.
1. POS Retail Checkout (PC / APP)
Suitable for face-to-face payment in stores:
1. POS Retail Checkout (PC / APP)
Suitable for face-to-face payment in stores:
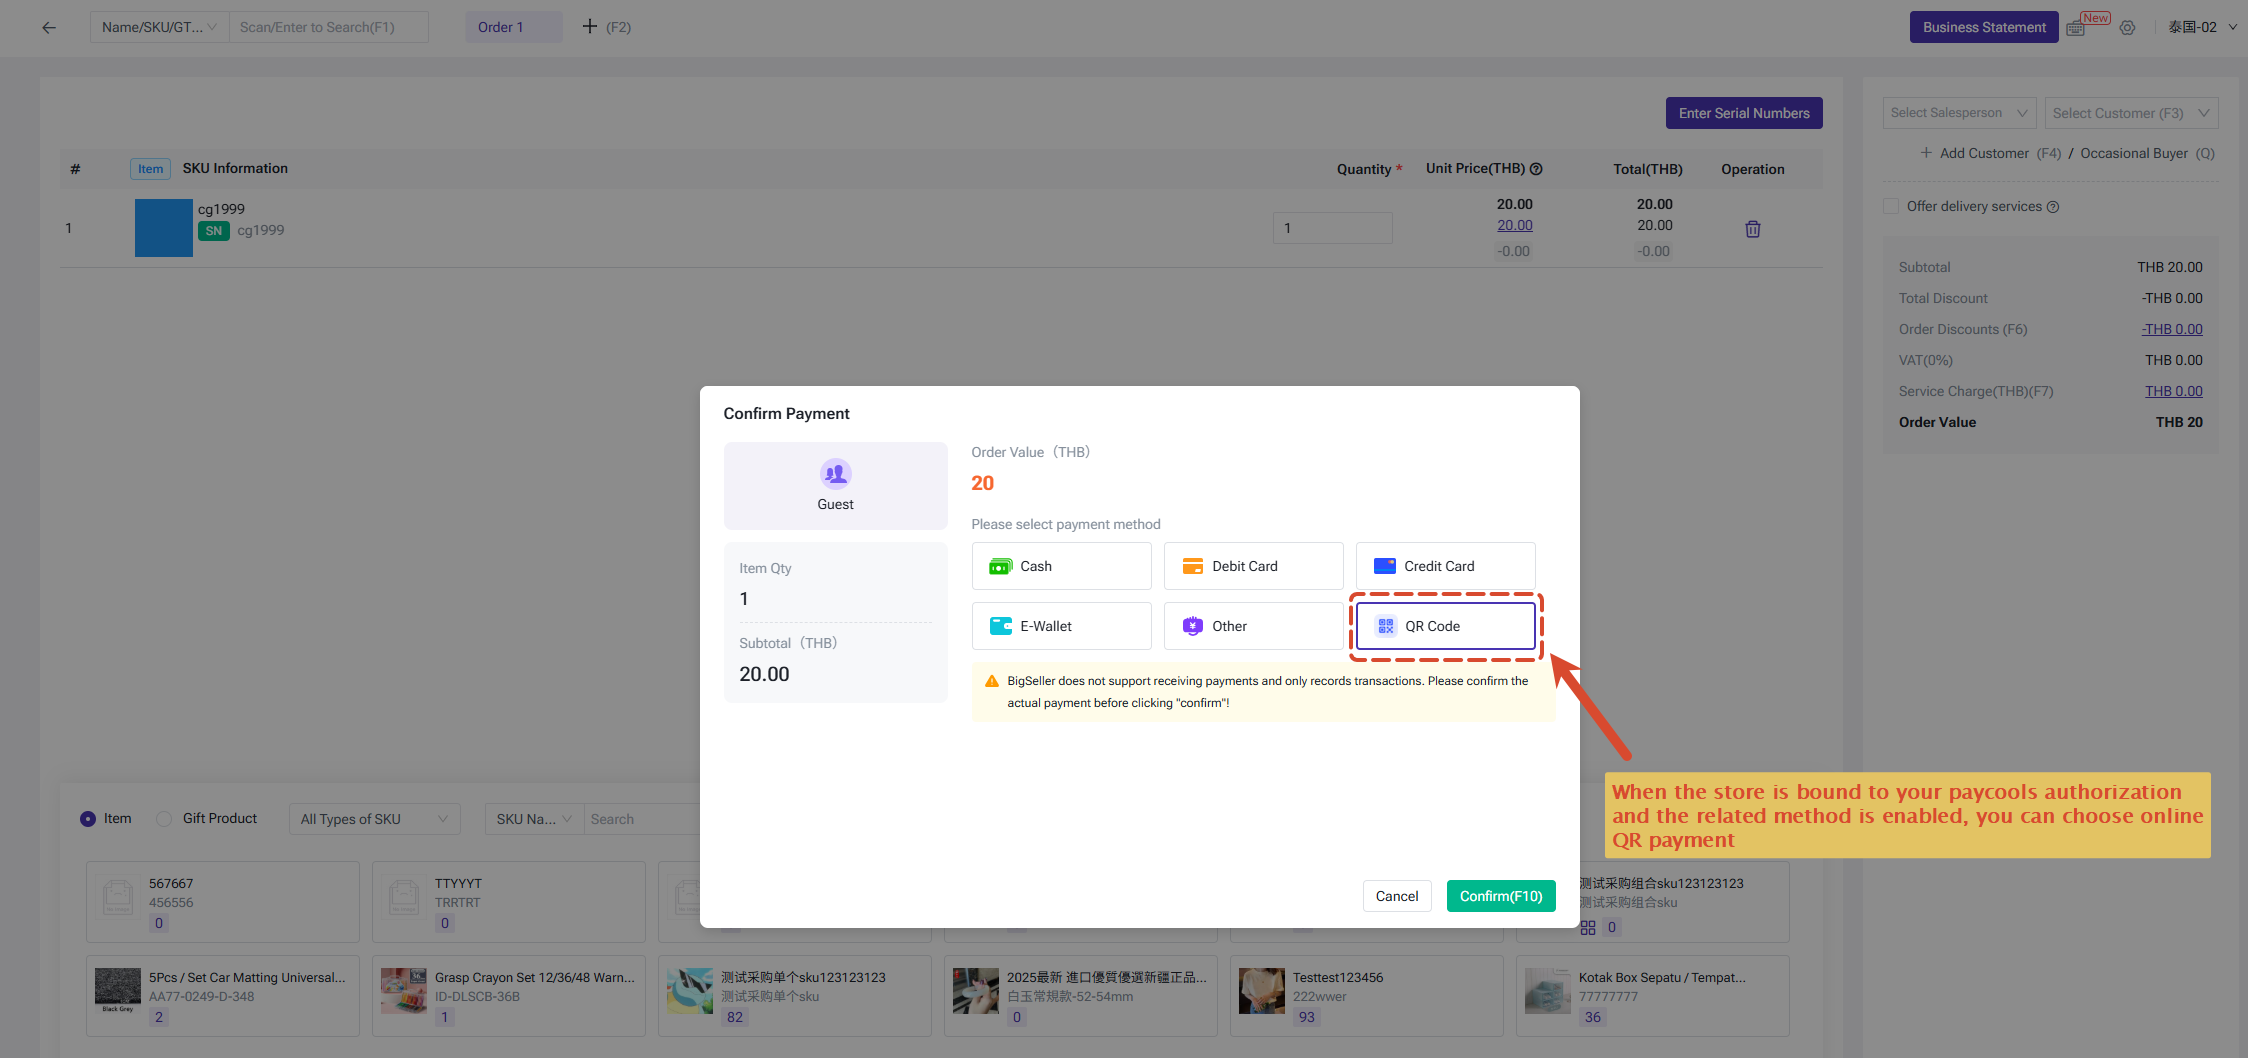
- Create a retail order in the POS checkout, add items, and click Checkout to open the payment pop-up;
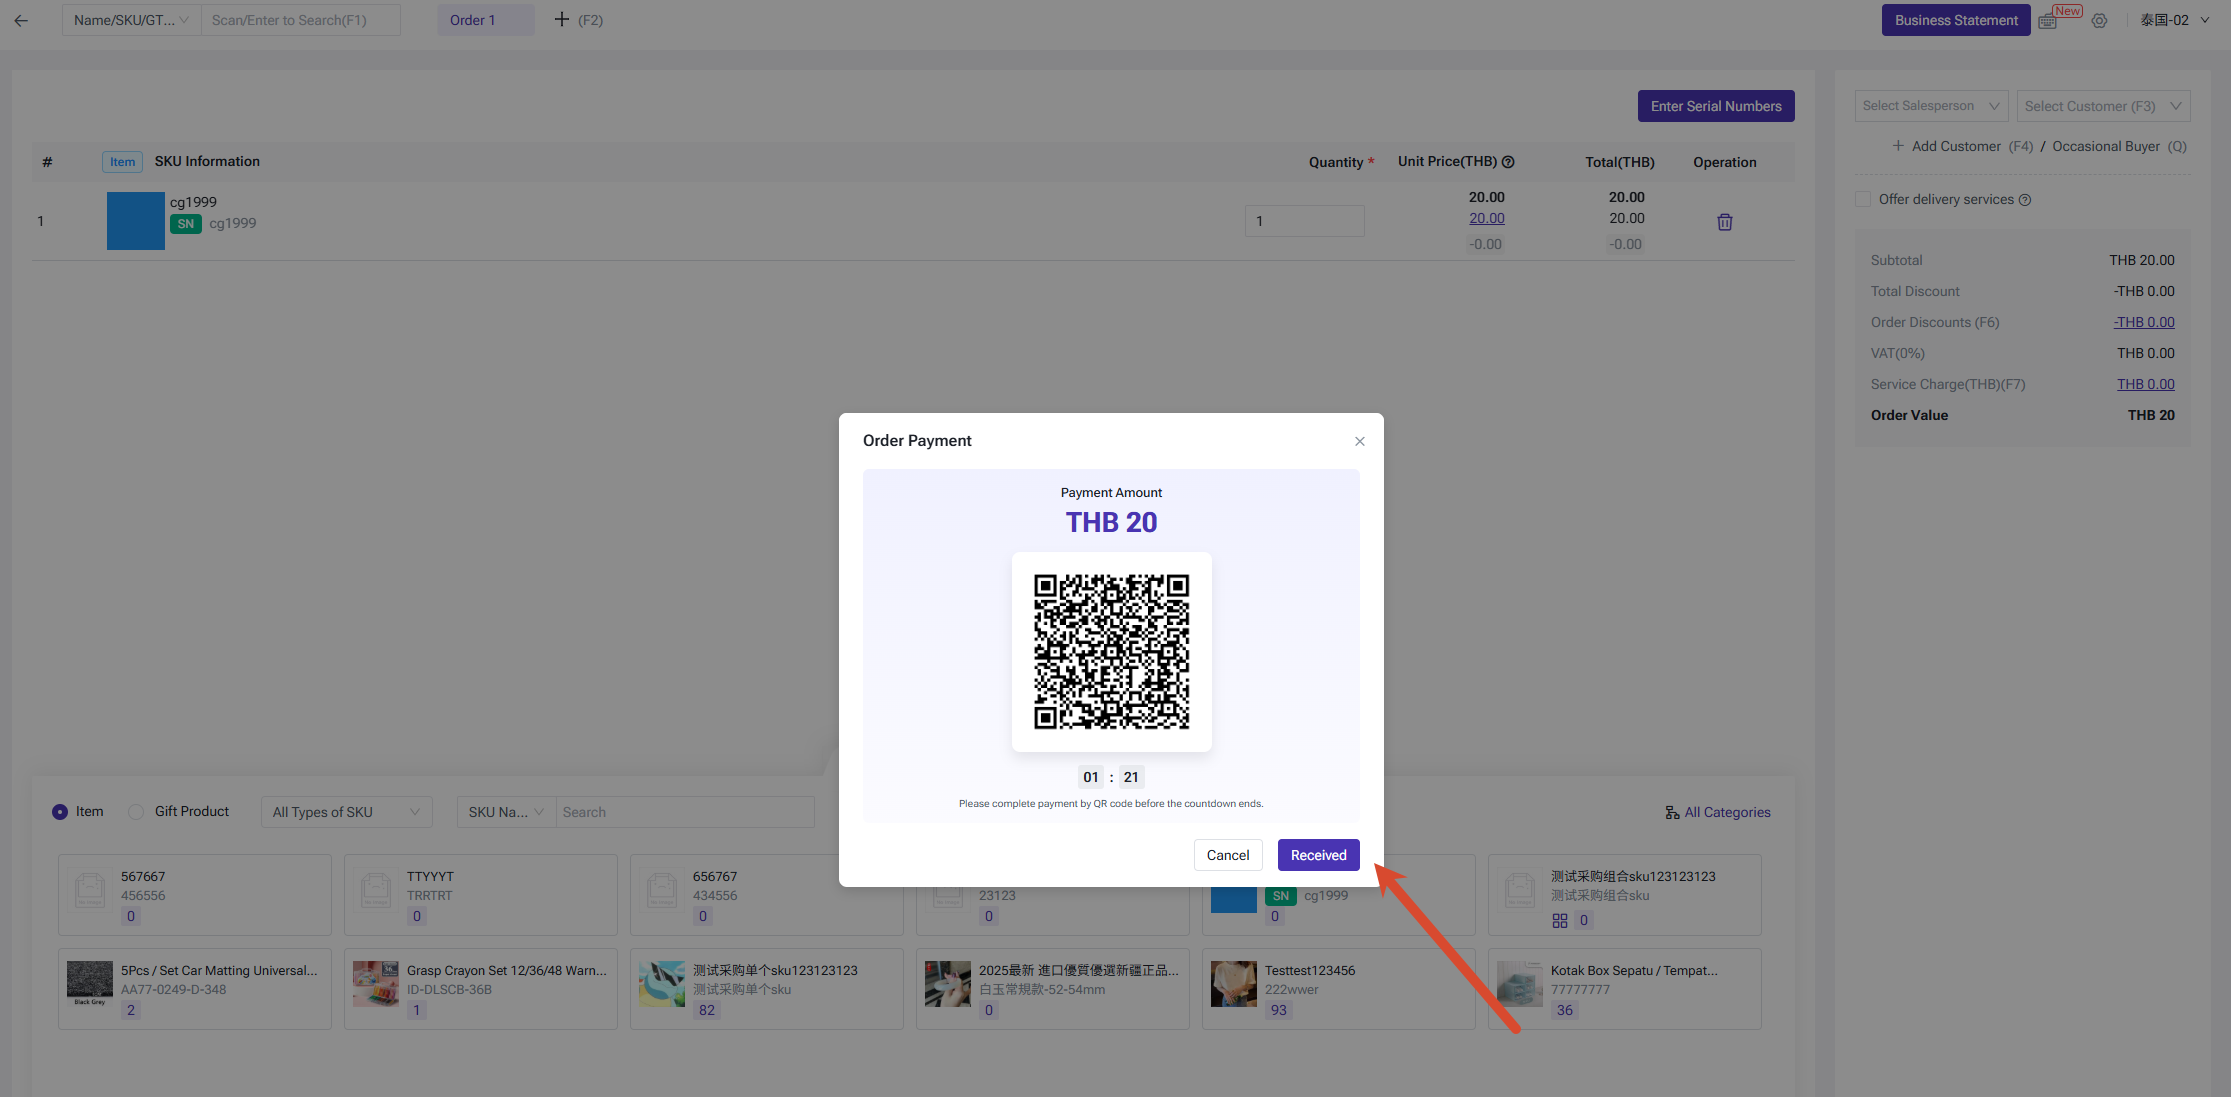
- Select Online Payment / QR Code (PayCools) as the payment method, and click Checkout. The system generates a payment QR code;
- Show the QR code to the buyer (in landscape mode, it can be displayed on a secondary screen). The buyer scans it with their phone and selects a payment channel to complete the payment;
- After the payment succeeds, the system automatically confirms the payment and closes the payment pop-up, and the order is marked as paid. If a secondary screen is enabled, the QR code is also displayed on it for the buyer to scan.
2. Messenger Orders
Suitable for remote payment after a deal is reached with the buyer in a messenger order:
Suitable for remote payment after a deal is reached with the buyer in a messenger order:
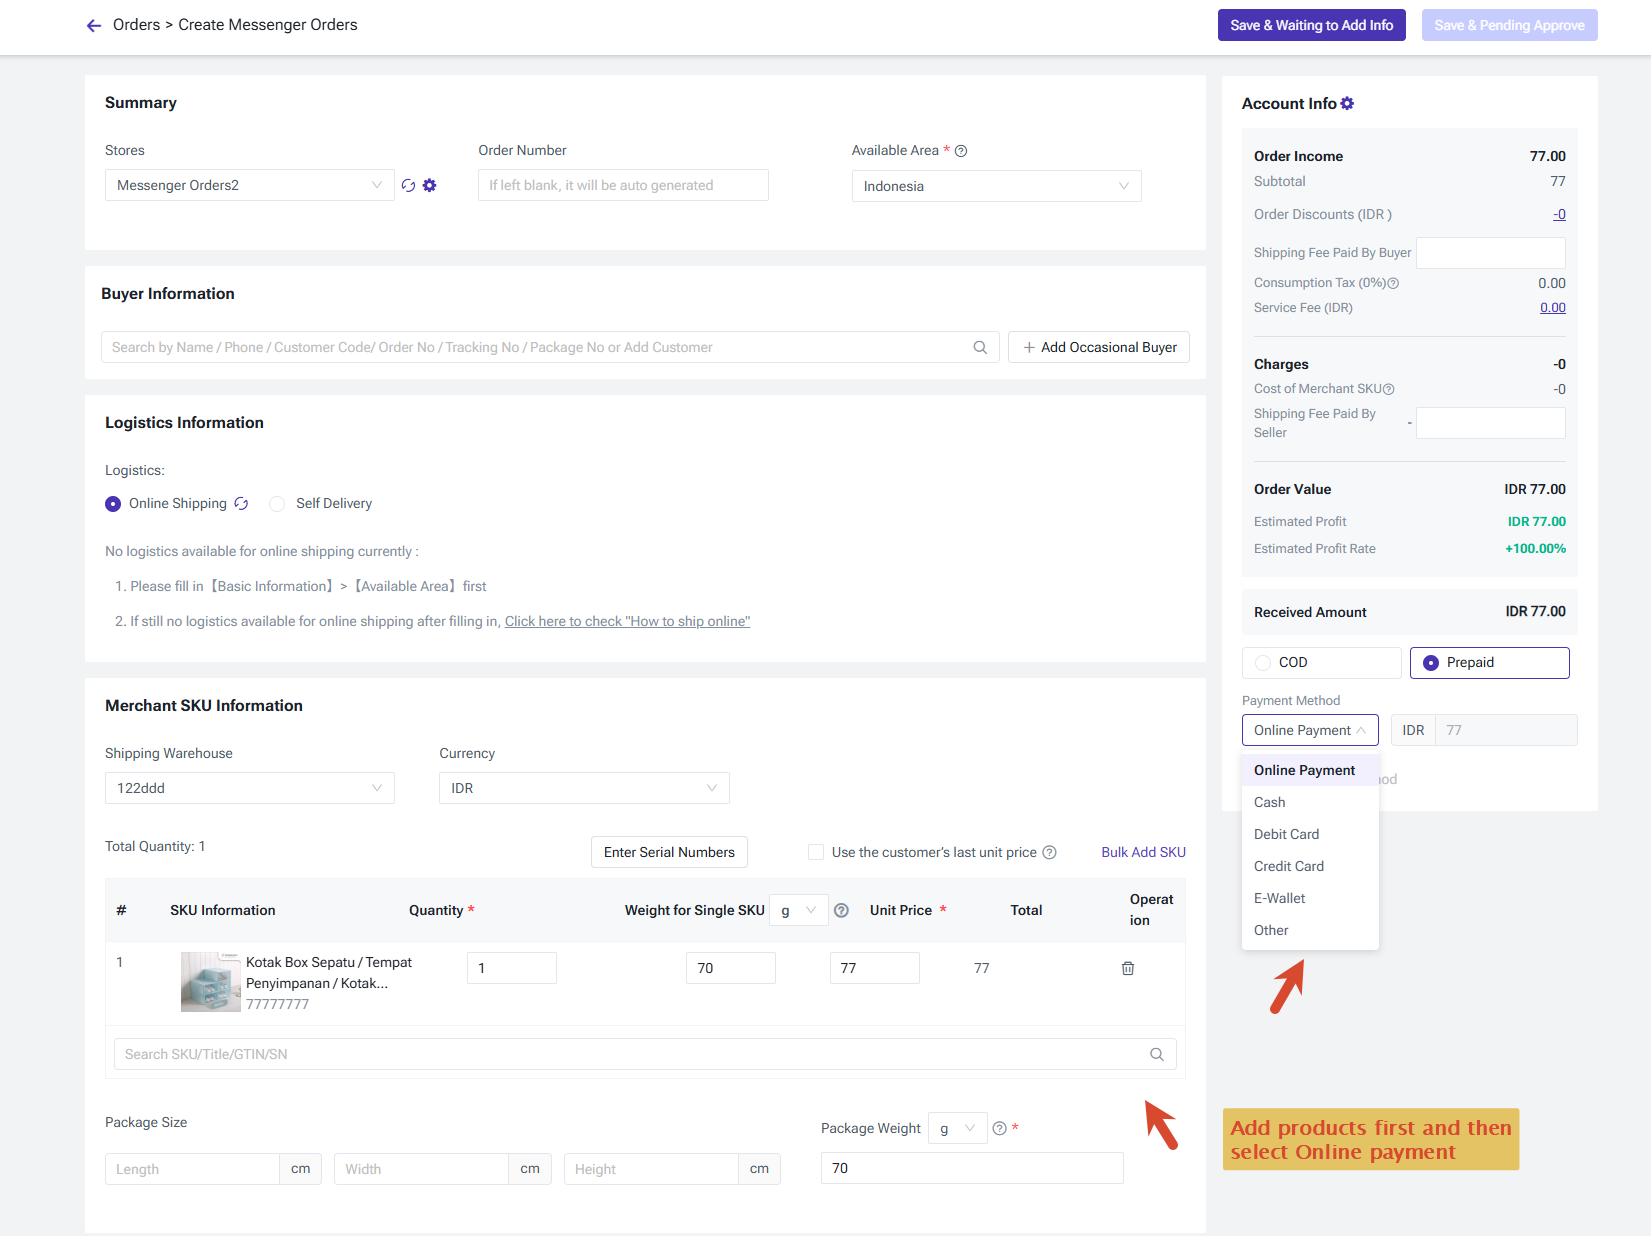
- When creating a messenger order, select Online Payment as the payment method. After the order is created, the payment status is "Unpaid" and the order enters the pending-review list;
- Click Copy Link in the order actions and send it to the buyer;
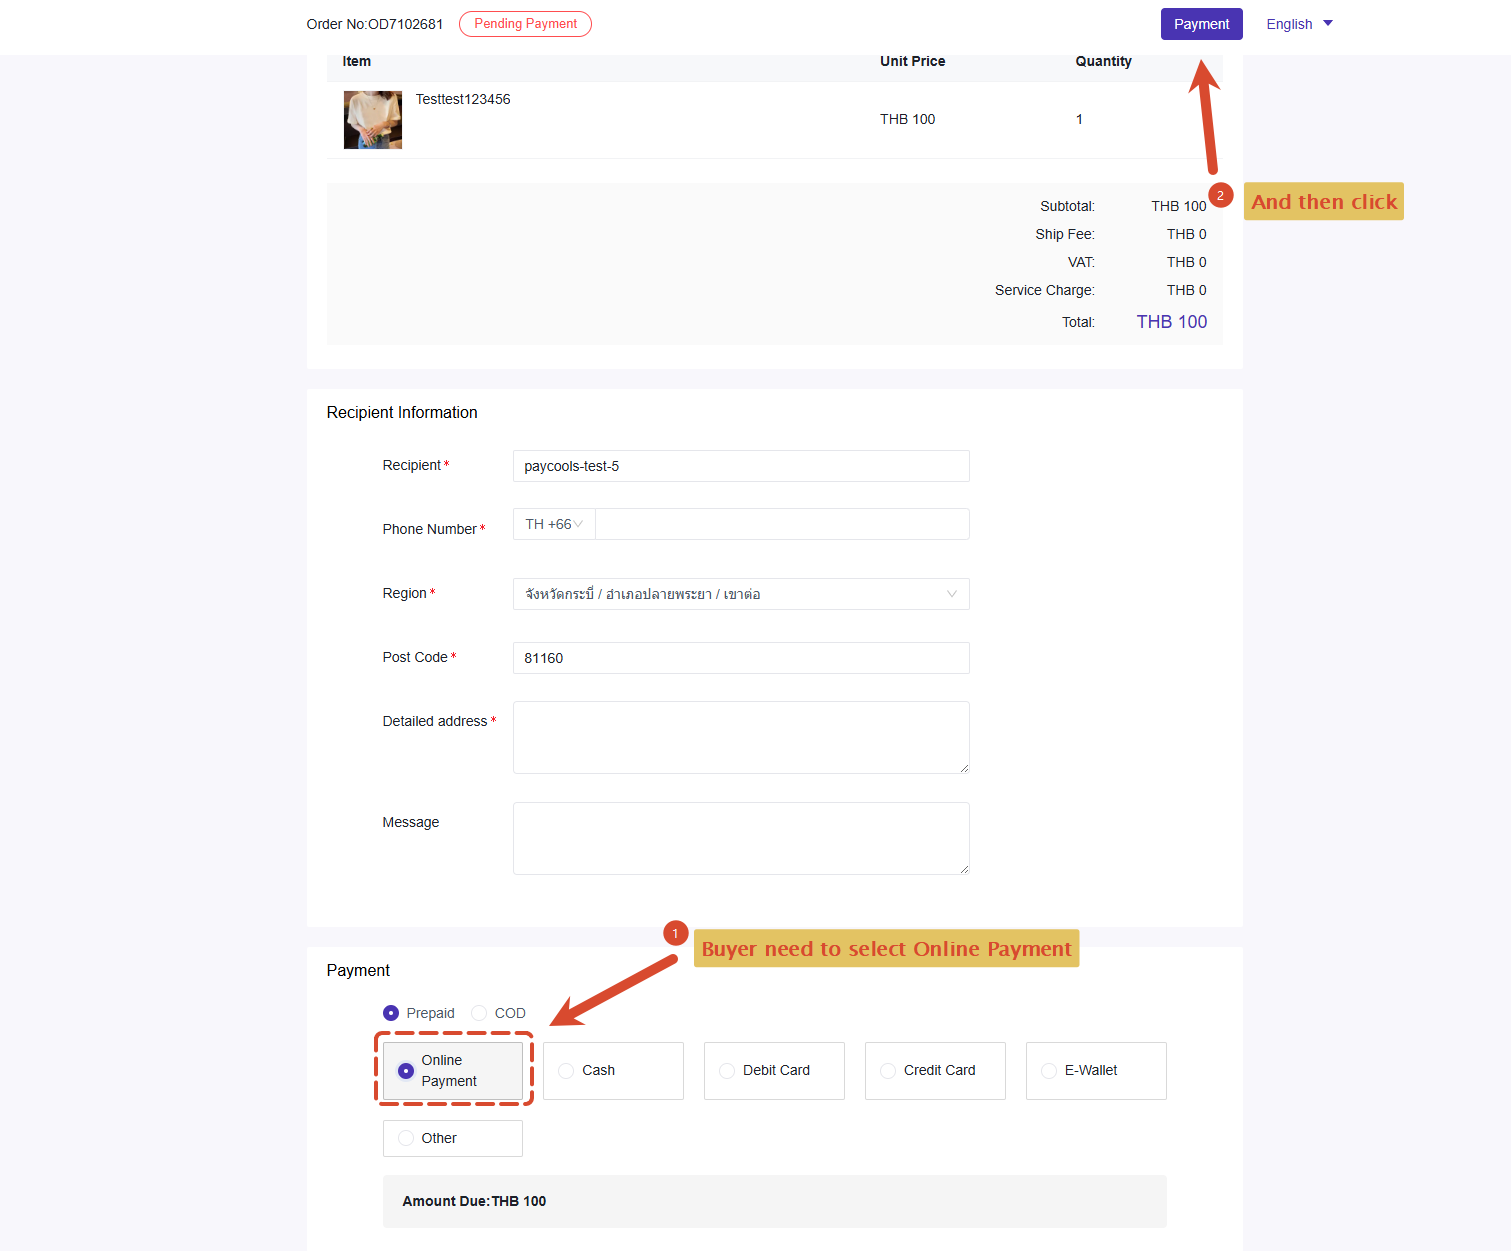
- The buyer opens the link to the payment page, selects online payment and clicks Pay to launch the checkout;
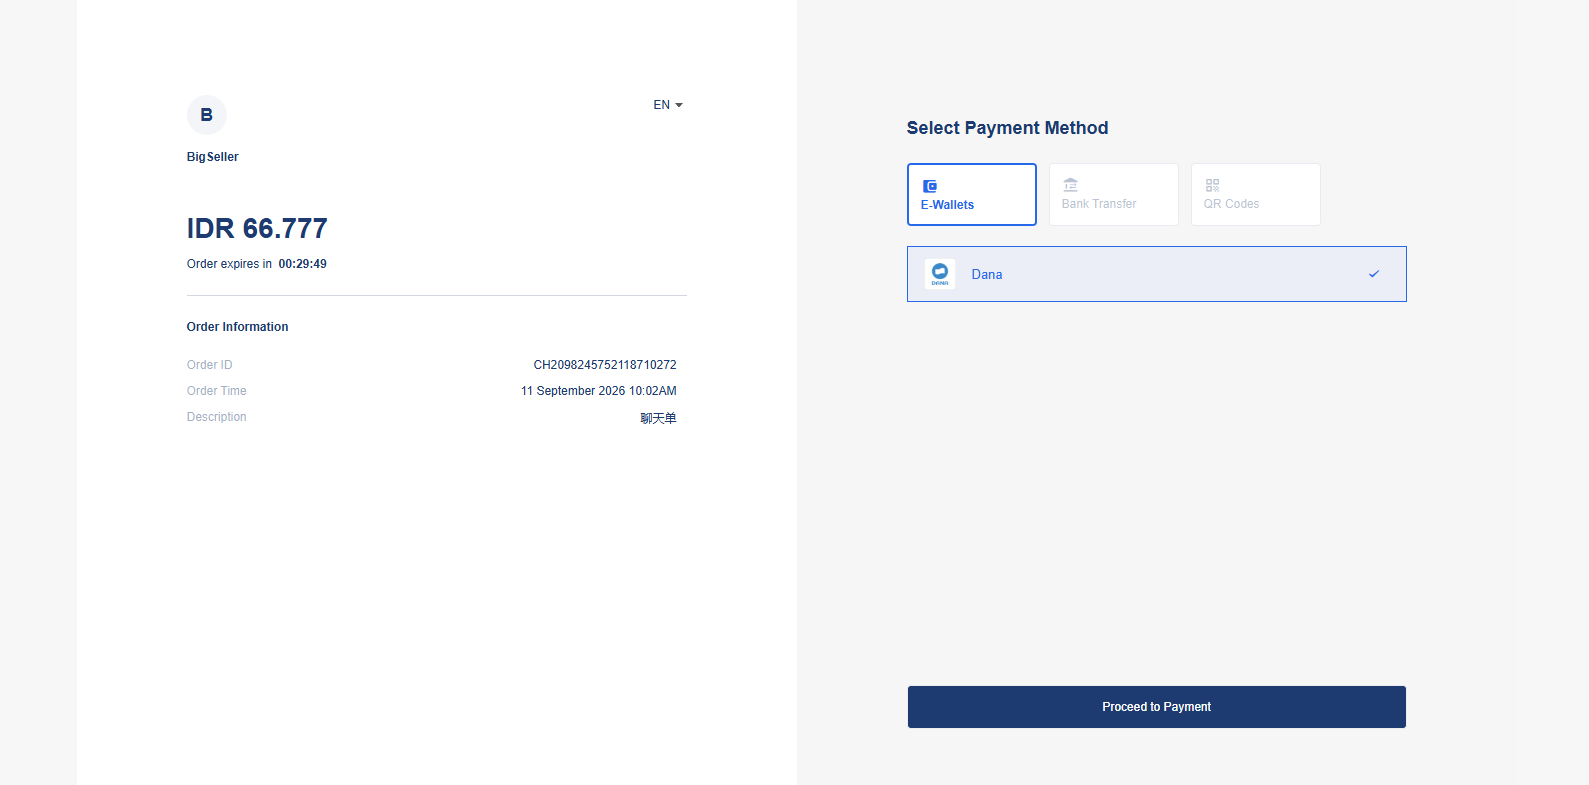
- The buyer selects a payment method in the checkout (bank card, credit card, e-wallet, QR, etc.; the channels are those you have enabled) to complete the payment;
- The payment result is typically returned within about 1 minute. The system automatically updates the order payment status, and the order moves to the New Orders list, from which it can proceed through the normal fulfillment flow. If the payment fails, the buyer can initiate the payment again.
3. Facebook Live Orders
Orders from the Facebook channel share the same online payment capability as messenger orders:
Orders from the Facebook channel share the same online payment capability as messenger orders:
- When the buyer selects online payment on the order details page and clicks Pay, the system launches the checkout;
- After the buyer completes the payment, the order payment status updates to paid, and the subsequent fulfillment flow can continue.
4. Distribution Orders: Supplier Account Top-up
Designed for large customers using the distribution (supply and distribution) business, it solves supplier payment collection and distributor account top-up/recharge:
- The supplier must first enable PayCools payment. Once enabled, distributors can call the supplier's checkout to pay online when topping up the supplier's account;
- In the account information of "My Suppliers", the distributor clicks Recharge, and enter the recherge amount and select the supplier;
- Click Confirm to launch the checkout. After the distributor completes the payment, the page automatically returns to the supplier page, and the account balance updates on both the distributor and supplier sides;
Note: this recharge feature is essentially an online payment collected by the supplier; the amount is used to record the supplier's account balance in the system, and the supplier cannot manually modify the amount topped up online by the distributor.
How to Reconcile Every Payment
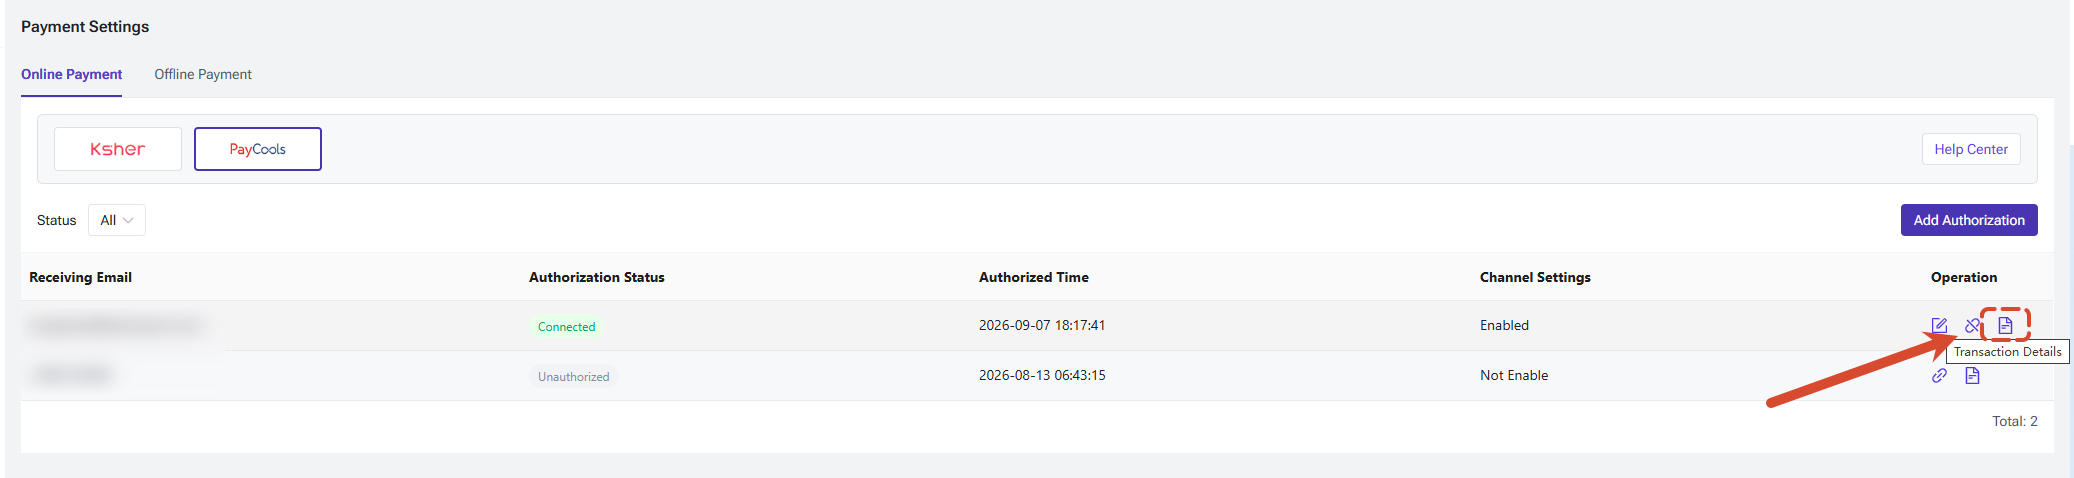
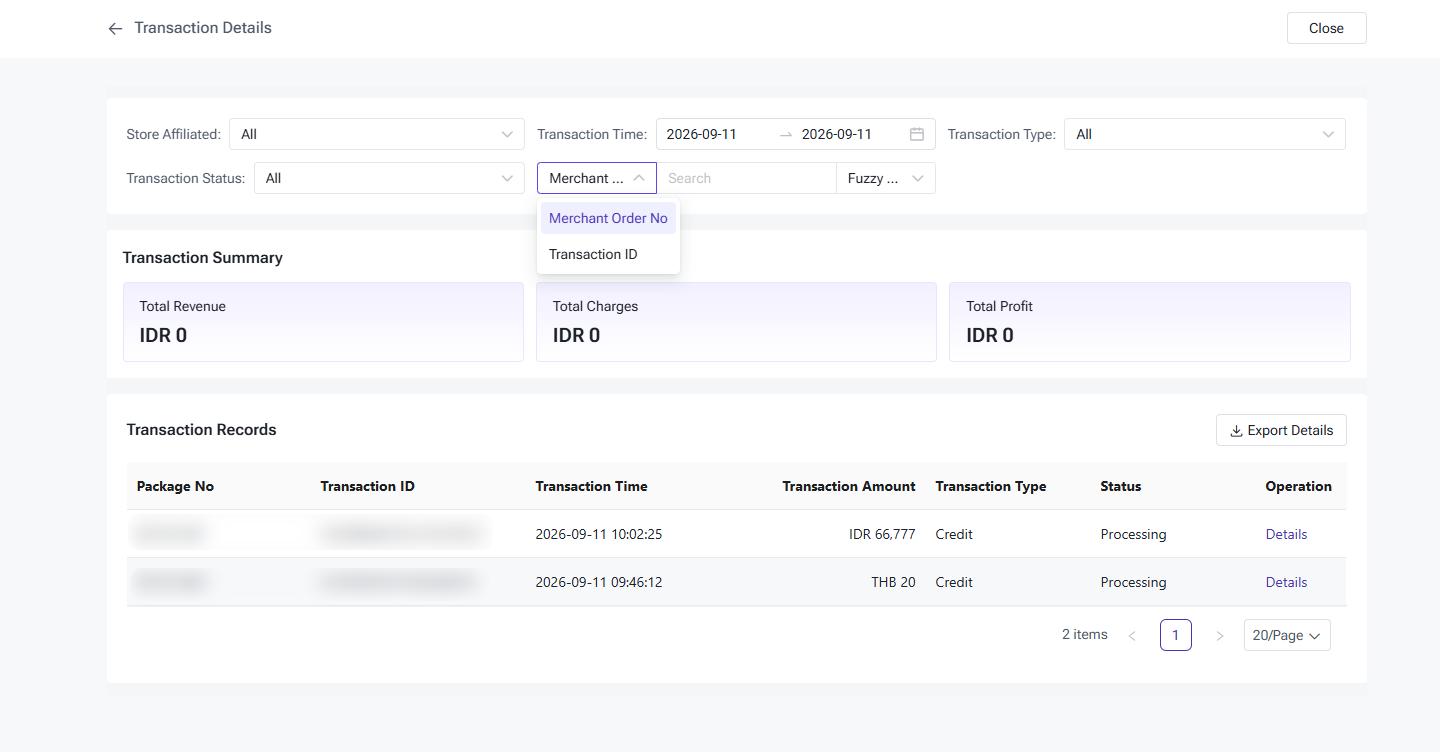
Transaction Details automatically records all payments and refunds completed through PayCools and serves as the basis for your daily reconciliation and fund verification.
How to Refund Buyers
When an order paid through PayCools online payment needs to be refunded, you can use the Refund to the Original Payment Method (online refund) option to return the funds to the buyer's original payment account, keeping the entire fund handling traceable.
1. After-Sales Refund (Non-POS Orders)
1. After-Sales Refund (Non-POS Orders)
- When creating a refund order, select Refund to the Original Payment Method as the refund method. This option is only valid for orders paid online;
- After the refund order is approved, click Confirm Refund, and the system calls the refund interface of the payment platform;
- After the refund succeeds, the system confirms the refund, the after-sales order status updates accordingly, and an expense entry is automatically created in Transaction Details;
2. POS After-Sales
- When a cashier initiates after-sales on a paid order in the POS and clicks Refund, the refund method defaults to Online Refund (Refund to the Original Payment Method);
- After confirming the refund, the system calls the refund interface and returns the refund result. Once the refund succeeds, the order enters the refunded status, and the transaction is recorded accordingly.
3. Order Withdrawal and Refunds
- When withdrawing an order in scenarios such as distribution, the system first checks whether the order can be withdrawn. The withdrawal can only be completed after the refund succeeds, ensuring that funds and order status stay consistent.
Is this content helpful?
Thank you for your feedback. It drives us to provide better service.
Please contact us if the document can't answer your questions