Introduction to Warehouse Pick&Store Zoning (One SKU Multiple Shelves) - Wave
1. What is Pick&Store Zoning
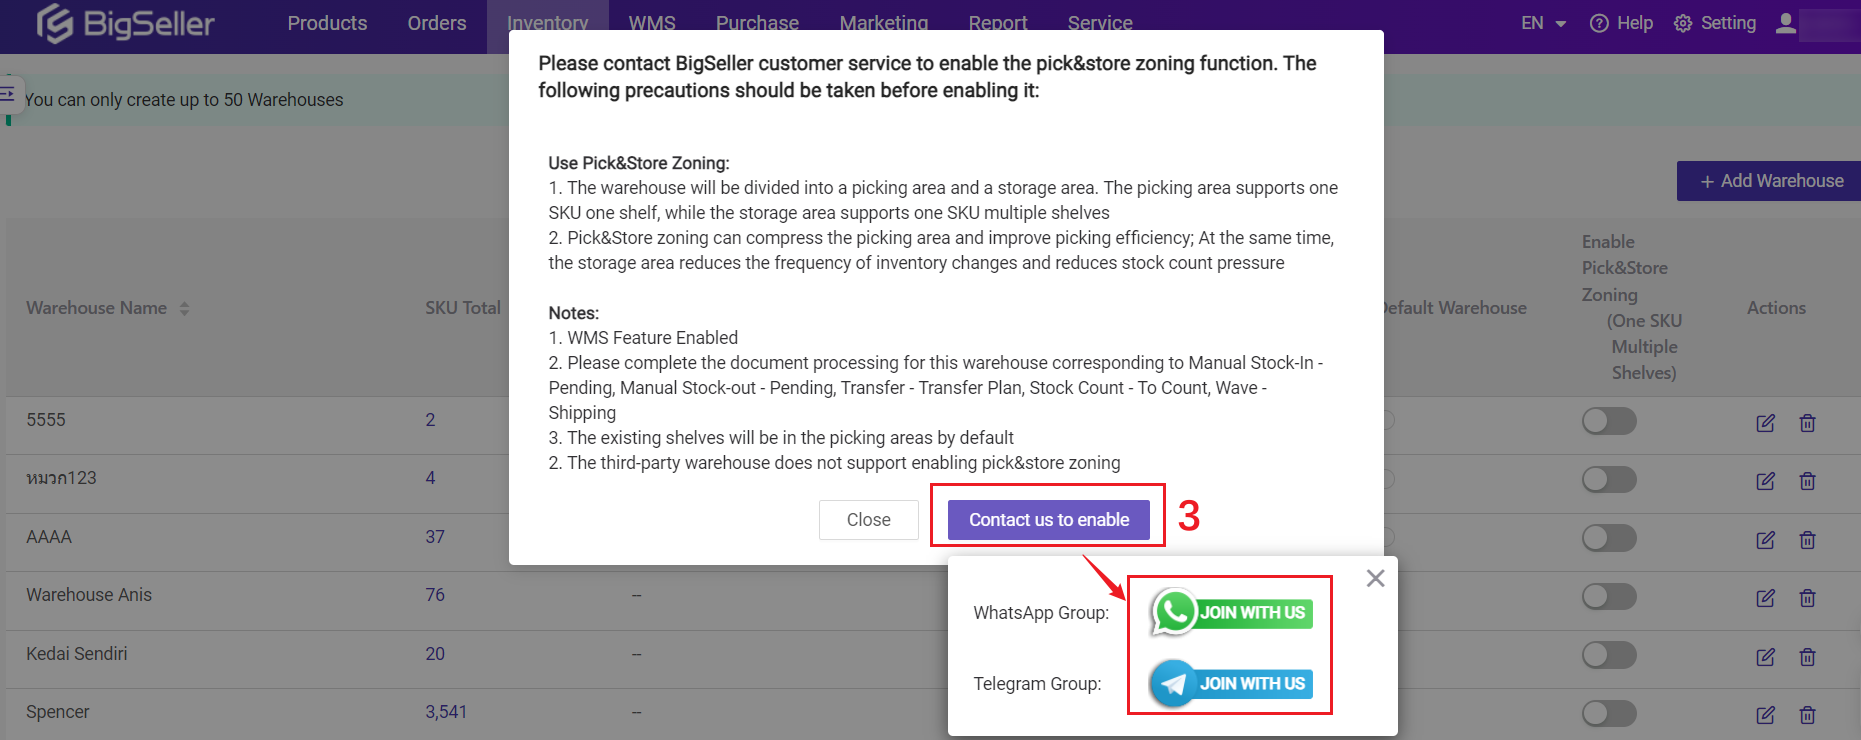
Warehouse Pick&Store Zoning refers to dividing the warehouse into two areas: Picking Area and Storage Area. The picking area supports one SKU on one shelf, while the storage area supports one SKU on multiple shelves.Pick&Store zoning can compress the picking area and improve picking efficiency; At the same time, the storage area reduces the frequency of inventory changes and reduces stock count hours.
2. Enable Pick&Store Zoning
💡 Notes- The third-party warehouse does not support enabling pick&store zoning.
- After enabling pick&store zoning, the warehouse will also enable Unstored Inventory Management by default.
- Warehouse enabling pick&store zoning does not support simple stock count and on shelf / off shelf in BigSeller APP.
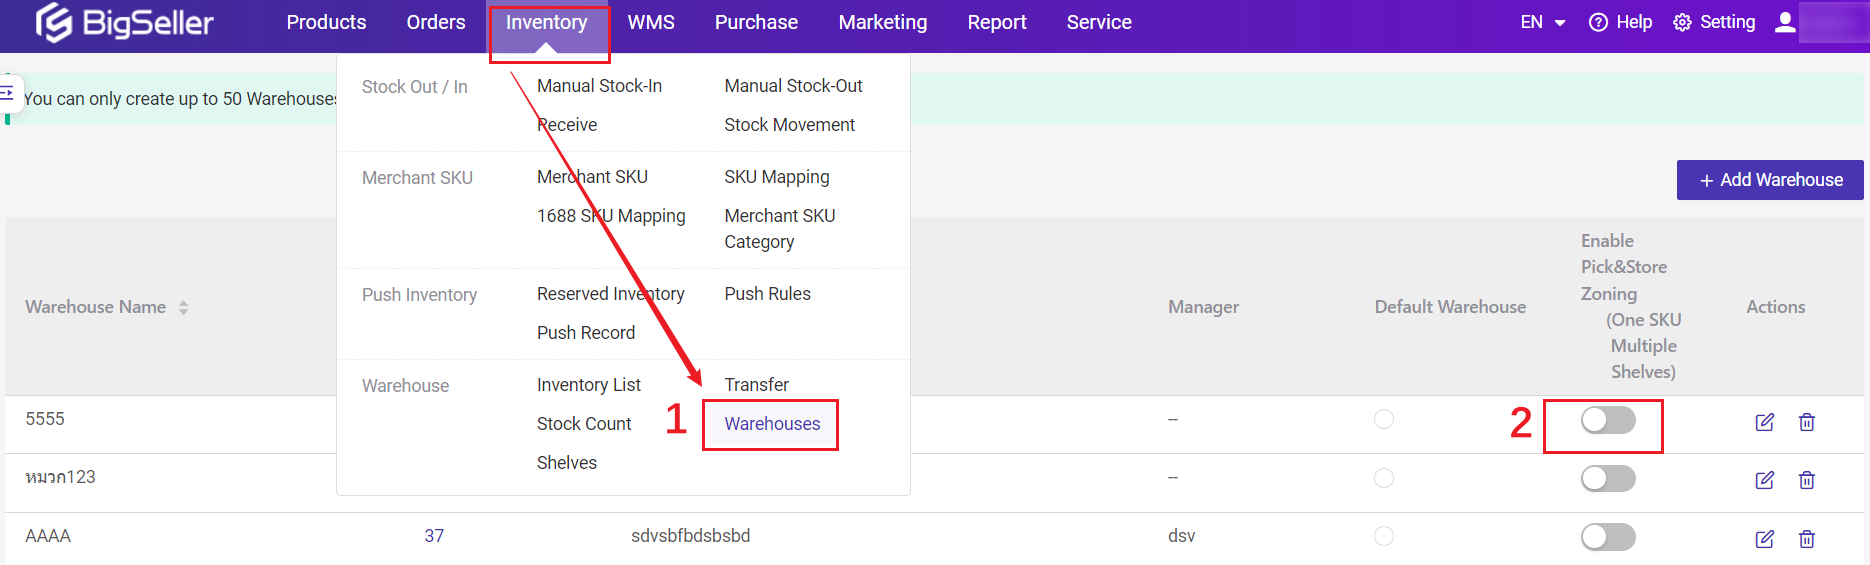
2.1 How to Enable
If you want to enable this feature, please contact our customer service.
2.2 Changes after enabling
① The shelf info cannot be checked in the Inventory List, please check the shelf info on WMS- Inventory Details;② The existing merchant SKUs will be initially synced to the two warehouse areas, and their stock will default to increasing to the picking area. The inventory in the storage area will be processed as 0 by default;
③ The shelf info will not be displayed on merchant SKU label. (Because a merchant SKU may be placed on multiple shelves);
④ The available stock can not be edited in the Inventory List, please use the Manual Stock In/Out to adjust the inventory;
⑤ When creating a new merchant SKU to this warehouse, the initial inventory quantity cannot be set (i.e. you cannot edit the inventory quantity). Please increase the inventory by manually stocking in.
3. Manual Stock In/Out
How to manual stock in or stock out?💡Note: When adding Stock-In List, warehouses with Pick&Store Zoning support adding combination SKUs. Once added, the system will display the information of individual SKUs.
4. Out of Stock
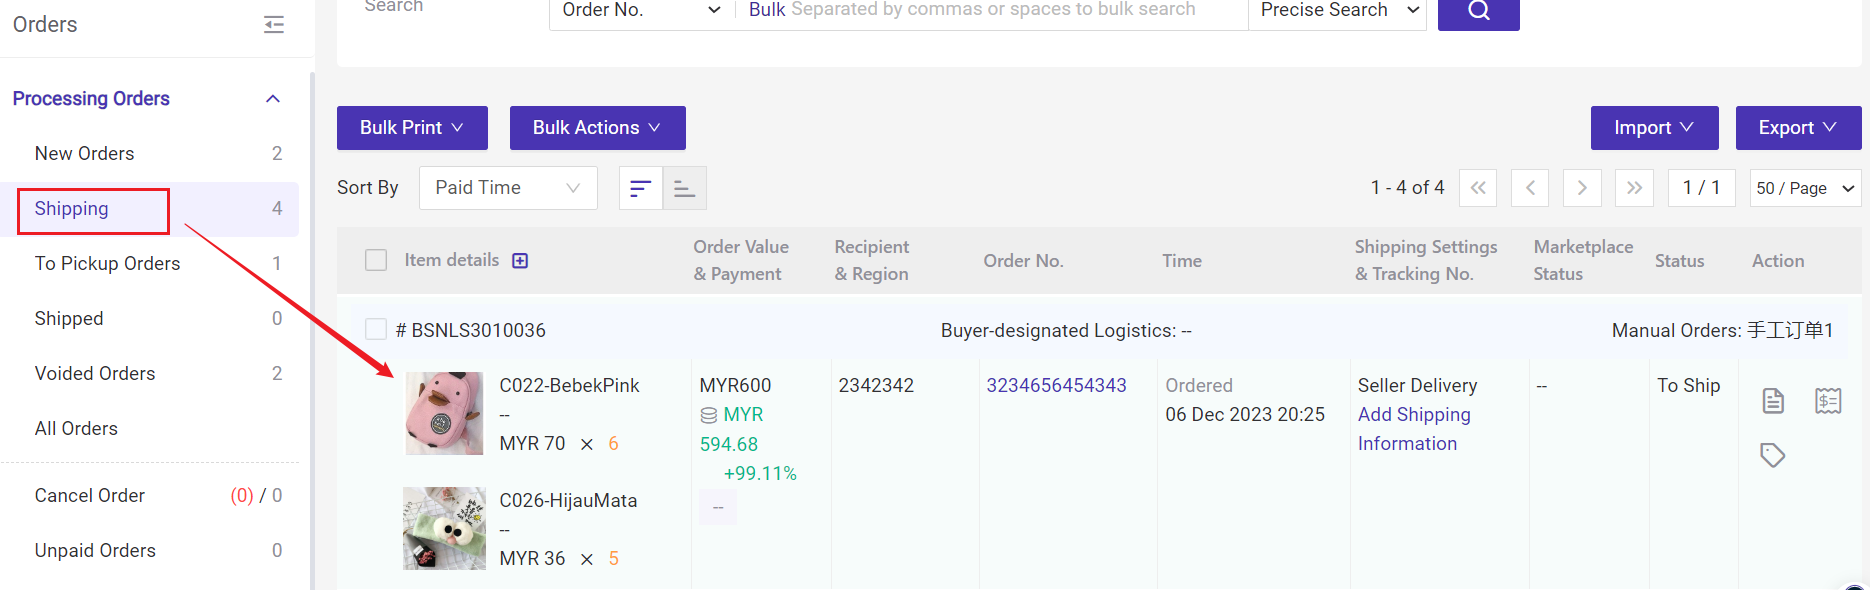
This section will tell you why there are orders in the WMS Out of Stock list.When packing an order, the order will first allocate the stock of the whole warehouse. If the order is successfully packed and moved to Shipping list, it means that the inventory of the whole warehouse is sufficient.
But in WMS, some orders are in Out Of Stock list.
Reason: The inventory of SKUs in the picking area is insufficient, and there are available stocks in the storage area.
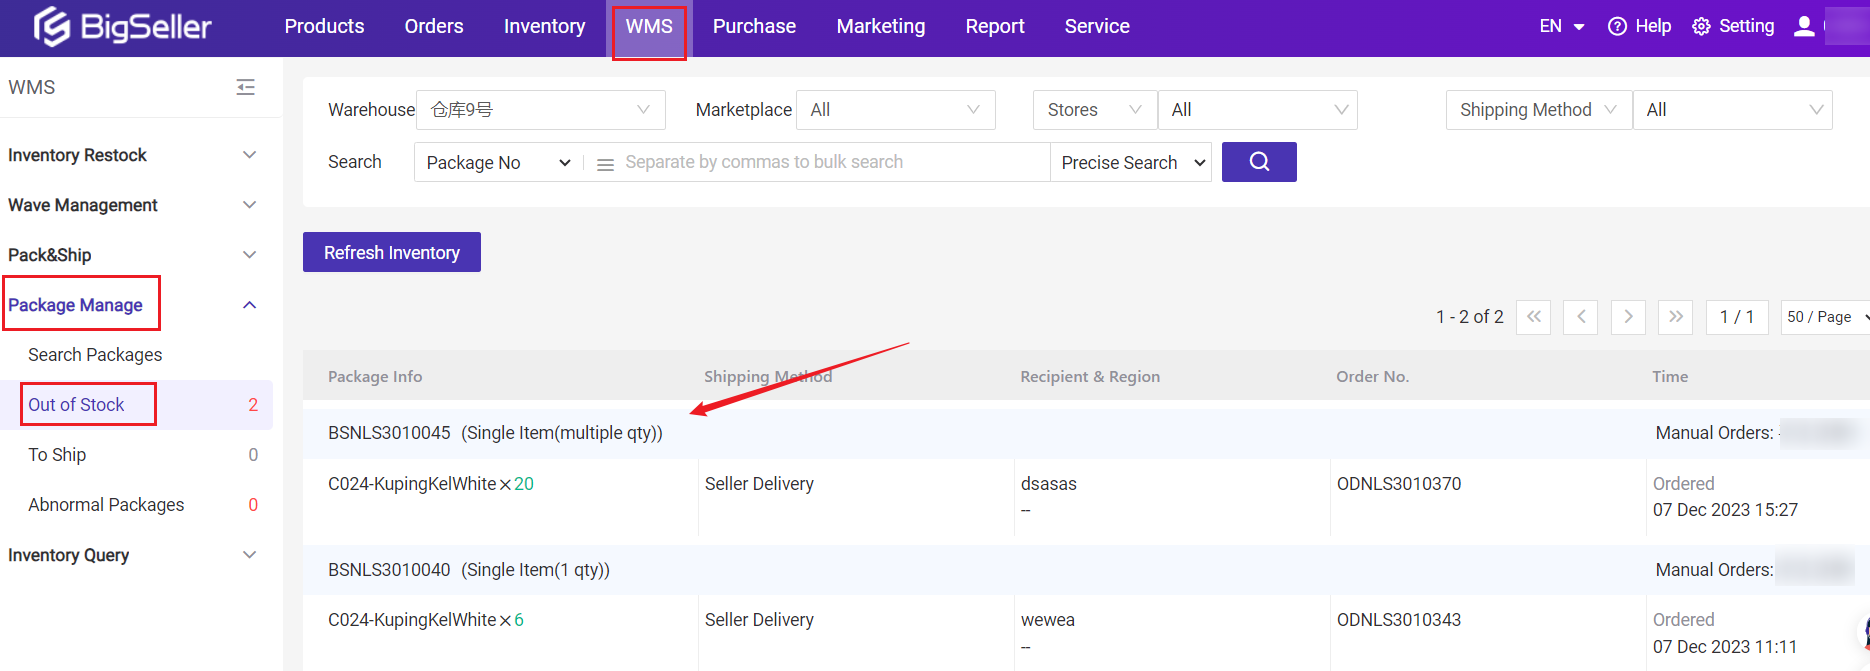
This situation requires restocking from the storage area to the picking area.
5. Inventory Restock
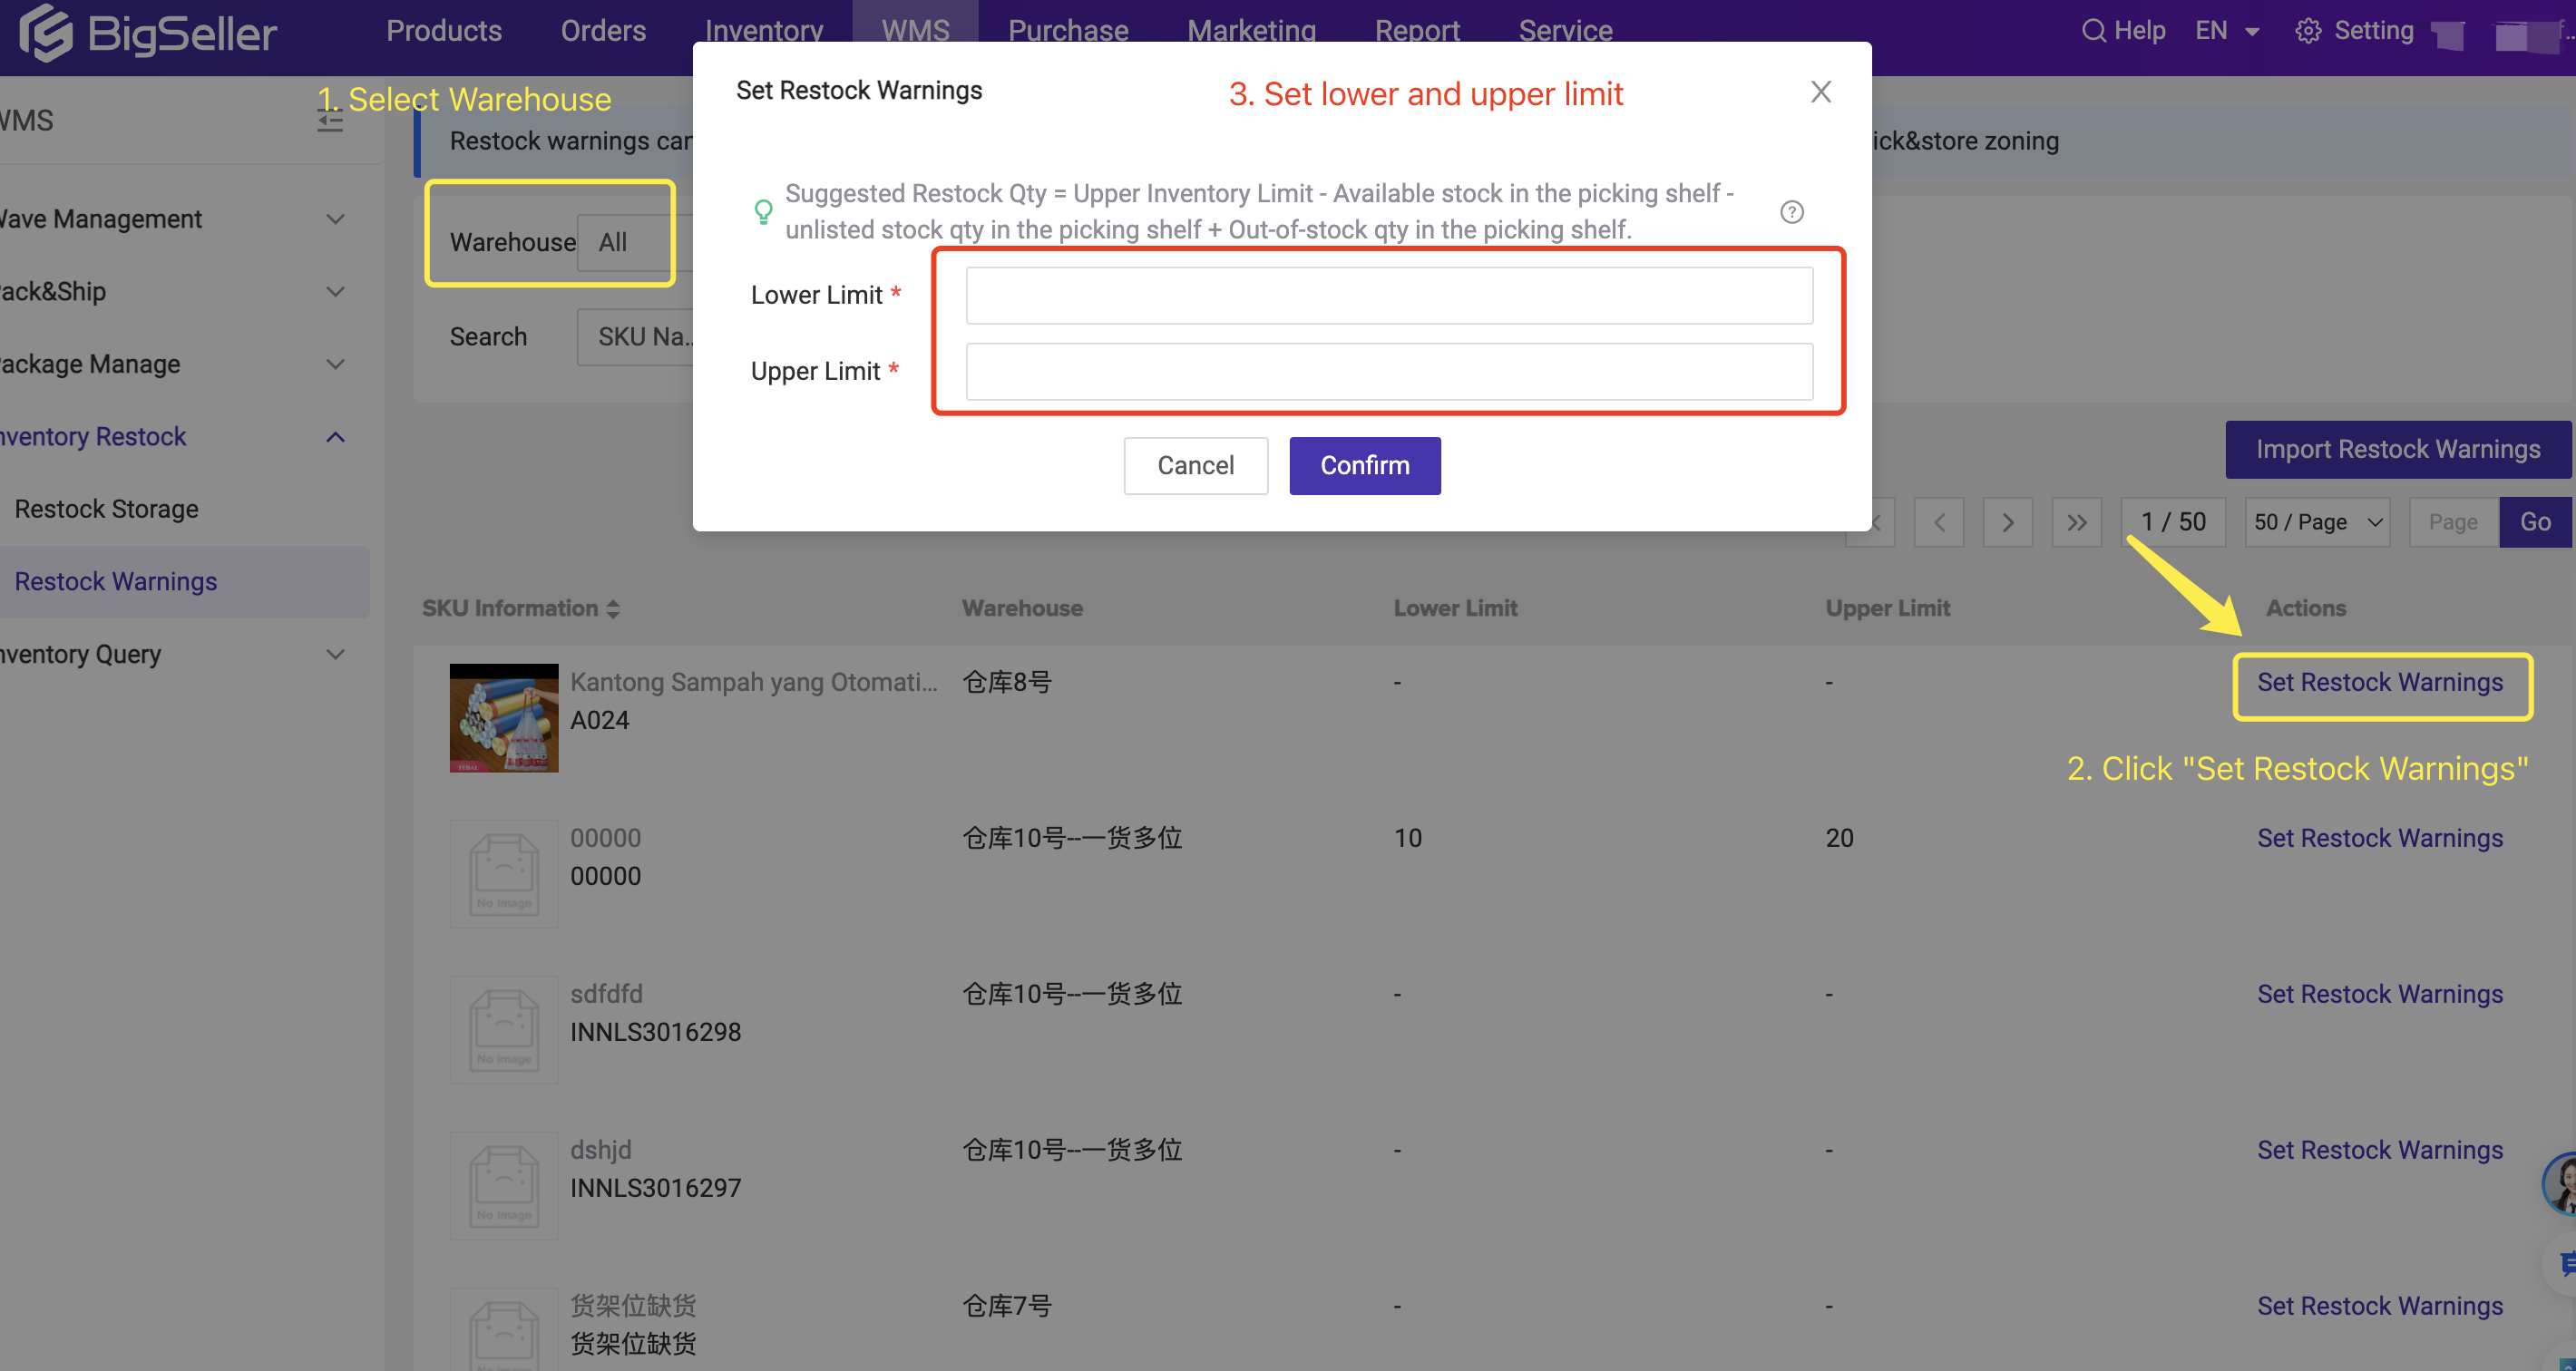
Step 1: Set restock upper and lower limit in Restock Warnings
Method 1: Set restock warnings for single SKU
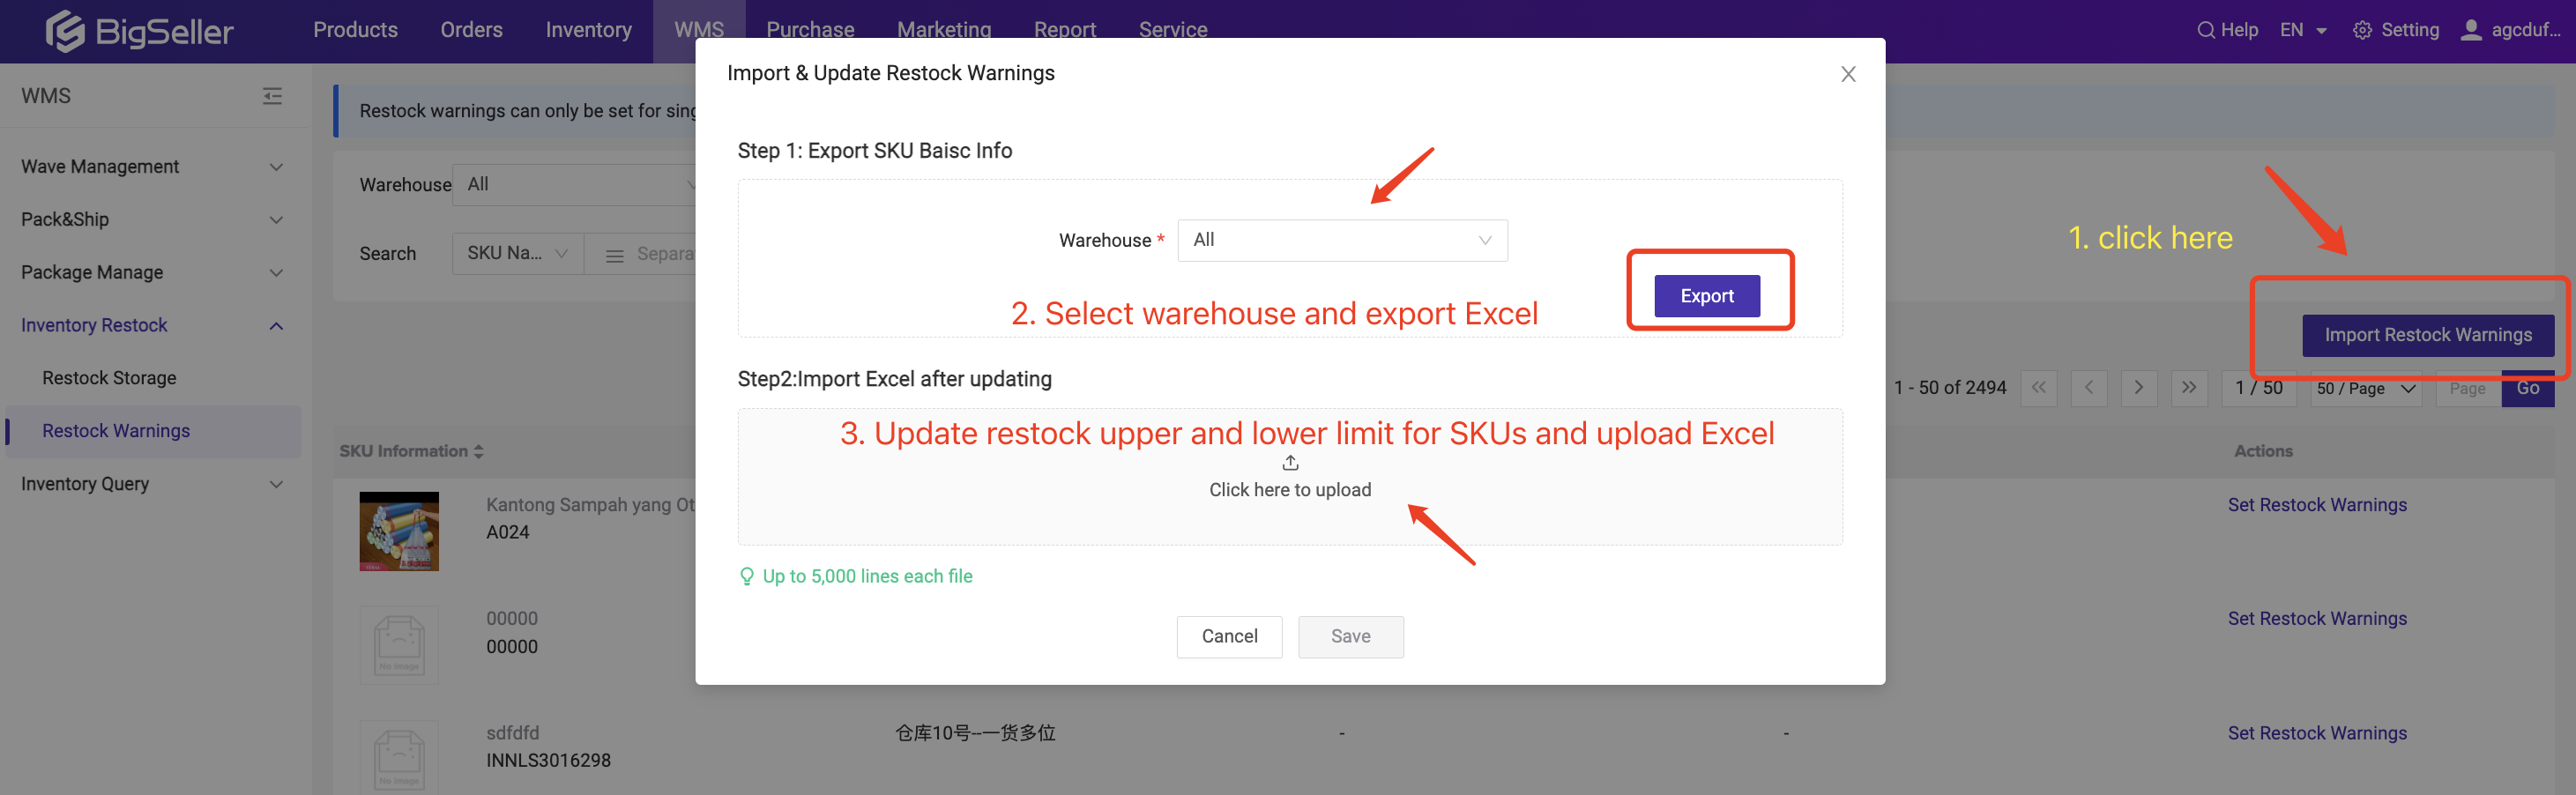
Method 2: Import Restock Warnings
Step 2: Generate the Restock data
Method 1: System Generated -- The system will automatically calculate the data based on the Restock Warnings at 3am every day.
Method 2: Manual Generated -- Click "Generate Restock Data"

If you have set the upper and lower limit in restock warning:
- When the SKU's available stock in picking area < The lower restock limit + Out-of-stock Qty in the picking area - unstore Qty, the restock data will be generated.
- Suggested Restock Qty = The upper restock limit - Available stock in the picking area + Out-of-stock Qty in the picking area - unstored Qty
If you have not set upper and lower limit in restock warning:
- When the SKU's available stock in picking area < Out-of-stock Qty in the picking area - unstore Qty, the restock data will be generated.
- Suggested Restock Qty = Available stock in the picking area + Out-of-stock Qty in the picking area - unstored Qty
💡 What is unstored Qty?
The restocking process will track the unstored Qty at the target shelf. For example, when items are picked from the shelf A (storage area) and moved to shelf B (picking area), the in-transit Qty is considered as unstored Qty of shelf B until the SKUs are placed on the designated picking shelf.
The inventory changes are outlined in the list below.

For example, when restocking 5 quantities from Storage Shelf A to Picking Shelf B:
- When performing Storage Area Stock-Out
- The available stock quantity on Shelf A will decrease by 5.
- The unstored quantity on Shelf B will increase by 5.
- When performing Picking Area Store-In
- The unstored quantity on Shelf B will decrease by 5.
- The available stock quantity on Shelf B will increase by 5.
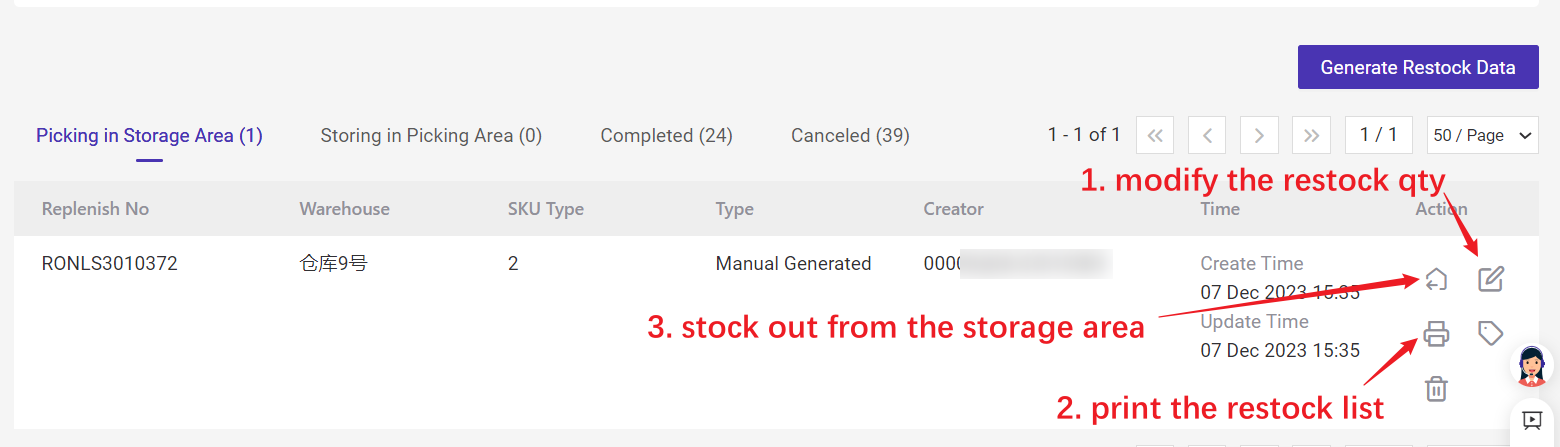
Step 3: Stock Out From the Storage Area
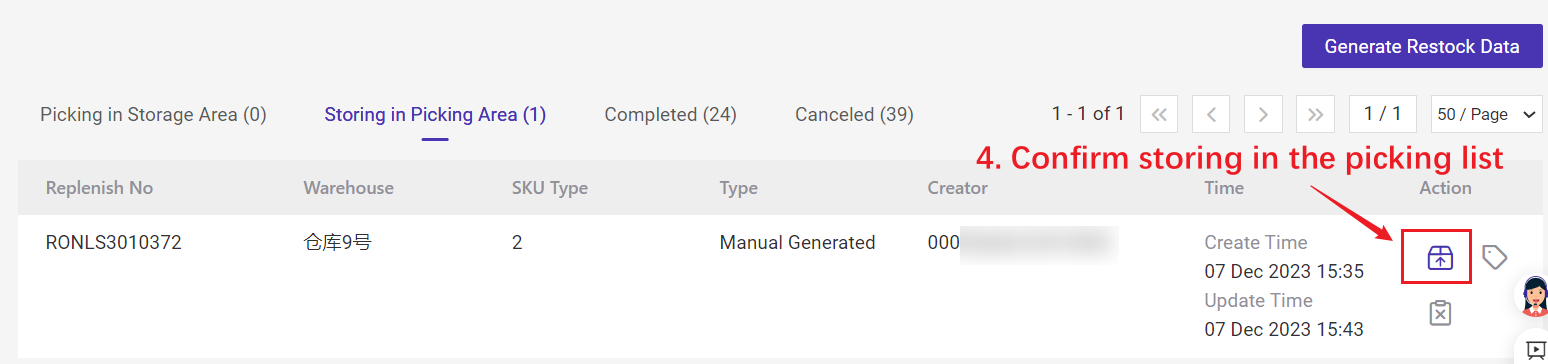
Step 4: Stock In To the Picking Area
Step 5: Refresh the Inventory
After refreshing the inventory, you can process the orders in waves.

💡 Notes: You can check the restock data on Area stock movement.

6. Inventory Details
You can check the warehouse stock in different warehouse areas here.
Set or change the shelf

7. Stock Count
Introduction to Stock CountIf the warehouse has enabled the Pick&Store Zoning feature, the counting merchant SKU is marked based on the dimensions of Warehouse-merchant SKU-Shelf.
For example, SKU A is stored in both shelf 001 and shelf 002. When you are counting SKU A on shelf 001, SKU A on shelf 002 will NOT be marked as in counting and can stock in and out operations normally.
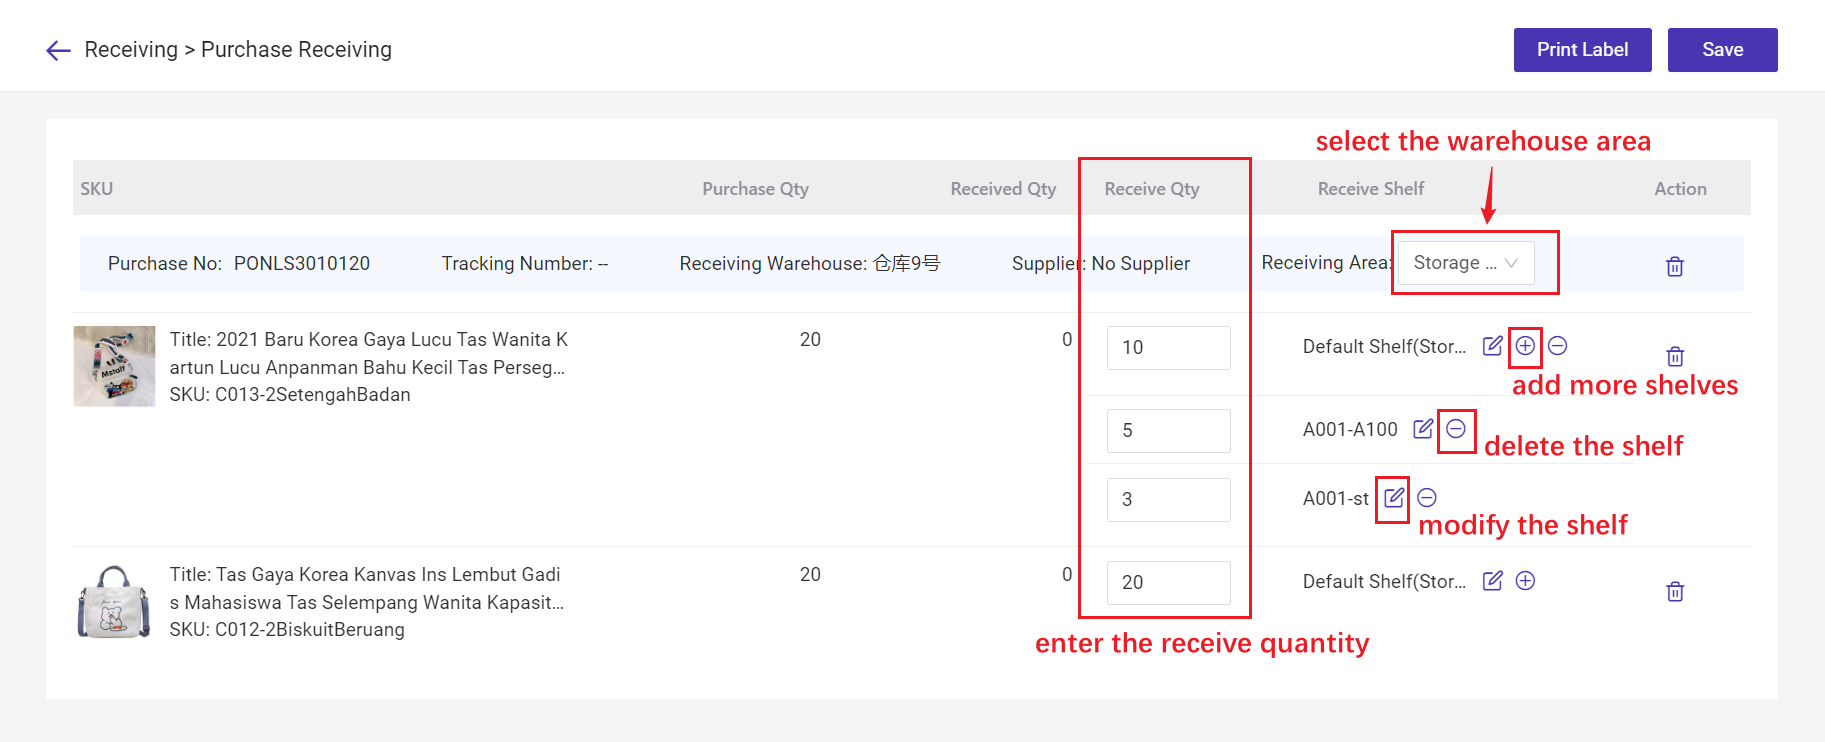
8. Purchase/ Transfer/ Scan to Receive
The operation process is the same as the ordinary receiving process, except for the addition of warehouse area and support for receiving products to multiple shelves.Purchase Process
💡 Notes Multiple shelves can only be selected when the receiving warehouse area is the storage area.
Is this content helpful?
Thank you for your feedback, which drives us to provide better services_
Please contact us if the document can't answer your questions